Studio: AWS RDS VPC
Overview
This studio will expand on what was learned in the AWS basics unit. Your goal is to deploy the Airwaze app using load-balanced, cloud-based, and modern Dev Ops practices.
New Topics
- AWS RDS
- VPC
- Custom Snapshot
- Creating Instance with User Data Script
- Load Balancer
Setup
- Checkout the Airwaze branch that you deployed to AWS for Week 5 Day 1 Studio
- In Intellij look at
application.properties.
- Make sure your app is using tokens for db settings
- Set the
ddl-auto value to update, we do NOT want Spring Data to run the import.sql file
spring.datasource.url=jdbc:postgresql://${APP_DB_HOST}:${APP_DB_PORT}/${APP_DB_NAME}
spring.datasource.username=${APP_DB_USER}
spring.datasource.password=${APP_DB_PASS}
spring.jpa.hibernate.ddl-auto=update
- Go into IntelliJ’s Gradle tool window, and click on Tasks > build > bootRepackage
- Verify that the jar appears in
build/libs
1) Create a VPC
In order to isolate your application instances from other instances in AWS and the open internet, you need to create a Virtal Private Cloud (VPC). This gives you your own little private network in the cloud which can help when establishing access controls as well as keeping your instances private from the rest of AWS. Typically, you’ll have a few of these in an enterprise environment to keep strict boundaries between unrelated services.
A VPC is a way to coordinate and configure how multiple servers will work together and how those servers can be accessed.
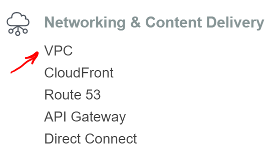
- Click Services in the header and locate VPC under Networking & Content Delivery
Screen shot with red arrow pointing to VPC in the Services list
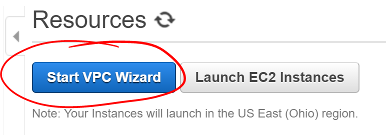
- Click Launch VPC Wizard
Screen shot with red circle around the Start VPC Wizard button (image is out of date)
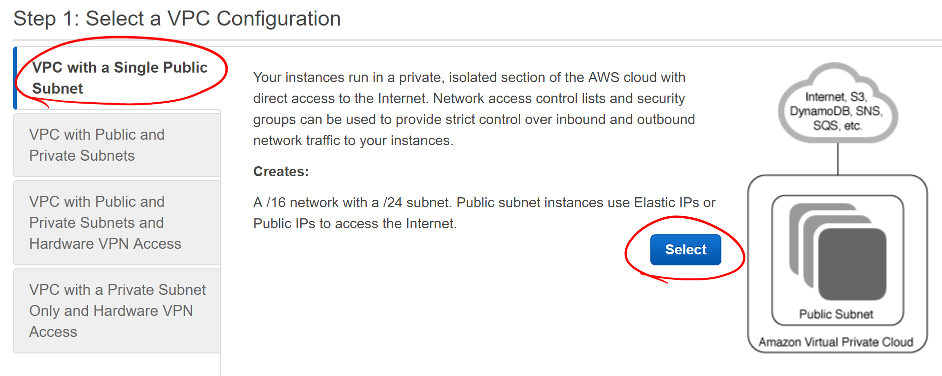
- Select the Single Public Subnet
- This allows your instances to connect to the internet without an intermediary.
- Some VPCs will have private subnets that require a Network Address Translator (NAT) instance to serve as a gateway for private services to connect to the internet and outside services.
- Other configurations allow (or require) a VPN connection and can serve as an extension of a private data center.
Screen shot with red circle around the VPC with a Single Public Subnet tab
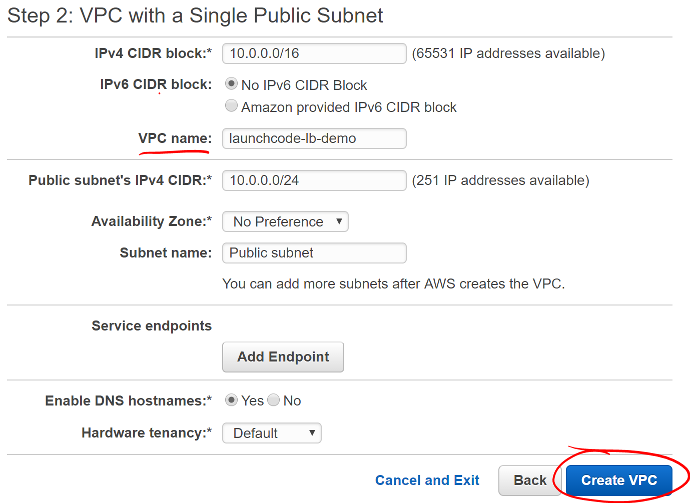
- Set Name of the VPC
- Provide a useful VPC name to help identify this VPC among the others (example: sallys-vpc-day2)
Screen shot of the VPC with a Single Public Subnet configuration window
- Review the IPv4 CIDR Block Settings
- This defines the IP addresses that will be available in your VPC.
- A
x.x.x.x/16 block will include 65,536 possible addresses*
- See Wikipedia’s CIDR table.
- Don’t worry if these don’t make sense instantly
- The Public subnet’s IPv4 CIDR will be
x.x.x.x/24, which includes 256 addresses
- This is the subnet where you’ll put your public-facing instances (such as your Airwaze app).
- Create the VPC
- Click Create VPC button
- Make sure to note the
VPC ID of your VPC
- That id/name will appear everywhere you will select it later
- Not every AWS web interface includes the descriptive name you gave before
Screen shot of the VPC Dashboard with a red circle around the VPC ID
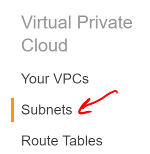
2) Create RDS Subnets
- Select Subnets in the VPC Dashboard sidebar
- These are going to be for the RDS that we haven’t created yet
Screen shot of the Virtual Private Cloud sidebar with a red arrow pointing to Subnets
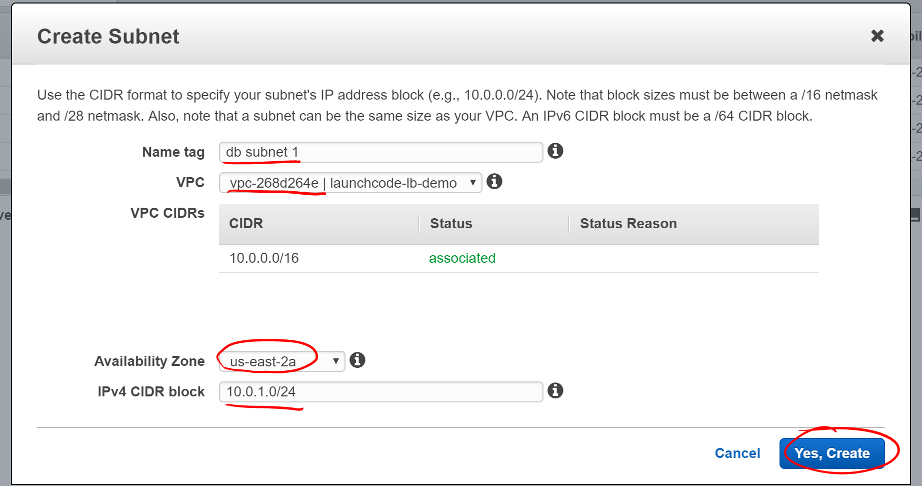
- Click Create Subnet
Screen shot with a red circle around the Create Subnet button
- Give the subnet descriptive name to help identify it later. (example: sallys-d2-rds-1)
- Select your VPC from the VPC select list
- Select one of the availablity zones for your region
- Create a new CIDR block for this private subnet
- CIDR block:
10.0.1.0/24
- Remember, if you use a
x.x.x.x/24 subnet, that will contain 256 addresses, so increase the third number by one from the previously created subnet.
- Create a second Subnet, with a different availability zone and CIDR block for both subnets.
- Example name: sallsy-day2-rds-2
- Availability zone: us-east-1f
- CIDR block:
10.0.2.0/24
Screen shot of the Create Subnet configuration window
3) Set Up RDS
Now that the VPC is set up and ready for use, you need to create your database server. In the last studio, you installed a PostgreSQL server on your instance. This time, you’ll use AWS’s Relational Database Service (RDS) to host and manage our DB instance.
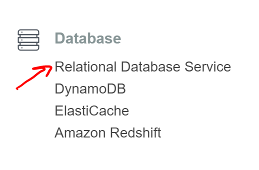
- Click Services in the header and select Relational Database Service.
Screen shot with red arrow pointing to Relational Database Serivce in the Services list
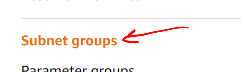
Before creating any instances, you need to create a DB Subnet Group so AWS knows where to place your instance.
- Select Subnet groups in the RDS Dashboard sidebar
- Click the Create DB Subnet Group button
Screen shot of the RDS sidebar with a red arrow pointing to Subnet groups
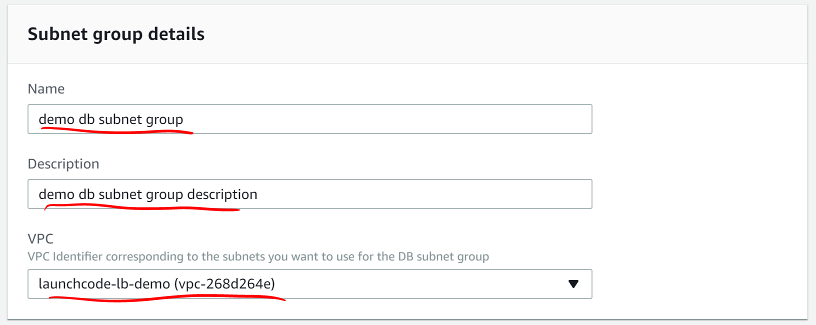
- Enter a useful subnet group name and description
- Select your VPC
Screen shot of the Subnet group details configuration window
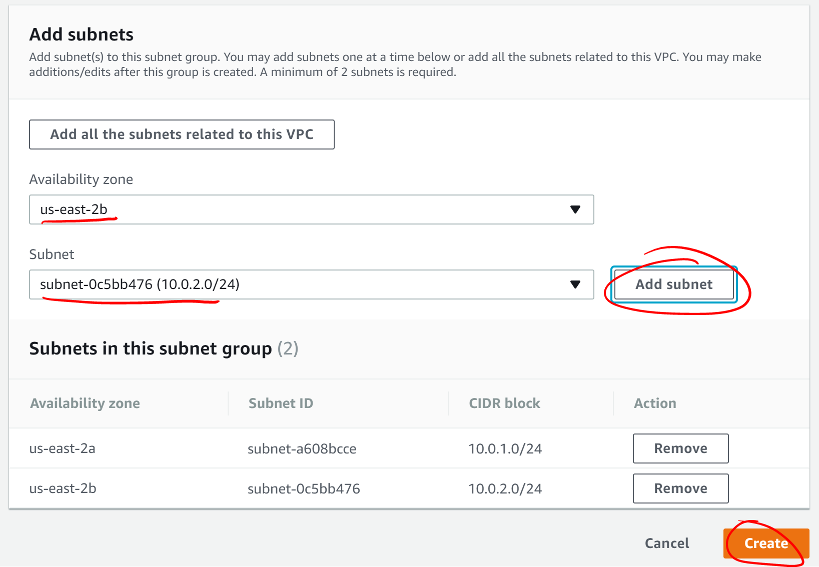
- Select an availability zone you used above and select a subnet you created in that zone
- Click Add subnet
- Do this for both subnets you created above
- Click the Create button
Screen shot of the Add subnets configuration window
Now that you’ve created the database subnets, you need to create a database instance for your application to use.
- Return to the RDS Dashboard
- Scroll down and click the Create Database button (image below is out of date)
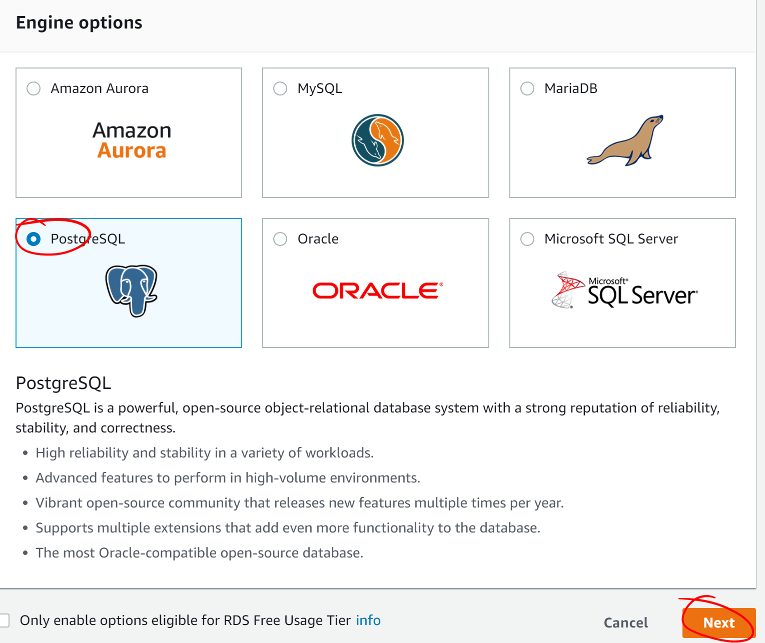
- For Airwaze, you will use a PostgreSQL database
- Select PostgreSQL
- Click Next
Screen shot of the Engine options window
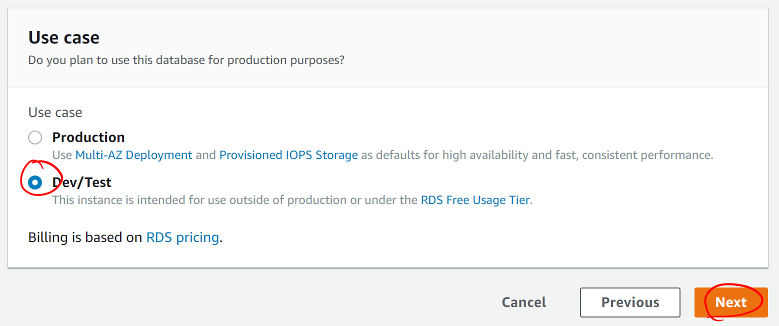
- AWS will next ask you how you plan to use the database. Production-ready databases will have multiple availability zone redundancy and higher-speed storage options, but are also more expensive. Select Dev/Test to access the lower-powered options then click Next.
Screen shot of the Use case window
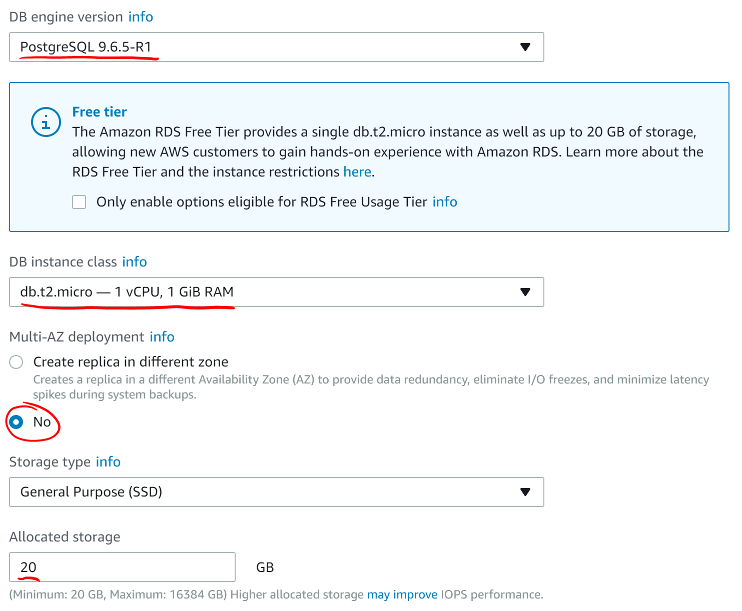
- Make sure the DB engine version matches the version of PostgreSQL you need to use.
- Select
db.t2.micro instance class. This is the smallest, slowest, and least-expensive instance option for RDS.
- For this studio, select No for a Multi-AZ deployment. In a production environment, this is an important option to ensure the database is always accessible. For this studio, you do not need this.
- The studio database is very small. Use the smallest storage option.
Screen shot of the instance class configuration window for RDS
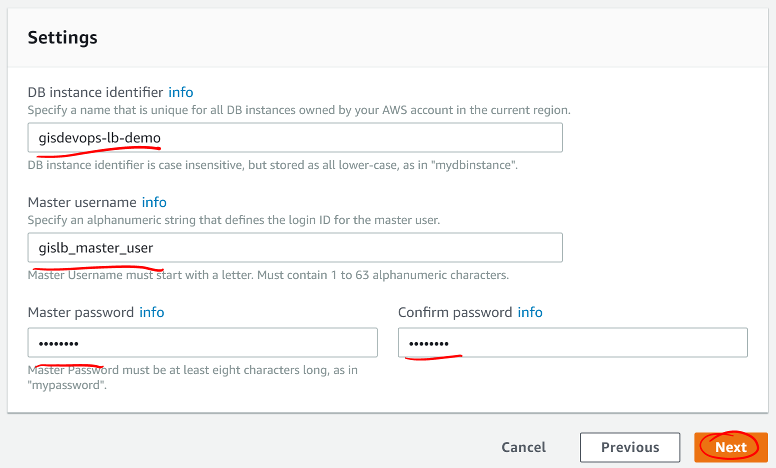
Next, you’ll set up the instance’s identifier and master user account. Do not set up the application user as the master user. That would introduce a security risk for your database and data if your application were to be compromised. You will set up a separate DB user account later.
- Give your DB instance a useful name in the
DB instance identifier field.
- Make a master username that is difficult to guess, but easy for you to remember.
- Use a secure password for your master user.
- Click Next.
Screen shot of the RDS instance Settings configuration window
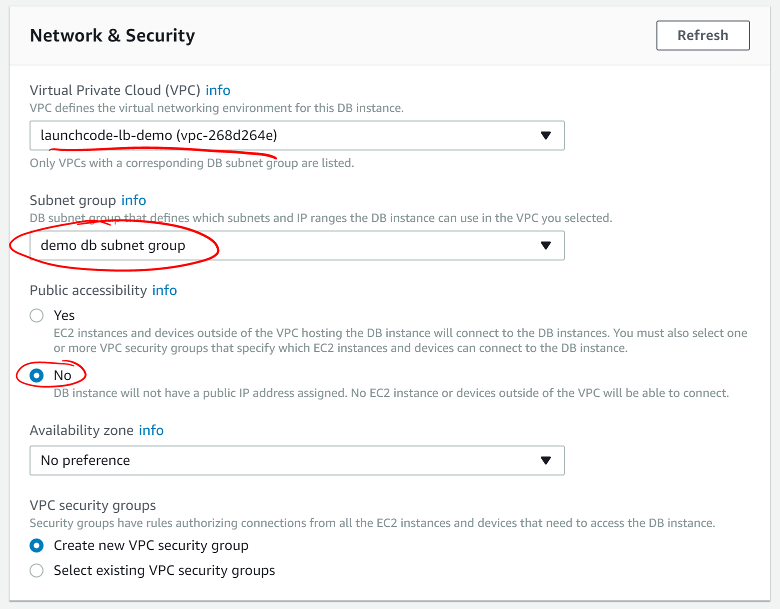
Here you’ll indicate where RDS should place your instance and how to secure it.
- Select your VPC.
- Select the DB Subnet Group you made above.
- Do not make your DB publicly accessible. For security, you should limit the services that can be accessed from outside your VPC.
Screen shot of the RDS instance Network & Security configuration window
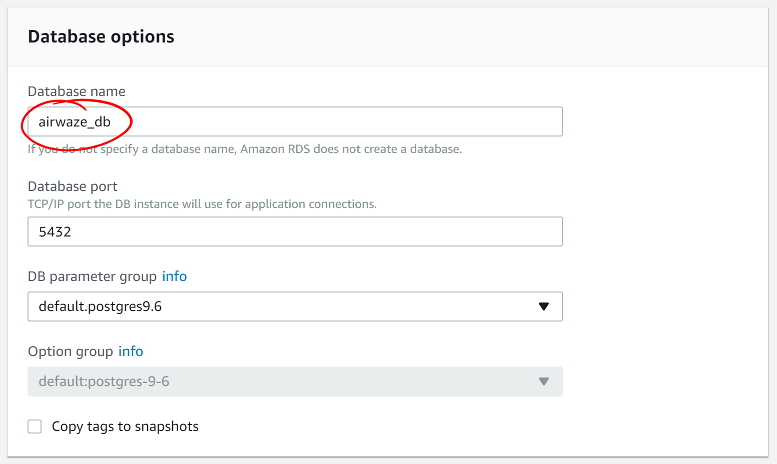
- Set up your desired database name and port.
- Keep the default DB parameter group.
- Click Launch DB instance.
Screen shot of the RDS instance Database options configuration window
- RDS will start creating a DB instance, security groups, and your master user and database.
- Return to the RDS Instances dashboard and select your instance.
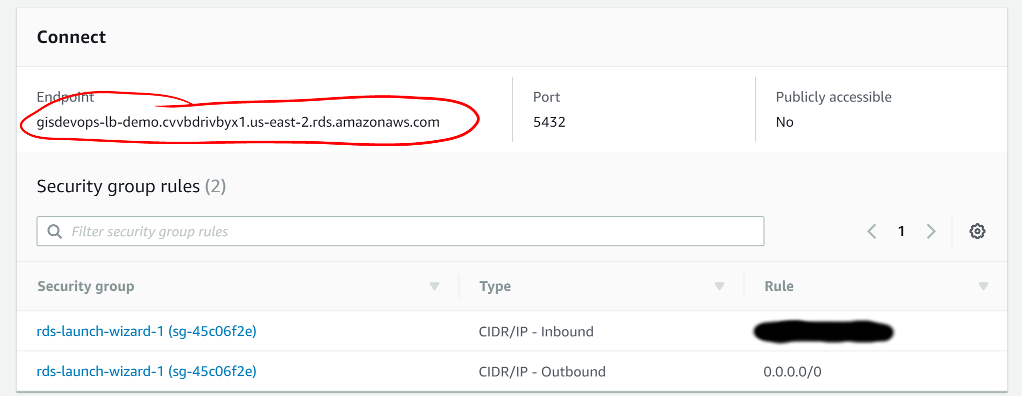
- Scroll down to the Connect section.
- Your Endpoint will appear here when the instance is ready
- It may take 5-7 minutes for the end point URL to appear
- Note this endpoint address
You’ll also see the security group inbound and outbound rules set up. If the inbound rule doesn’t match your VPC’s subnet CIDR, change that by clicking the gear icon to the right of Security group rules.
Screen shot of the RDS Dashboard Connect sub-window with a red circle around the instance endpoint
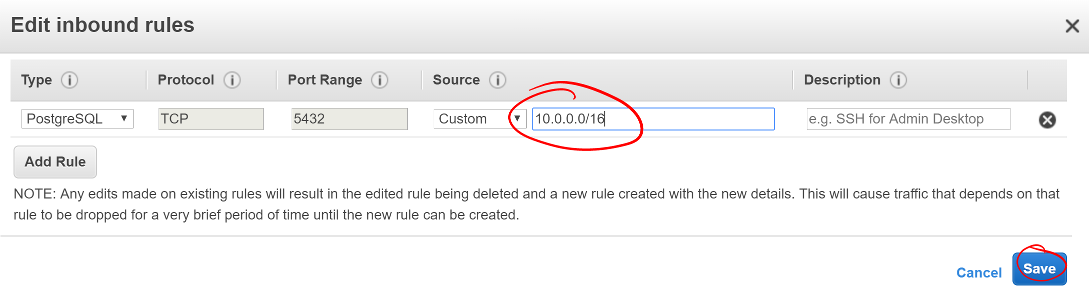
- Select the Inbound rules tab
- Click Edit
- Find the PostgreSQL port line
- Change its Source to your VPC subnet CIDR
- This will allow traffic from all instances in your VPC, but not from the outside world.
- Click Save
Screen shot of the PostgreSQL inbound rules with a red circle around the VPC’s subnet CIDR
4) Create EC2 Instance with User Data Script
Now that you have created your database, you need to create an instance to connect to it as our template. If you need review on creating an EC2 instance, please see the previous lesson and studio.
You’ll follow the same steps as before, with a few changes that are described here.
- On the Configure Instance Details screen while creating your instance:
- Select your VPC in the Network selection.
- Select your Public subnet.
- Enable auto-assigning a Public IP.
Screen shot of the Configure Instnace Details screen
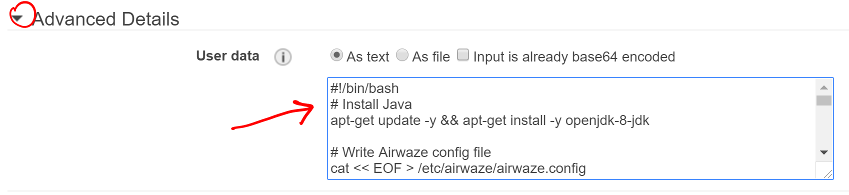
- Setup User Data Script to Install and Configure EC2
- At the bottom of the Configure Instance Details screen is a collapsed area called Advanced Details.
- Click the text Advanced Details to expand that section (you may have to scroll down to see it).
- You will see a User data section.
- This is an area to specify extra configuration AWS should perform when launching your instance.
- We will call it the User Data Script and our script will…
- Installs Java
- Creates the
airwaze system user
- Creates the application and configuration directories
- Writes the airwaze configuration file, which includes the env variables for the application
- Writes the
systemd service file
- Prepares the service for execution
- This script is run as
root, so sudo is not needed for these commands. That also means you must be careful when crafting a script to run here.
- Paste this script into the User data section and adjust
- Be sure to adjust the
APP_DB_HOST value to be your RDS instance’s endpoint.
Screen shot of the Advanced Details section of the Configure Instance Details screen
#!/bin/bash
# Install Java
apt-get update -y && apt-get install -y openjdk-8-jdk

# Create airwaze user
useradd -M airwaze
mkdir /opt/airwaze
mkdir /etc/opt/airwaze
chown -R airwaze:airwaze /opt/airwaze /etc/opt/airwaze
chmod 777 /opt/airwaze

# Write Airwaze config file
cat << EOF > /etc/opt/airwaze/airwaze.config
APP_DB_HOST=CHANGE TO YOUR RDS ENDPOINT URL (example: rds-instance.us-east-2.rds.amazonaws.com)
APP_DB_PORT=5432
APP_DB_NAME=airwaze_db
APP_DB_USER=airwaze_user
APP_DB_PASS=verysecurepassword
EOF

# Write systemd unit file
cat << EOF > /etc/systemd/system/airwaze.service
[Unit]
Description=Airwaze Studio
After=syslog.target

[Service]
User=airwaze
EnvironmentFile=/etc/opt/airwaze/airwaze.config
ExecStart=/usr/bin/java -jar /opt/airwaze/app.jar SuccessExitStatus=143
Restart=no

[Install]
WantedBy=multi-user.target
EOF

systemctl enable airwaze.service
5) Setup App and Data on the EC2 Instance
- Copy Over .jar and .csv Files to EC2 Instance
- The new EC2 instance has some software installed for us by the User Data Script, but it doesn’t have our .jar file yet
- Copy over the .jar file and .csv files to the new EC2 instace
(on local computer)
$ scp -i ~/.ssh/aws-ssh-key.pem app-0.0.1-SNAPSHOT.jar [email protected]:/opt/airwaze/app.jar
$ scp -i ~/.ssh/aws-ssh-key.pem *.csv [email protected]:/home/ubuntu/
(remote server)
ubuntu$ chmod 555 /opt/airwaze/app.jar
We Need a One Time Setup of the Database
Now that you have your instance set up and ready, you need to log into the server to prepare your database and start the service. During development of the Airwaze studio application, it was set to reload the database on every start of the service. This is not something you want happening in your cloud environment. Instead, you’ll create everything your application needs in your instance by hand.
- Copy and Paste in theInstall the
postgresql client package on your EC2 instance
(on remote server)
ubuntu$ sudo apt-get update
ubuntu$ sudo apt-get install postgresql
- Connect to your RDS instance from your remote server
(on remote server)
ubuntu$ psql -h rds-instance.us-east-2.rds.amazonaws.com -p 5432 -U rds_master_user airwaze_db
- Copy and Paste the below sql into your psql shell. The script will…
- The application’s DB user
- The postgis extensions
- The data tables
- Then set your tables to be owned by your application’s DB user.
CREATE USER airwaze_user WITH PASSWORD 'verysecurepassword';
CREATE EXTENSION postgis;
CREATE EXTENSION postgis_topology;
CREATE EXTENSION fuzzystrmatch;
CREATE EXTENSION postgis_tiger_geocoder;
CREATE TABLE airport
(
    id serial primary key,
    airport_id integer,
    airport_lat_long geometry,
    altitude integer,
    city character varying(255),
    country character varying(255),
    faa_code character varying(255),
    icao character varying(255),
    name character varying(255),
    time_zone character varying(255)
);
CREATE TABLE route
(
    id serial primary key,
    airline character varying(255),
    airline_id integer,
    dst character varying(255),
    dst_id integer,
    route_geom geometry,
    src character varying(255),
    src_id integer
);
ALTER TABLE airport OWNER to airwaze_user;
ALTER TABLE route OWNER to airwaze_user;
Now that the tables are created, you need to fill them with data.
- Run the following commands to copy from your CSV files into the database. (You’ll find the password along with the user you just created above).
- TIP: Copy these statement to a code editor and adjust them to work with your RDS
(on remote server)
ubuntu$ psql -h rds-instance.us-east-2.rds.amazonaws.com -d airwaze_db -U airwaze_user -c "\copy route(src, src_id, dst, dst_id, airline, route_geom) from STDIN DELIMITER ',' CSV HEADER" < /home/ubuntu/routes.csv

ubuntu$ psql -h rds-instance.us-east-2.rds.amazonaws.com -d airwaze_db -U airwaze_user -c "\copy airport(airport_id, name, city, country, faa_code, icao, altitude, time_zone, airport_lat_long) from STDIN DELIMITER ',' CSV HEADER" < /home/ubuntu/Airports.csv
Start the Airwaze Service
At this point, everything is ready to go on this instance. You no longer need (or want) to connect to the database directly so uninstall the postgresql client package. Then you may start the Airwaze service.
(on remote server)
ubuntu$ sudo apt-get remove postgresql
ubuntu$ sudo systemctl start airwaze.service
You can run journalctl as you learned in the previous studio to check the logs for your running service.
(keeps the log open and shows you any new entries, that's what the -f does)
ubuntu$ journalctl -f -u airwaze

(opens the entire log, starting at the top. you can go forward and back with ctrl f and ctrl b)
(note to see the latest issue with your service you will need to go to the END of the log file)
ubuntu$ journalctl -u airwaze
7) Take a Snapshot of your EC2 Instance
The benefit of the cloud is more than just having an application running on a single server in the cloud. You can make your application more resilient by having it run on multiple servers with a load balancer transferring traffic to the least-used server.
To facilitate spinning up more instances, you can take an image of your current instance to start others.
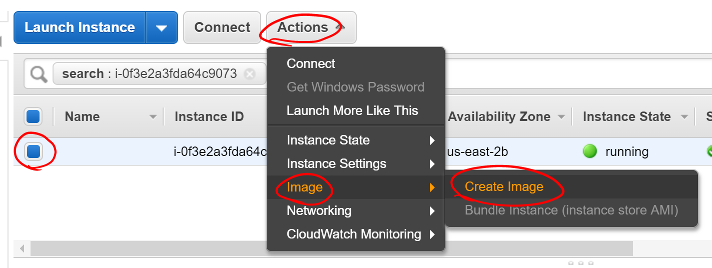
- Return to the EC2 Instances Dashboard
- Select your instance
- Click Actions, then Image, then Create Image
Screen shot of the EC2 Instances dashboard with the Actions menu open
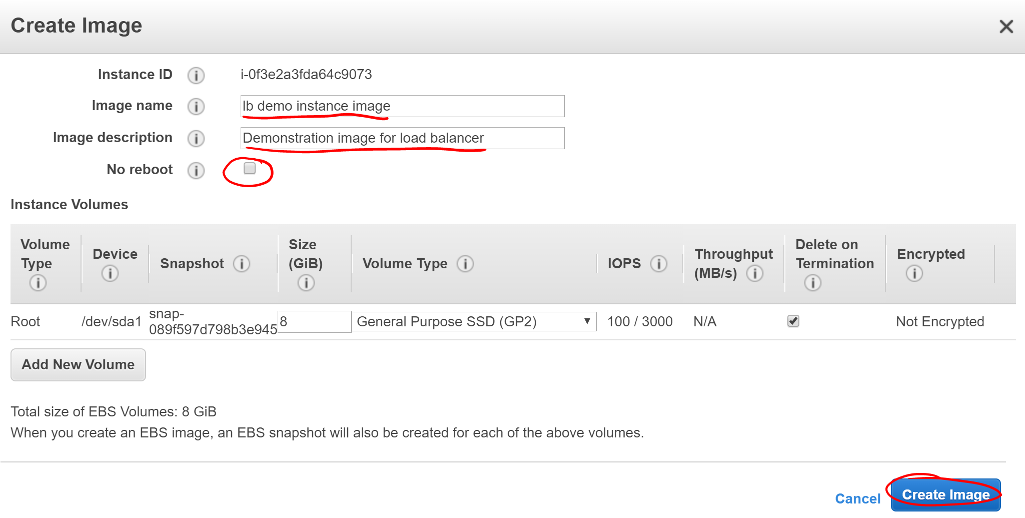
- Give your image a useful name so you can find it again later.
- Give your image a helpful description.
- Ensure No reboot is not selected.
- Taking an image of a running instance is risky as it may catch it in the middle of writing to a file. Just leave this as No reboot unless there’s a valid reason to not.
- Click Create Image.
Screen shot of the Create Image configuration window
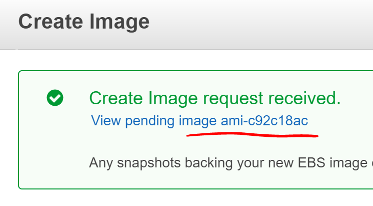
AWS will then shut down your instance, take an image of it, then restart it. Click the link in the confirmation dialog to montior the process of the image creation.
Screen shot of the Create Image success dialog with a red line below the pending image ami
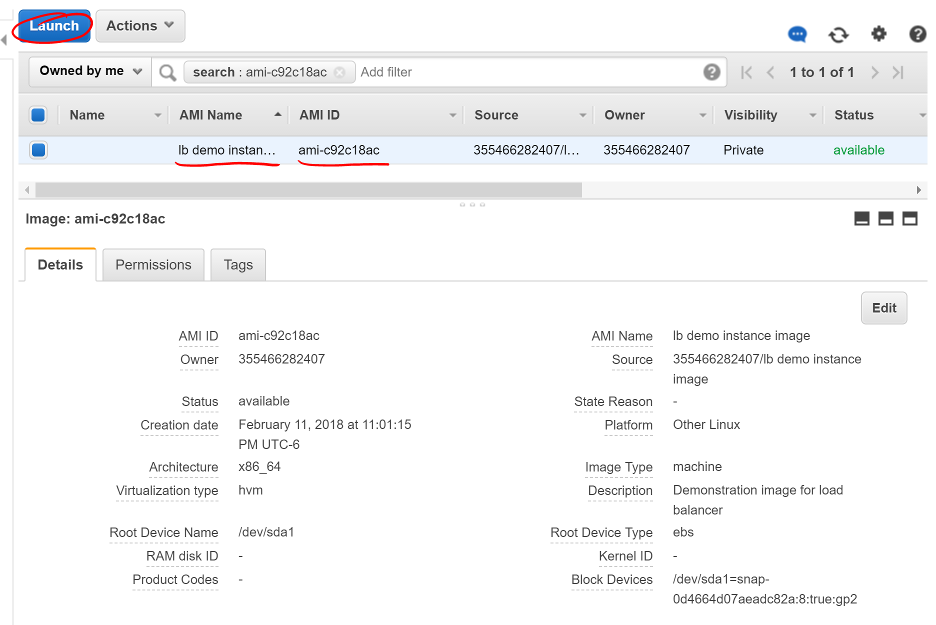
Once the image creation is complete, you can launch new instances with this image.
- Select your Amazon Machine Image (AMI)
- Click Launch
Screen shot of the AMIs dashboard with a red circle around Launch
This will start the familiar instance creation process, but with your image rather than the standard Ubuntu image you’ve been using. As before, on Configure Instance Details, select your VPC, public subnet, and assign a Public IP. This time, do not provide a User data script since this image already has the full configuration run.
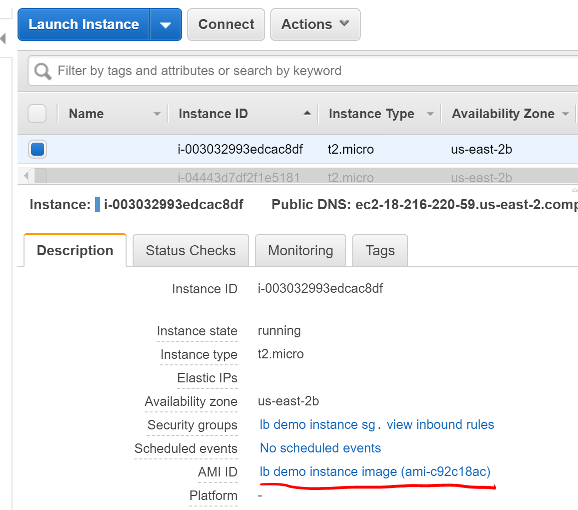
After creating the instance, return to the EC2 Instances dashboard. Select your new instance and you’ll see it was created from the image you created rather than the Ubuntu AMI used to create the previous one.
Screen shot of the EC2 Instances dashboard with a red line under the AMI ID of the new instance
8) Set Up Load Balancing
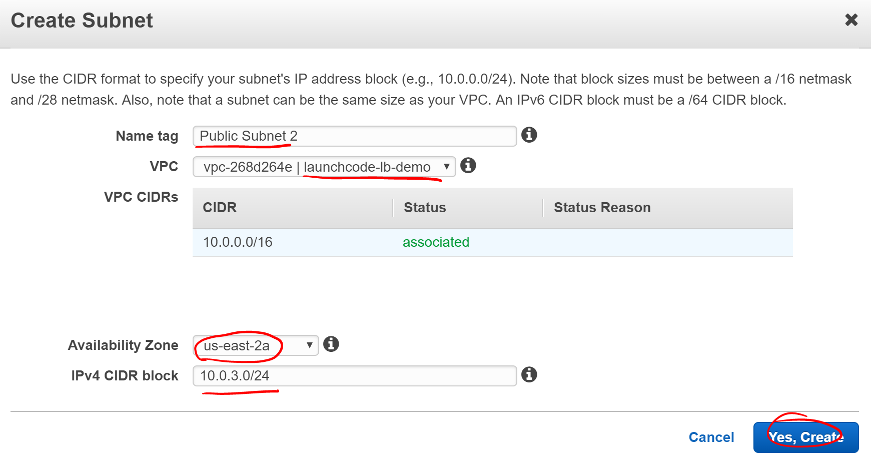
In order to connect a load balancer (LB), you need to have two public subnets in different availability zones. Return to the VPC Subnet dashboard.
- Click Create Subnet
- Provide a useful name for the new subnet
- Select your VPC
- Pick a different availability zone than your other public subnet
- Pick a new CIDR block
- Click Yes, Create
Screen shot of the Create Subnet window
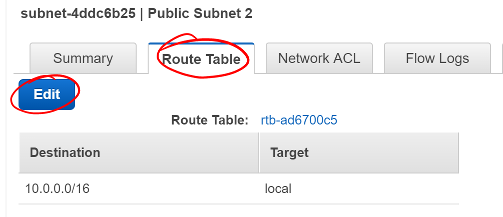
This new subnet is originally created as a private subnet, so you’ll have to change its route table to allow connections with the internet.
- Click the Route Table tab
- Click Edit
Screen shot of the Route Table tab on the new subnet
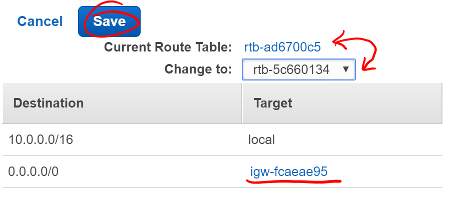
- Change the Route Table selection to one with a target that starts with
igw. This is your VPC’s internet gateway.
* An Internet Gateway allows communication between instances in your VPC and the internet.
- Click Save
Screen shot showing a route table that includes an internet gateway
With the new public subnet in place, you can now create your LB.
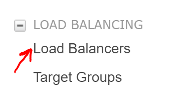
- Return to the EC2 Dashboard
- Select Load Balancers in the sidebar
- Click Create Load Balancer
Screen shot of the EC2 Dashboard with a red arrow pointing to Load Balancers
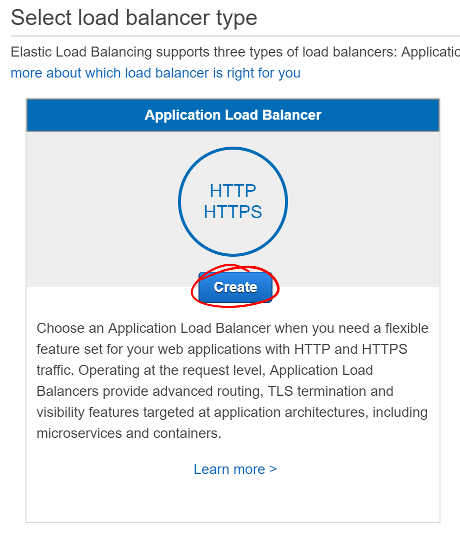
- Find the Application Load Balancer
- Click Create
Screen shot of the Select load balancer type selection screen
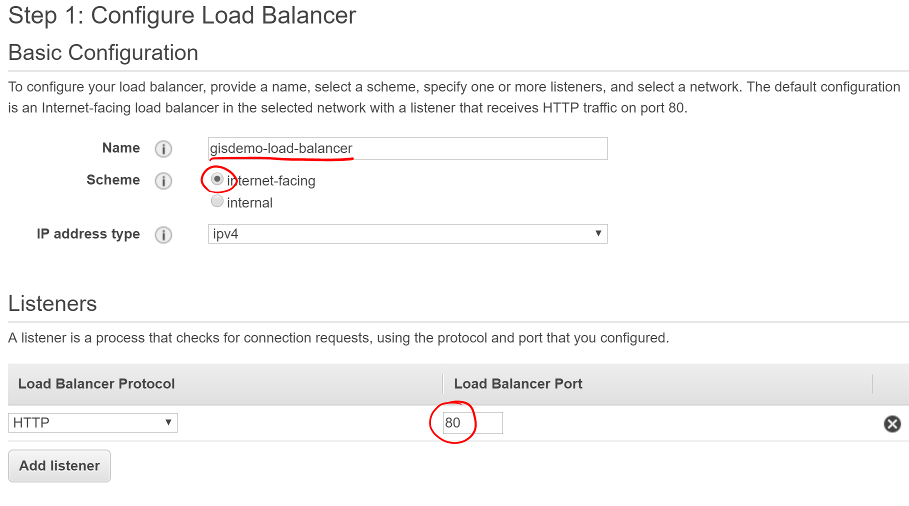
- Provide a useful name for your LB
- Select an internet-facing LB
- Set your LB protocol to
HTTP and port to 80
Screen shot of the Configure Load Balancer window
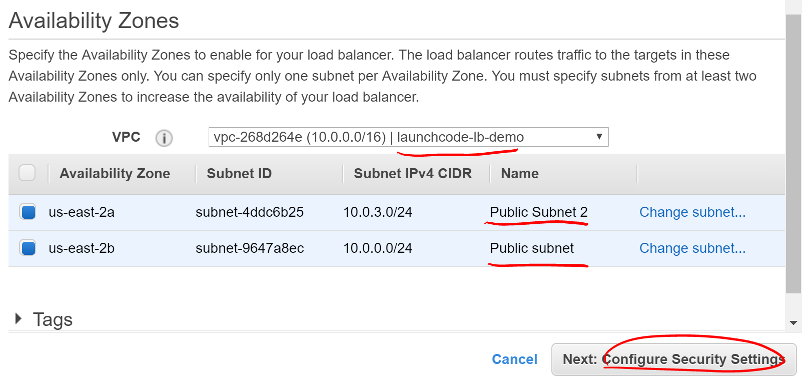
- Under Availability Zones select your VPC
- Select the two public subnets you created
- Click Next: Configure Security Settings
Screen shot of the Load Balancer Availability Zones window
The Configure Security Settings screen will likely encourage you to improve the LB’s security. This is because you opted to only allow HTTP connections. This is sufficient for the studio, but you should enable HTTPS for every service that can support it in an enterprise environment. Click Next: Configure Security Groups.
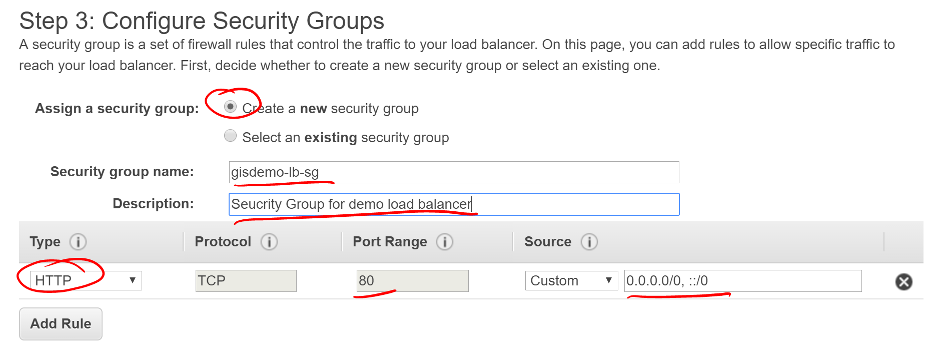
You will be presented with a screen similar to one you used when creating your instances. This will allow you to configure the firewall to manage access to your LB.
- Create a new security group
- Give the group a useful name and description
- Select type
HTTP and verify port 80 is selected
- Make a custom source for 0.0.0.0/0, ::/0
- This allows for all IPv4 and IPv6 sources to connect through this LB
- Click Next: Configure Routing
Screen shot of the Load Balancer Configure Security Groups window
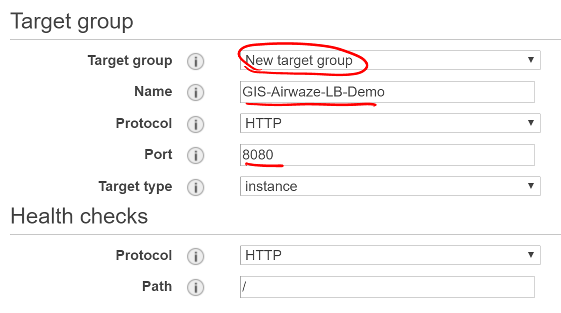
The next screen allows you to define a target group for the routing behavior of the LB. This will determine what protocol and internal port it uses to communicate with your application servers.
- Select New target group
- Give your new target group a useful name
- Select port
8080 since that is the port Airwaze set up for listening
- Select
instance target type
- Click Next: Register Targets
Screen shot of the Load Balancer Target group configuration window
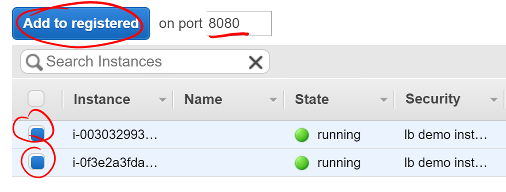
Now, you need to register your application instances to your LB so it can route traffic correctly.
- Select your instances in the Instances section
- Verify they are set to register for port 8080
- Click Add to registered to add them to the LB
- Click Save
Screen shot of the Load Balancer Target Instances configuration window
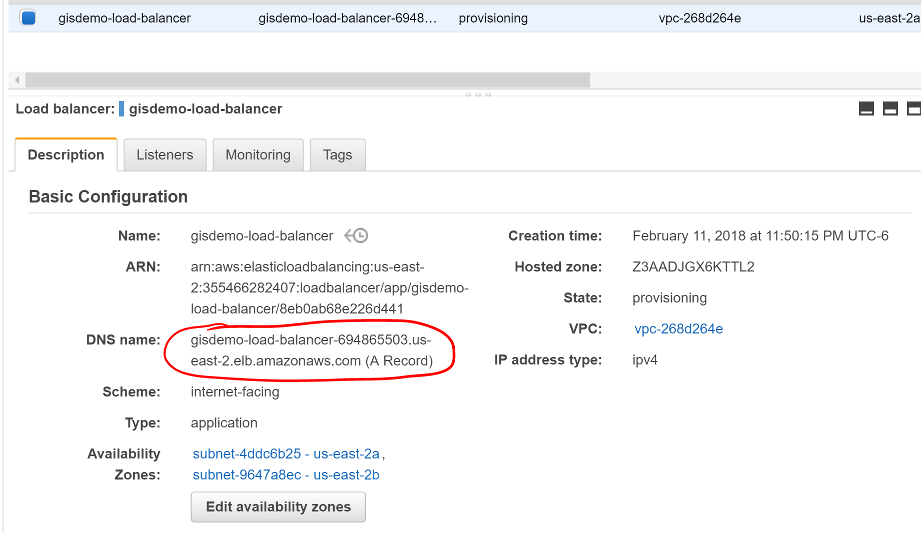
At this point, AWS will begin configuring the LB. Find and note the DNS name they have assigned your LB.
Screen shot of the Load Balancer Dashboard with a red circle around the new LB’s DNS name
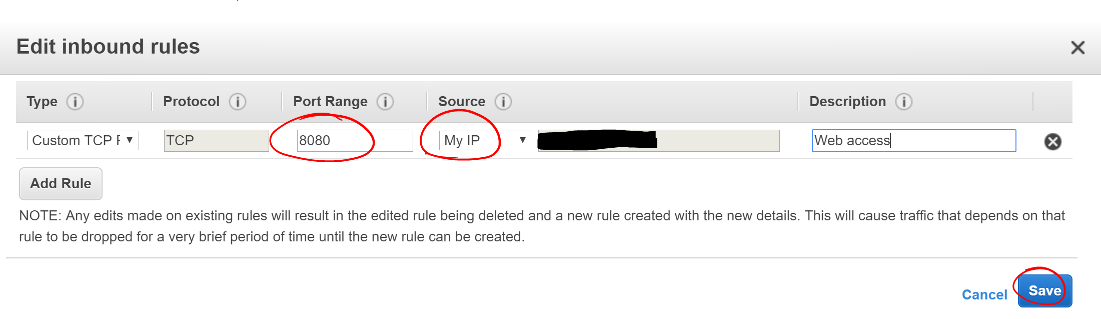
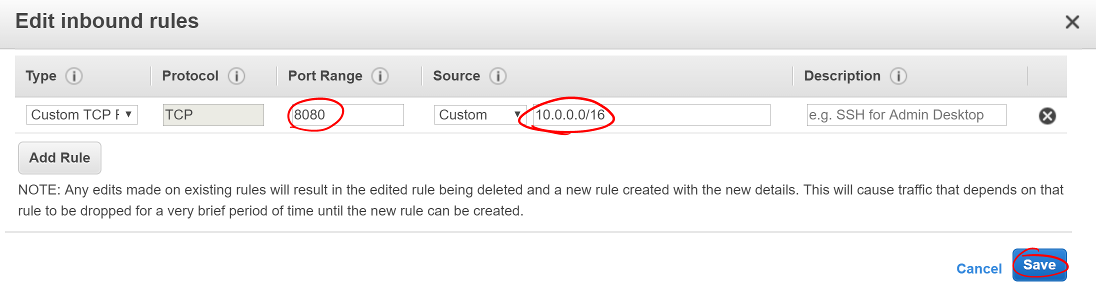
While the LB is starting up, you can configure your application instances to stop listening to the public internet and only to internal traffic.
- Return to the EC2 Security Groups Dashboard
- Find your instance security group
- Remove the SSH rule
- Change the Source for the 8080 rule to listen only to your internal subnet
- Click Save
Screen shot of the inbound rules for the application instances
Now it’s time to see the result of your hard work:
Open http://demo-lb-instance.us-east-2.elb.amazonaws.com in the browser and see the application running.
The real power in a load balancer is it can route traffic away from unhealthy instances. Time to test that out.
- Return to the EC2 Instances Dashboard
- Locate your application instances
- Select one instance
- Click Actions -> Instance State -> Stop
- Wait for the instance state to switch to Stop
- Refresh the browser and see the application still works
- Stop your other instance
- Refresh the browser and see the application no longer works
- Click Actions -> Instance State -> Start to restart one of your instances
- Refresh the browser and see the application return to a working state
* This step may take a while as the instance has to return to a good state and the LB has to verify the instance is healthy again before routing traffic
Congratulations! You have successfully created a load-balanced application in the cloud.
Bonus Mission
There’s no bonus mission today. Use your time to work on your project or brush up on topics that you want to learn more about.