Scaling horizontally AutoScaling Group
Overview
The ability to scale horizontally is very important in building Cloud Native applications. In this studio, you will be extending your Airwaze App to scale horizontally as traffic on the server increases.
New Topics
- Cloud Formation Script for VPC
- S3 Bucket
- AWS CLI
- Auto Scaling
Setup
You can do this studio in any US Region that has not reached it’s VPC limit. N.Virginia and Oregon have the highest VPC limit.
Create a KeyPair for the Region (if in new Region)
IF you are in a new Region, you will need to create a new KeyPair.
- Make sure you are in the new region
- Go to EC2 in the services menu
- Click Key Pairs in the left menu in the NETWORK & SECURITY section
- Enter a name like
yourname-region-name-key
- Download key
- Copy the key to your
~/.ssh folder
- Make it so that only the owner can read and write to the file
$chmod 400 yourname-useast-key.pem
1) AWS CLI
We will be using the AWS CLI tool for some parts of the studio. The AWS CLI tool allows you to create and change infrastructure on the cloud via the command line.
Install AWS CLI
To install the AWS CLI tool run the following commands in your terminal:
(on local computer)
$ brew install awscli
$ aws --version
AWS CLI Credentials
Create AWS CLI credentials
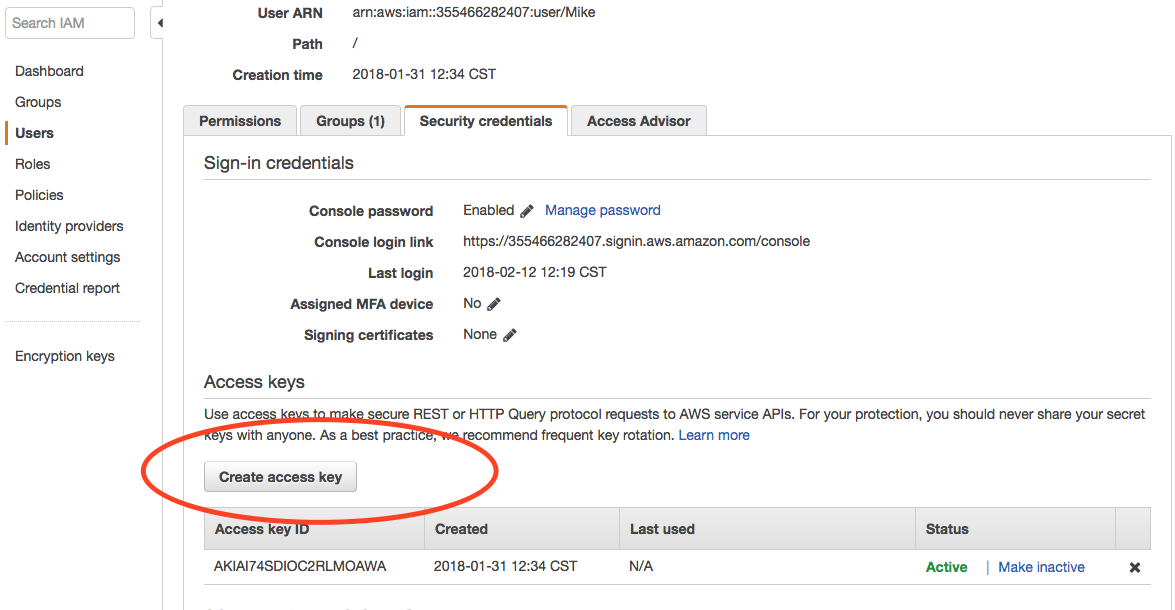
- Go to Services > IAM > Users
- Click on yourself in the list
- Click Security credentails tab
Screenshot of IAM credentails
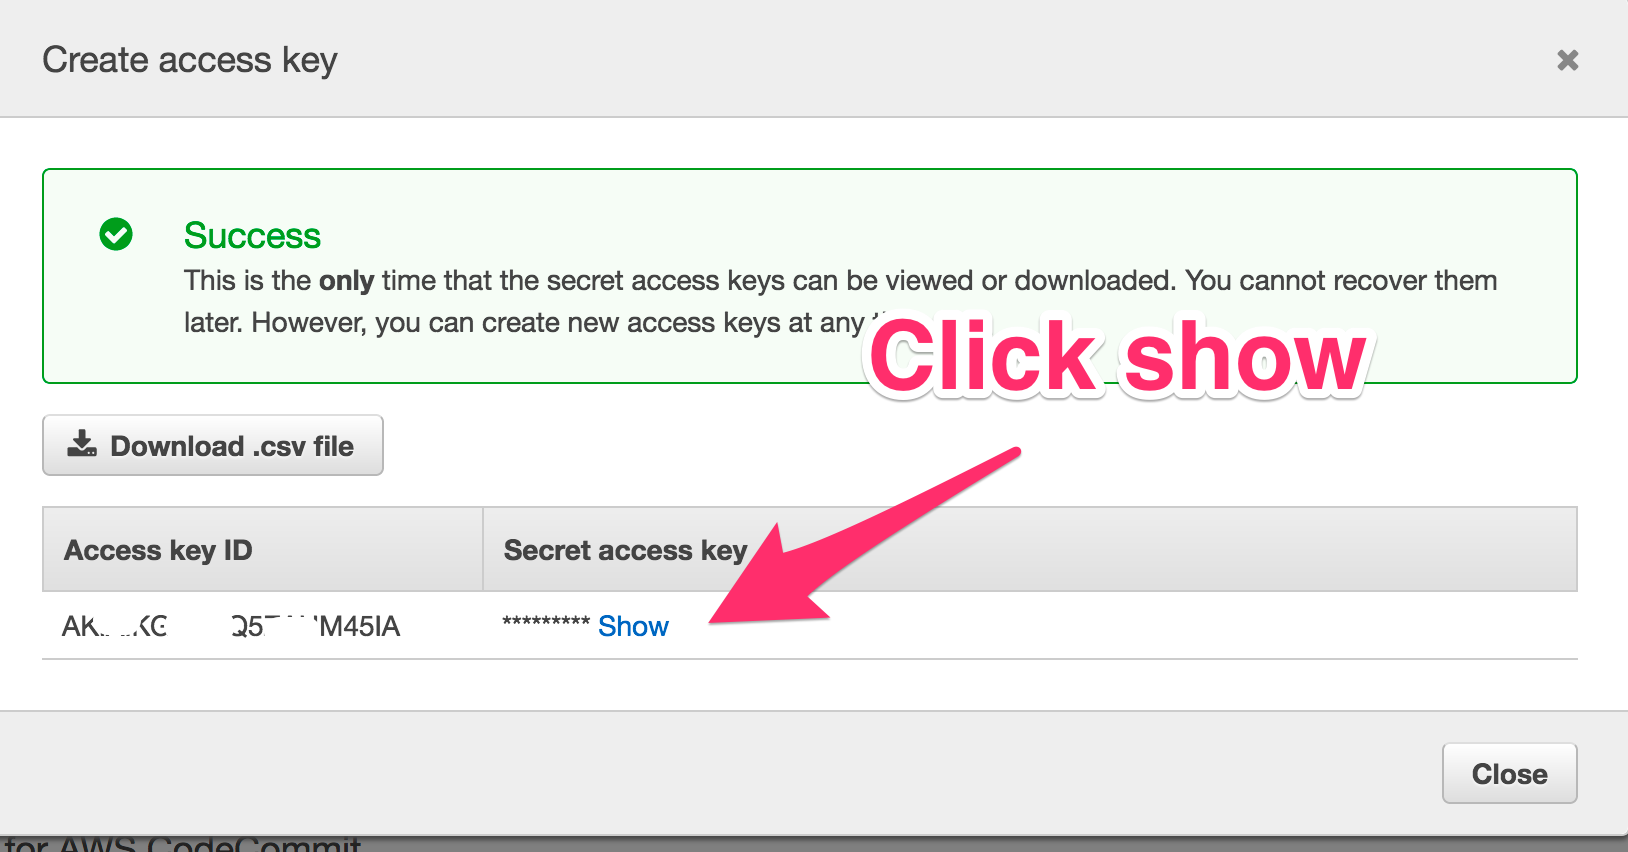
- Click Create Access Key
- Copy or write down the Secret Key
- WARNING: You will not be able to see the secret code after closing the new key window
- If you do close the window before copying the key, you can remove the key and create a new one
Screenshot of Create Access Key
Note
It is very important that you keep the AWS Secret Access Key private. Keep it secret, Keep it safe!
Access to that key allows anyone to programmatically create infrastructure(servers, rds, etc) on the AWS account.
Enter Your Credentials into AWS CLI
Next run the below command and configure your the AWS CLI tool. Use the “Default region name” or us-east-1:
(on local computer)
$ aws configure
AWS Access Key ID [None]: AK-------------------
AWS Secret Access Key [None]: r4------------------
Default region name [None]: (just hit enter)
Default output format [None]: (just hit enter)
Run AWS CLI Commands
You should now be able to run commands against AWS. For example, you should now be able to list all of the buckets in S3::
Take a look around by looking at the help pages for a couple of commands::
$ aws help
$ aws s3 help
$ aws s3 sync help
The aws help command is a quick alternative to looking up information about the tool on line.
4) Create an EC2 to Populate the Database
You are going to create an EC2 do some initial database setup. This EC2 will not be used for anything else. Please name it your-name-day3-db-setup
- Create an EC2 instance of the same type as previous days
- Select the VPC that was just crated by the CloudFormation
- Select
{yourname}-airwaze-SubnetWebAppPublic as the subnet
- Once the server is up, SSH into the server and run the following commands:
(on remote server)
ubuntu$ sudo apt-get update
ubuntu$ sudo apt-get install postgresql
ubuntu$ psql -h airwaze-example.cew68jaqkoek.us-east-1.rds.amazonaws.com -p 5432 -U masterUser airwaze
(paste this sql into psql shell)
CREATE USER airwaze_user WITH PASSWORD 'verysecurepassword';
CREATE EXTENSION postgis;
CREATE EXTENSION postgis_topology;
CREATE EXTENSION fuzzystrmatch;
CREATE EXTENSION postgis_tiger_geocoder;
CREATE TABLE airport
(
id serial primary key,
airport_id integer,
airport_lat_long geometry,
altitude integer,
city character varying(255),
country character varying(255),
faa_code character varying(255),
icao character varying(255),
name character varying(255),
time_zone character varying(255)
);
CREATE TABLE route
(
id serial primary key,
airline character varying(255),
airline_id integer,
dst character varying(255),
dst_id integer,
route_geom geometry,
src character varying(255),
src_id integer
);
ALTER TABLE airport OWNER to airwaze_user;
ALTER TABLE route OWNER to airwaze_user;
Also, send up the routes.csv file and the Airports.csv file and get those in the database.:
Then after the csv files have been copied to the server you can populate the database by running these commands.
(remote server)
ubuntu$ psql -h airwaze-example.cew68jaqkoek.us-east-1.rds.amazonaws.com -d airwaze -U airwaze_user -c "\copy route(src, src_id, dst, dst_id, airline, route_geom) from STDIN DELIMITER ',' CSV HEADER" < /home/ubuntu/routes.csv
ubuntu$ psql -h airwaze-example.cew68jaqkoek.us-east-1.rds.amazonaws.com -d airwaze -U airwaze_user -c "\copy airport(airport_id, name, city, country, faa_code, icao, altitude, time_zone, airport_lat_long) from STDIN DELIMITER ',' CSV HEADER" < /home/ubuntu/Airports.csv
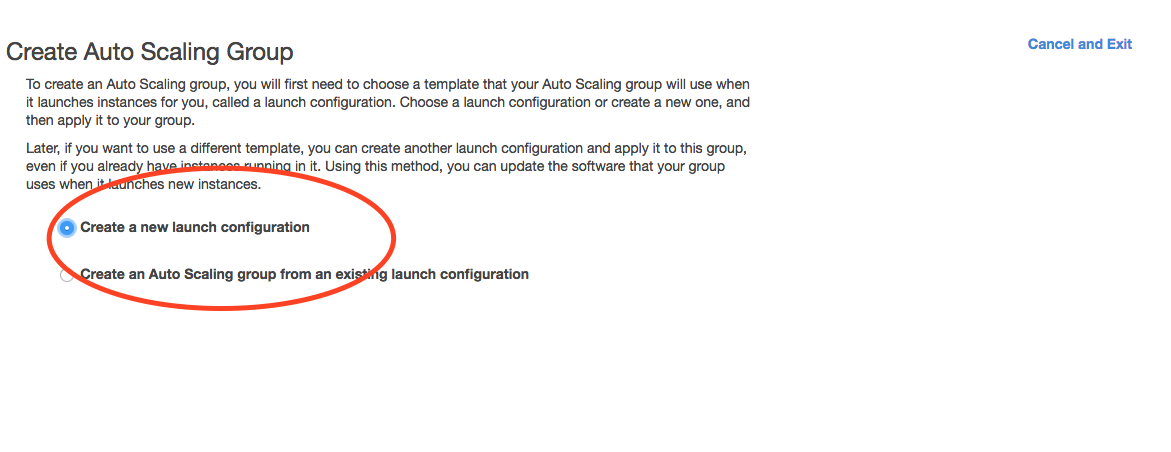
5) Create the Launch Configuration
You now have all of the pieces set up to begin Auto Scaling EC2 machines.
- Navigate to AutoScaling Page on the sidebar of EC2
- Click Create Auto Scaling Group.
Screenshot of AutoScale Start
A LaunchConfiguration is essentially creating a template for all of the EC2 instances that will be created automatically via Auto Scale.
- You are going to create a new Launch Configuration.
Screenshot of AutoScale Step 1
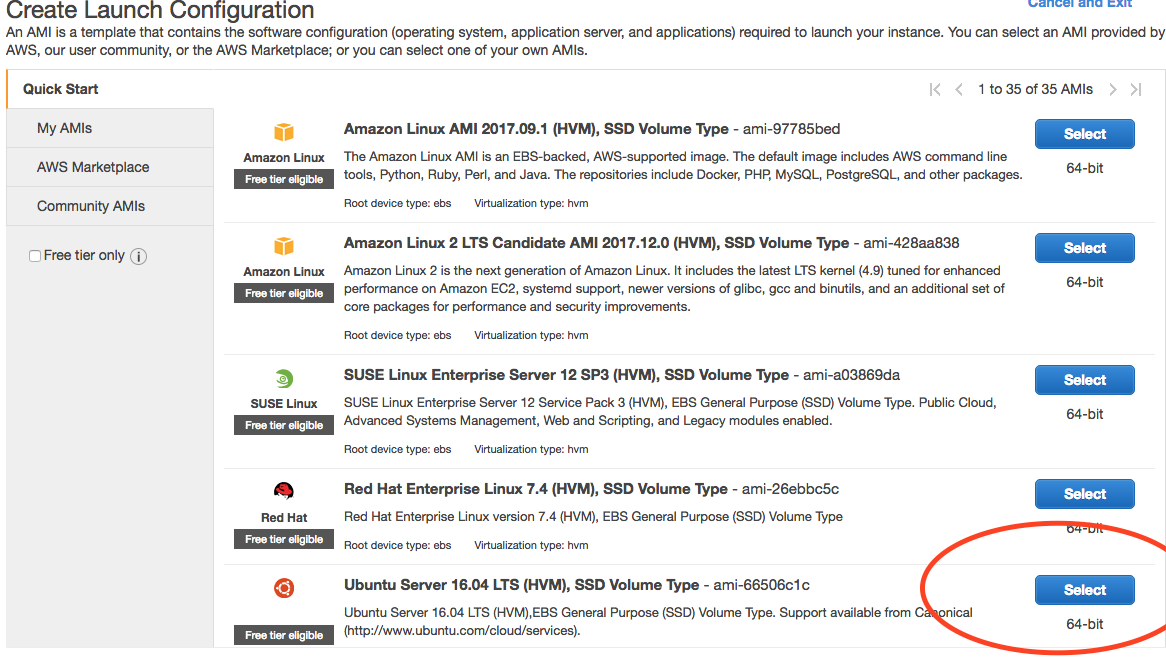
The Launch Configuration is going to be very similar to setting up a normal EC2 instance.
- Choose the Ubuntu distribution on the AMI screen.
Screenshot of Auto Scale AMI
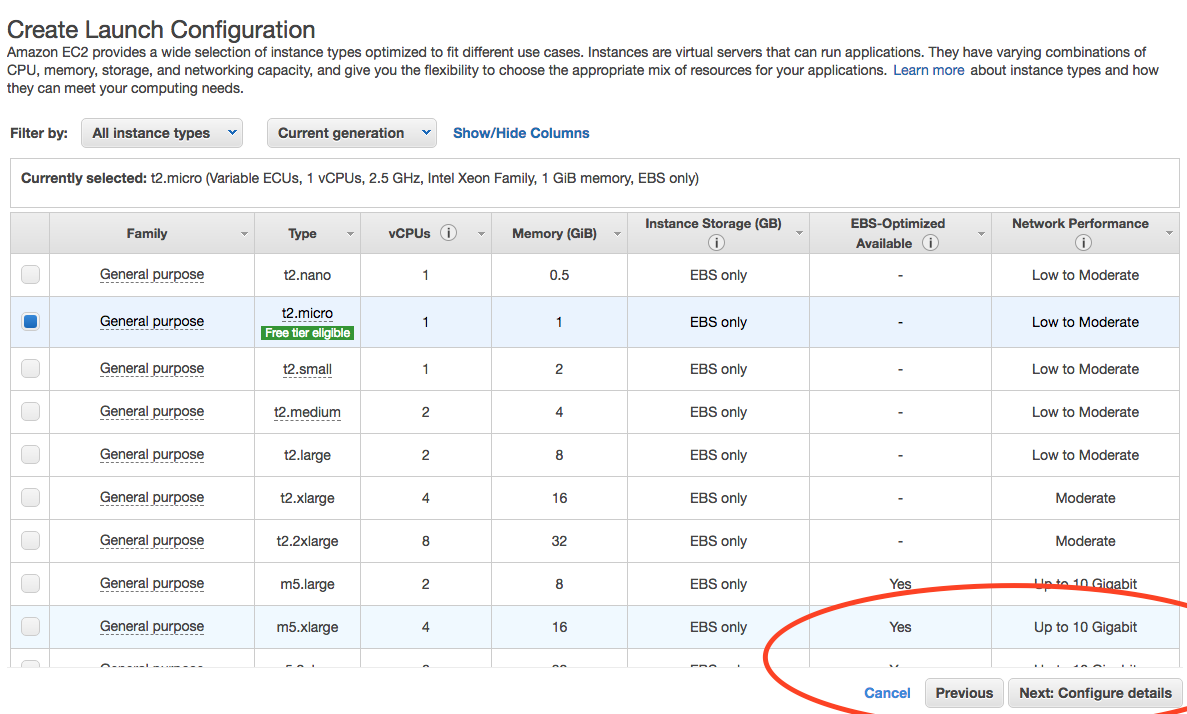
- Choose the micro instance.
Screenshot of Auto Scale instance size
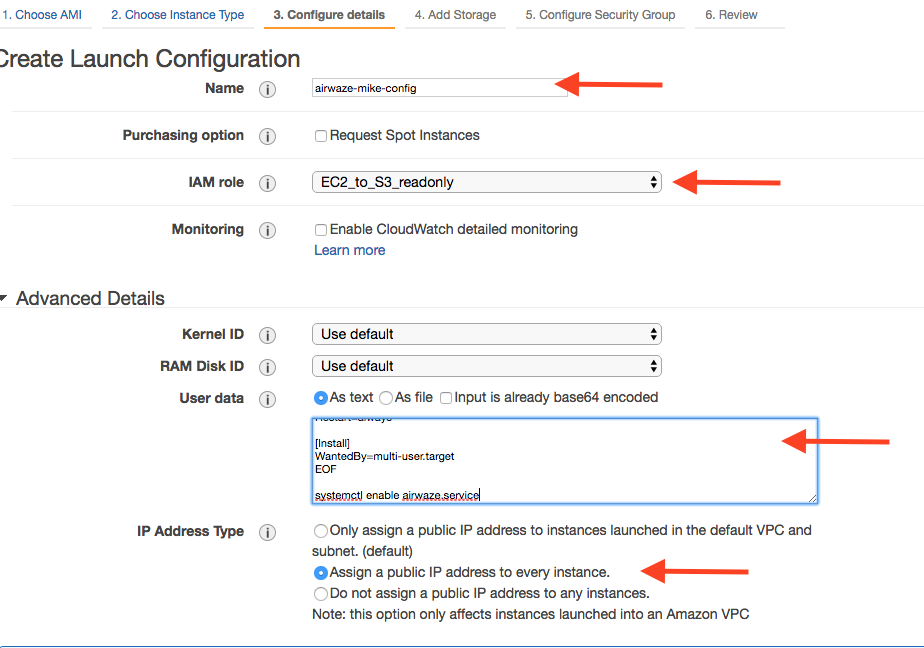
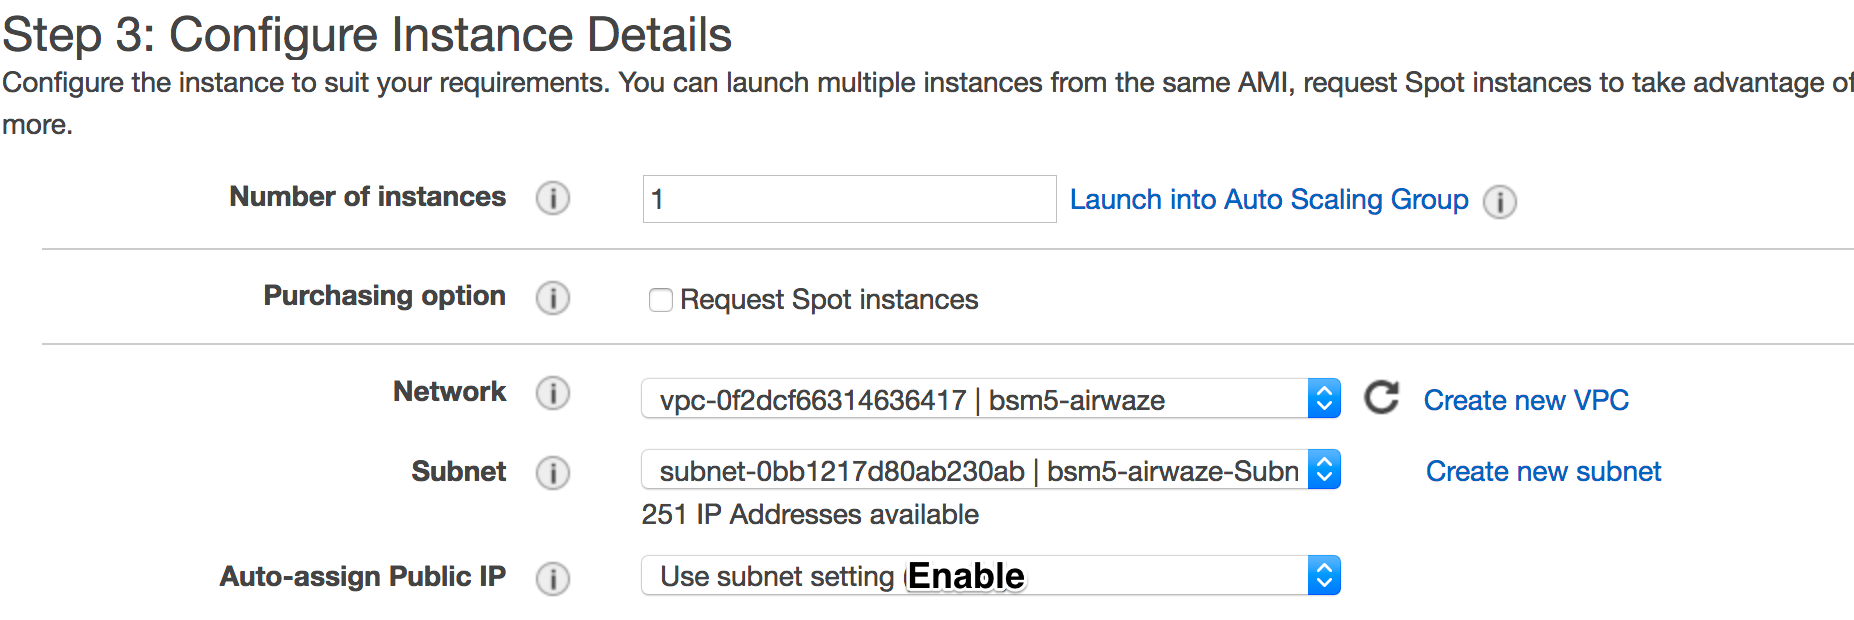
There are several important configurations that have to be made on the Configure Details screen.
The most important configuration is the User data in Advanced Details. The User data is the script that runs as the server starts up. This script creates the proper directories, configures systemd, and launches the app. Additionally, the app pulls down a copy of the jar file from S3.
There are two pieces of data to change in the User data script:
- Copy the User Data script that is provided below and paste it into an editor
- Set
APP_DB_HOST to the endpoint of your RDS database.
- Change the
aws s3 c s3://launchcode-gisdevops-c1-yourbucket/app.jar /opt/airwaze/app.jar command to point to the bucket that you created earlier in the studio.
- Paste your updated script in the “User data” field.
- Set “IAM role” to “EC2_to_S3_readonly”. When the machine is starting, the startup script will need to reach out to S3. The “IAM role” gives the startup script the proper credentials to be authenticated to access S3.
- Set the name of the configuration to
airwaze-{your name}-config.
- Change the “IP Address Type” to be
Assign a public IP address to every instance.
Screenshot of Auto Scale configuration
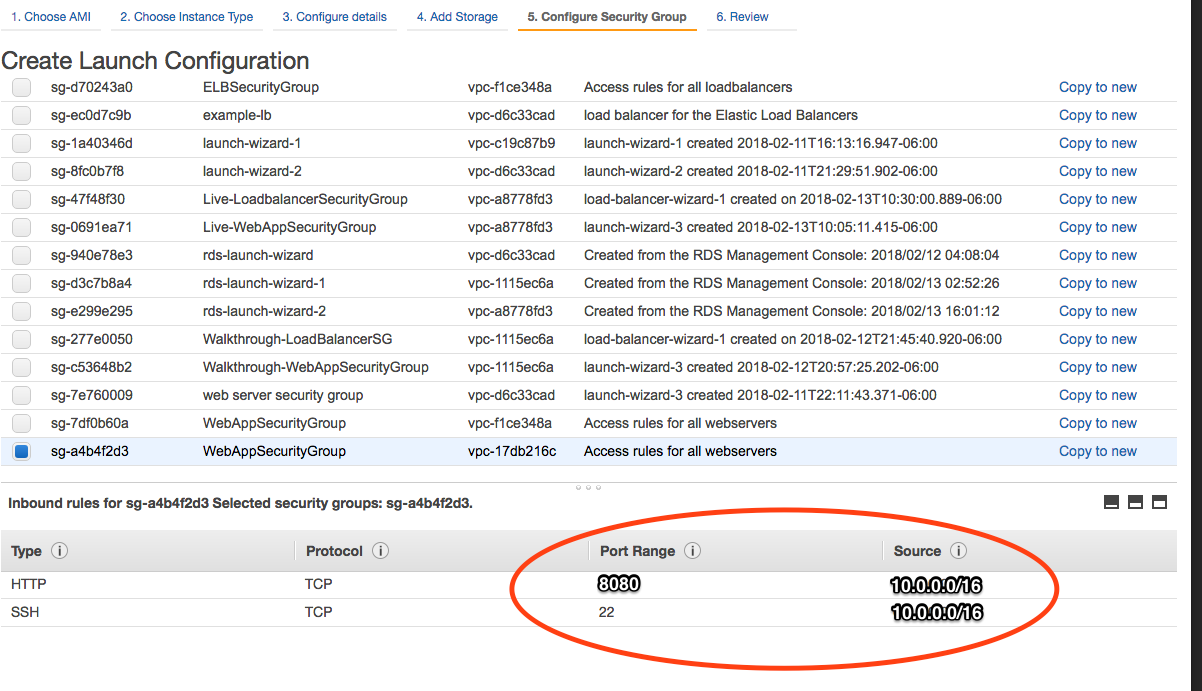
- Click “Next: Configure Security Group”
- On the Security Group screen, choose the
WebAppSecurityGroup from your VPC. The key is that you want to have ports 22 and 8080 open on the machines that you are running.
- Click “Review”
- Click “Create Launch configuration”
User Data Script (remember to change certain parts)
#!/bin/bash
# Install Java
apt-get update -y && apt-get install -y openjdk-8-jdk awscli

# Create airwaze user
useradd -M airwaze
mkdir /opt/airwaze
mkdir /etc/opt/airwaze
aws s3 cp s3://launchcode-gisdevops-c1-traineemike/app.jar /opt/airwaze/app.jar
chown -R airwaze:airwaze /opt/airwaze /etc/opt/airwaze
chmod 777 /opt/airwaze

# Write Airwaze config file
cat << EOF > /etc/opt/airwaze/airwaze.config
APP_DB_HOST=airwaze-example.cew68jaqkoek.us-east-1.rds.amazonaws.com
APP_DB_PORT=5432
APP_DB_NAME=airwaze
APP_DB_USER=airwaze_user
APP_DB_PASS=verysecurepassword
EOF

# Write systemd unit file
cat << EOF > /etc/systemd/system/airwaze.service
[Unit]
Description=Airwaze Studio
After=syslog.target

[Service]
User=airwaze
EnvironmentFile=/etc/opt/airwaze/airwaze.config
ExecStart=/usr/bin/java -jar /opt/airwaze/app.jar SuccessExitStatus=143
Restart=always

[Install]
WantedBy=multi-user.target
EOF

systemctl enable airwaze.service
systemctl start airwaze.service
Screenshot of Auto Scale security groups
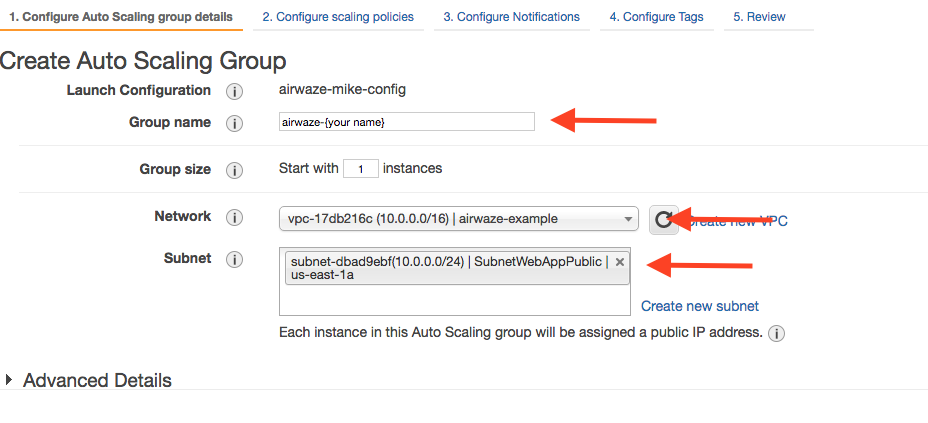
6) Create the Auto Scale Group
The Auto Scale Group is the piece of configuration responsible for how and when new machines are spun up (and spun down). Spun up = created and started. Spun down = stopped and possibly deleted.
The first step is configuring where the machines will be spun up.
- For “Group name”, provide a name similiar to
airwaze-{your name} (replace {your name} of course…)
- For “Network”, choose your VPC.
- For “Subnet”, choose the
SubnetWebAppPublic.
- Click “Next: Configure Scaling Policy”
Screenshot of Auto Scale configuration
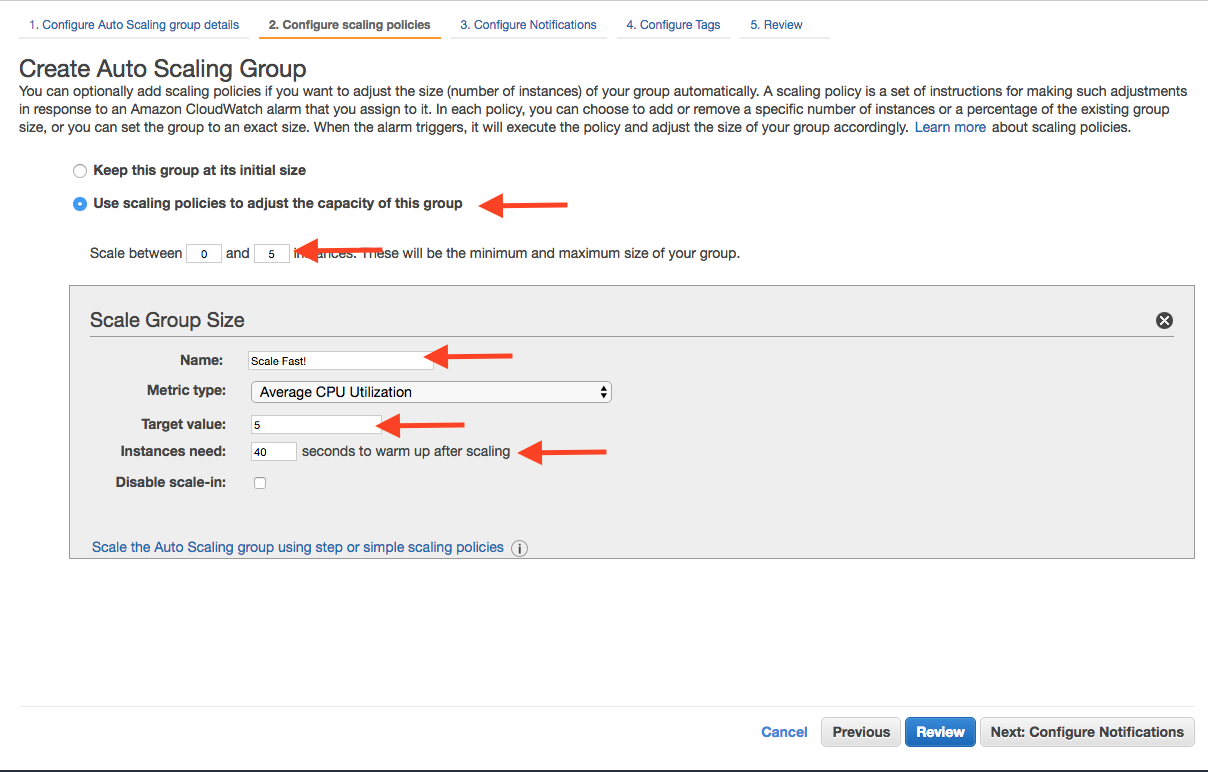
The next screen configures how an app scales up.
- Select
Use scaling policies to adjust the capacity of this group.
- Mark that the app can scale up to 5 machines.
- Change the name to
Scale Fast!.
- Set the “Target value” to 5. “Target value” is the percentage of CPU that triggers another machine to be provisioned.
- Set the “Instances need” to 40 seconds. Since Spring Boot packages the web server in the jar, your application doesn’t need as much start time as other machines.
- Click “Next: Configure Notifications”
Screenshot of Auto Scale configuration
- Click “Next: Configure Tags”
- Click “Review”
- Click “Create Auto Scaling Group”
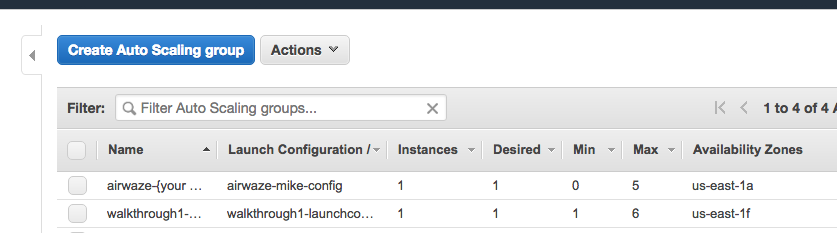
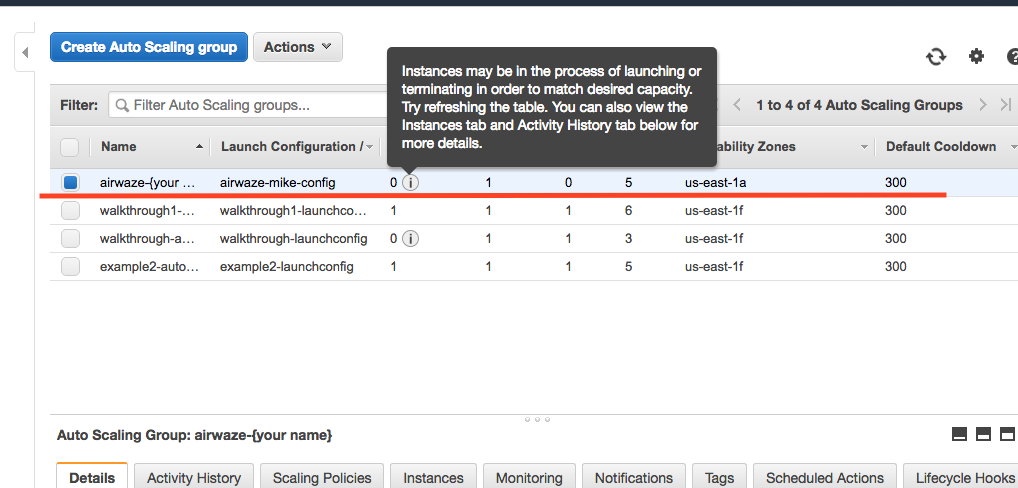
This will create you Auto Scaling Group. At first, the summary page will say 0 instances; it typically takes a couple of minutes to initialize.
Screenshot of Auto Scaling Group Dash
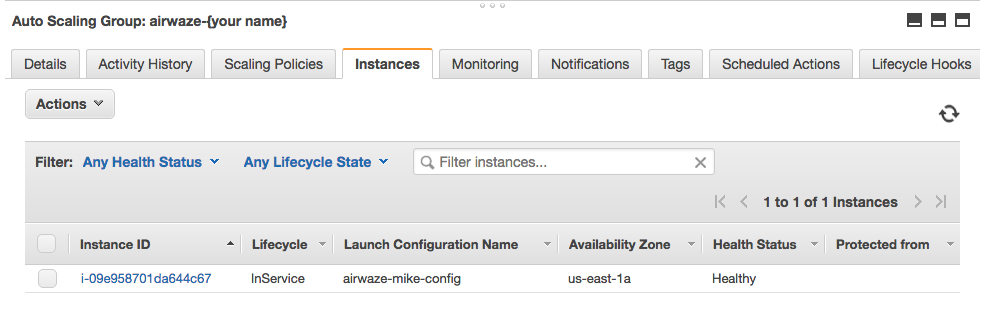
The “Instances” tab will show you how many machines you currently have running in your Auto Scaling Group.
Screenshot of the Instances tab
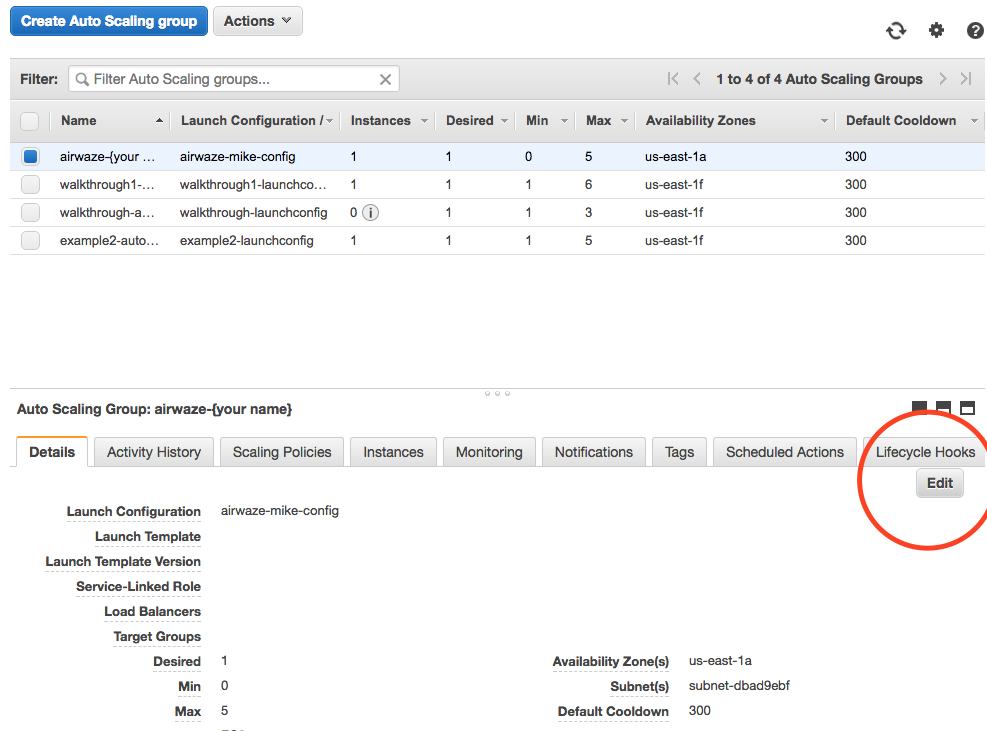
Next you need to hook a load balancer up to your Auto Scaling Group.
- Go to EC2 Dashboard > Auto Scaling Group
- Find your Auto Scaling Group
- Click Edit
Screenshot of Target Groups Edit
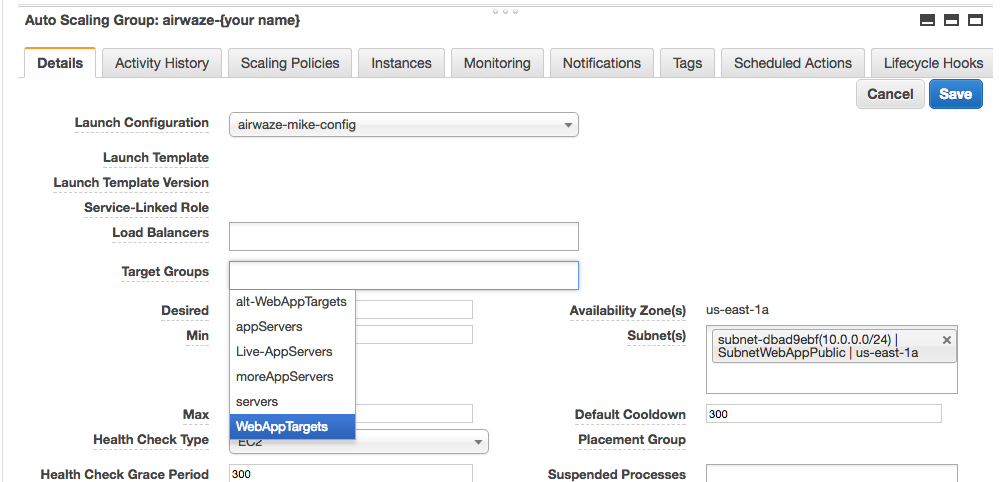
- Select
WebAppTargets from the “Target Groups” drop down.
Screenshot of Target Groups select target
7) Placing Load on your App
Next, you want to test that your autoscaling is working properly.
Go to the public DNS of your ELB and hit refresh many times. You can even go to that address in multiple browsers at the same time. You are trying to send as many requests as possible to your ELB.