ngFor¶In the Angular lesson 1 exercises, you modified
a movie-list component to display a series of titles. The final code
within movie-list.component.html probably looked something like:
1<div class='movies'>
2   <h3>Movies to Watch</h3>
3   <ol>
4      <li>{{movies[0]}}</li>
5      <li>{{movies[1]}}</li>
6      <li>{{movies[2]}}</li>
7      <li>{{movies[3]}}</li>
8   </ol>
9</div>
movies[0] - movies[3] reference an array assigned within the
movie-list.component.ts file.
To change the number of movie titles displayed in the ordered list, we could
manually add or remove li tags, or we could use the structural directive
ngFor to iterate through the movie options.
ngFor Syntax¶The example below shows the basic approach for using ngFor to iterate
through the contents of an array. For a more detailed guide to using ngFor
and all of its variations, refer to the following resources:
Just like a for loop in JavaScript requires a specific syntax in order to
operate, loops in Angular must follow a set of rules. Let's explore these rules
by adding ngFor to our movie list code.
1<div class='movies'>
2   <h3>Movies to Watch</h3>
3   <ol>
4      <li *ngFor = "let movie of movies">{{movie}}</li>
5   </ol>
6</div>
Some items to note:
* symbol."let movie of movies" provides the instructions
for running the loop.let keyword declares the movie variable.of movies sets movie equal to the first element of the movies
array. Each iteration of the loop sets movie equal to the next title
in the array.*ngFor statement is placed INSIDE the <li> tag.{{movie}} is the placeholder for the current value of movie.By placing the *ngFor statement inside the tag, the loop generates
multiple <li></li> elements. Each iteration adds a new list item to the
HTML code, one for each title in the movies array.
Warning
The *ngFor statement generates a new HTML tag for each item in the
array. Be careful where you put the statement! If we had added
*ngFor = "let movie of movies" to the <h3> tag, then the Movies
To Watch title would have been repeated multiple times.
In general, the syntax for *ngFor is:
*ngFor = "let variableName of arrayName"
Where variableName is the loop variable, and arrayName represents the
array to iterate through.
Note
*ngFor only operates over the contents of an array. If we want to
iterate over the characters in a string, we must first convert it into an
array.
There is a technique for iterating over the key/value pairs of an object, but that is a more advanced topic. We will not discuss that method here.
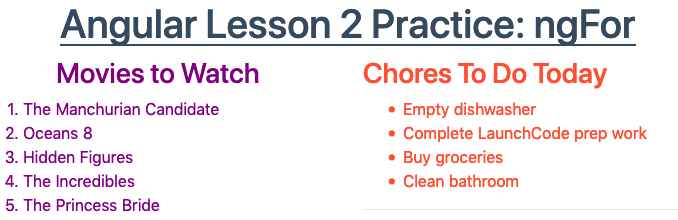
From the lesson2 folder in VSCode, open the
examples/ngfor-practice/src/app/chores folders and select the
chores.component.html file.
The starter code should match this:
1<div class='chores'>
2   <h3>Chores To Do Today</h3>
3   <ul>
4      <li>{{chores[0]}}</li>
5      <li>{{chores[1]}}</li>
6      <li>{{chores[2]}}</li>
7   </ul>
8   <hr>
9</div>
In the VSCode terminal window, navigate to the ngfor-practice folder.
$ pwd
   angular-lc101-projects/lesson2
$ ls
   examples        exercises
$ cd examples
$ ls
   input-practice  ngfor-practice  ngif-practice
$ cd ngfor-practice
Once you are in the folder, enter npm install in the terminal. This will
add all of the Angular modules needed to run the project.
Enter ng serve to launch the project, then:
Modify chores.component.html with *ngFor to loop over the chores
array:
<li *ngFor = "let chore of chores">{{chore}}</li>.Open chores.component.ts. Add "Clean bathroom" to the chores
array, then save. Reload the web page to make sure the new chore appears.
Your output should look like this:
Remove two chores from the array. Reload the web page to make sure these items disappear from the list.
Return to chores.component.html. Use *ngFor within the <div> tag to
loop over the todoTitles array:
<div class='chores' *ngFor = "let title of todoTitles">.title.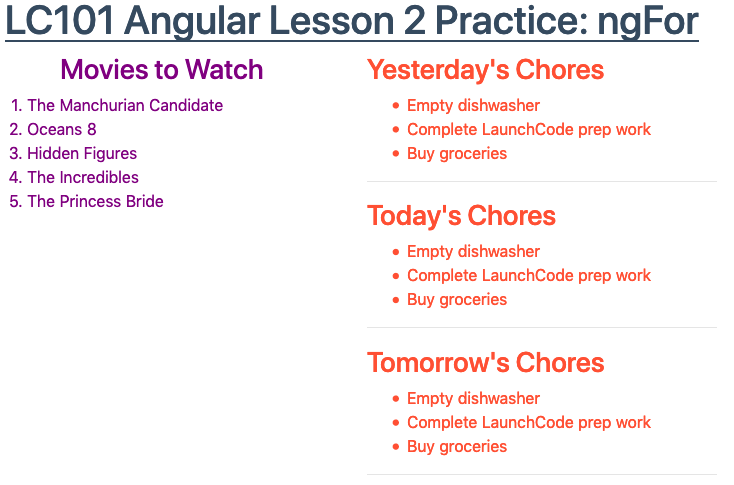
Return to chores.component.ts. Add an item to the todoTitles array,
then save. Check to make sure another list appears on the web page. Next,
remove two items from the todoTitles array. Save and make sure the page
reflects the changes.
*ngFor statement inside the <h3> tag instead
of the <div> tag? Try it and see what happens!<ul> tag instead? Try it!What if we want to have different chores listed for Yesterday, Today, and Tomorrow?
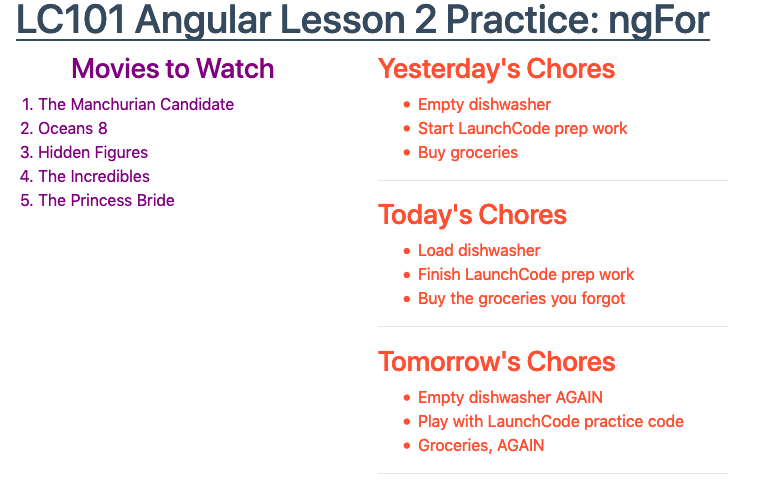
Accomplishing this task is OPTIONAL, but it boosts your skill level and makes your page look better.
In the chores.component.ts file, replace the chores and
todoTitles arrays with the following array of objects:
1chores = [
2   {title: "Yesterday's Chores", tasks: ['Empty dishwasher', 'Start LaunchCode prep work', 'Buy groceries']},
3   {title: "Today's Chores", tasks: ['Load dishwasher', 'Finish LaunchCode prep work', 'Buy the groceries you forgot']},
4   {title: "Tomorrow's Chores", tasks: ['Empty dishwasher AGAIN', 'Play with LaunchCode practice code', 'Groceries AGAIN']},
5]
Update line 1 in chores.component.html to access each object in the
chores array:
<div class='chores' *ngFor = 'let list of chores'>list will be assigned a new object with title
and tasks properties.Update the placeholder in line 2 to access the title property of
list.
Update line 4 to loop over the tasks array:
<li *ngFor = 'let chore of list.tasks'>.
The following questions refer to this code sample:
1<div>
2   <h3>My Pets</h3>
3   <ul>
4      <li>{{pet}}</li>
5   </ul>
6</div>
Assume that we have defined a pets array that contains 4 animals.
Question
Adding *ngFor = 'let pet of pets' to the <li> tag produces:
Question
Moving *ngFor = 'let pet of pets' from the <li> tag to the <div>
tag produces: