ngIf¶The *ngIf structural directive evaluates a boolean expression and then
adds or removes elements from the DOM based on the result.
The examples below show the basic usage of *ngIf. If you want to explore
more details about this directive, refer to the following resources:
*ngIf Syntax¶In general, the syntax for *ngIf is:
*ngIf = "condition"
*ngIf statements are added inside an HTML tag. The condition can either
be a boolean or an expression that returns a boolean. If condition
evaluates to true, then the HTML tag is added to the web page, and the
content gets displayed. If condition returns false, then the HTML tag
is NOT generated, and the content stays off the web page.
Note
*ngIf determines if content is added or removed from a page. This is
different from determining if content should be displayed or hidden.
Hidden content still occupies space on a page and requires some amount of memory. Removed content is absent from the page---requiring neither space on the page nor memory. This is an important consideration when adding items like images or videos to your website.
Example
Let's modify our movie list code as follows:
1<div class='movies' *ngIf = "movies.length > 3">
2   <h3>Movies to Watch</h3>
3   <ol>
4      <li *ngFor = "let movie of movies">{{movie}}</li>
5   </ol>
6</div>
Adding the *ngIf statement inside the <div> tag determines whether
that element and any content it contains gets added to the web page. If the
condition movies.length > 3 evaluates to true, then the div,
h3, ol, and li tags all get generated. If the condition returns
false, then none of the tags are added to the HTML code.
Note
Only one structural directive can be assigned to an element. Since the li
tag in the example above already contains *ngFor, we cannot add an
*ngIf statement.
*ngIf¶Just like if statements, we can use the operators AND (&&), OR
(||), and NOT (!) to modify the condition checked by *ngIf.
Examples
Logical AND:
<p *ngIf = "conditionA && conditionB">Some text</p>
Some text appears on the web page only if conditionA and
conditionB both return true.
Logical OR:
<p *ngIf = "conditionA || conditionB">Some text</p>
Some text appears on the page if either conditionA or conditionB
return true.
Logical NOT:
<p *ngIf = "arrayName.length !== 0">Some text</p>
Some text appears when arrayName.length is NOT equal to 0.
if/else?¶With JavaScript, we know how to use an if/else block to decide which set of
code to execute:
1if (num >  5) {
2   //Execute this code if num is greater than 5.
3} else {
4   //Execute this code if num is NOT greater than 5.
5}
We can do the same thing in Angular to decide which set of HTML tags to
generate. Unfortunately, setting this up with *ngIf is not as efficient.
The general syntax for adding an else block in Angular is:
1<someTag *ngIf = "condition; else variableName">
2   <!-- HTML tags and content --->
3</someTag>
4
5<ng-template #variableName>
6   <!-- Alternate HTML tags and content --->
7</ng-template>
Note that the # is required inside the ng-template tag.
Example
Let's modify the movie list example to create an alternate set of HTML tags
if movies.length > 3 returns false.
 1<div class='movies' *ngIf = "movies.length > 3; else needMoreMovies">
 2   <h3>Movies to Watch</h3>
 3   <ol>
 4      <li *ngFor = "let movie of movies">{{movie}}</li>
 5   </ol>
 6</div>
 7
 8<ng-template #needMoreMovies>
 9   <div class='movies'>
10      <h3>Not Enough Movies!</h3>
11      <p>You only have {{movies.length}} movies on your watch list!</p>
12      <p>What's up with that?</p>
13      <p>You need to purchase expensive popcorn more often.</p>
14   </div>
15</ng-template>
In line 1, the condition for *ngIf specifies what to do if
movies.length > 3 returns true or false:
true, Angular executes lines 1 - 6.false, Angular searches for alternate code labeled with the name
needMoreMovies. In this case, Lines 9 - 14 hold the alternate HTML tags.<ng-template></ng-template> is a special Angular element. It contains
content that might be required for a web page. When the else statement in
line 1 executes, Angular searches for an ng-template block labeled with the
matching variable name. Angular then ignores the original div tags and
anything they contain, and it replaces that content with lines 9 - 14.
In VSCode, return to your Angular Lesson 2 project. Use the terminal panel to
commit any changes to your *ngFor work, then switch to the
ngif-practice folder.
$ cd ..
$ ls
   input-practice  ngfor-practice  ngif-practice
$ cd ngif-practice
In VSCode, open the chores.component.html file from the ngif-practice
folder:
The code should look like this:
 1<div class="chores">
 2   <h3>Chores</h3>
 3   <ul>
 4      <li *ngFor = 'let chore of chores'>{{chore}}</li>
 5   </ul>
 6</div>
 7<hr>
 8<div class="doneChores">
 9   <h3>Done Chores</h3>
10   <ul>
11      <li *ngFor = 'let done of finishedChores'>{{done}}</li>
12   </ul>
13</div>
14<hr>
Once again, you must install the necessary Angular modules. Run npm install
in the terminal, then enter ng serve to launch the project.
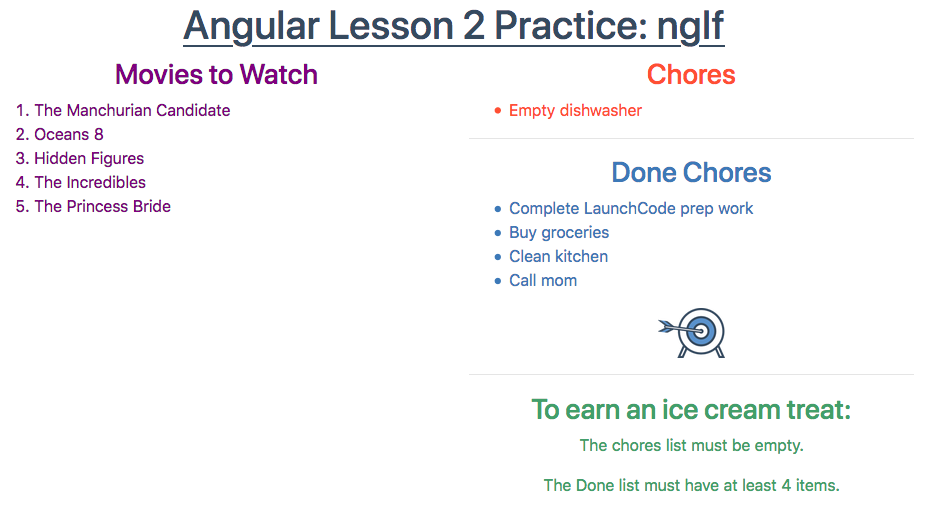
Now use *ngIf to do the following:
Chores list if the length of
the chores array is longer than the length of the finishedChores
array. Use a p tag for the text and make the words a different color.chores and finishedChores arrays in chores.component.ts
and modify the number of items. Save your changes and reload the page to
verify that your code works.chores array is empty OR the finishedChores array has at
least 3 more items than the chores array, display targetImage under
the Done Chores list. Otherwise, use a p tag to display the text,
"No allowance yet."chores.component.ts and change the number of items in the
arrays again. Check to make sure the web page correctly responds to your
changes.chores array is empty AND finishedChores contains
4 or more items, display an h1 underneath the lists with the text "Ice
cream treat!" Otherwise, display h3 and p elements that describe
how to earn ice cream.Properly done, your page should look something like:
Examine the following code:
 1<div>
 2   <h3>Prep Work</h3>
 3   <ul>
 4      <li *ngFor = "let task of prepWork">{{task}}</li>
 5   </ul>
 6</div>
 7
 8<ng-template #noHW>
 9   <p>This space intentionally left blank.</p>
10</ng-template>
Question
Assume we have defined a prepWork array to hold the homework tasks for our
next class. We want the web page to always show the heading. Underneath that
we want to add either the list of tasks or the paragraph text if the array is
empty.
Where should we place an *ngIf statement to make this happen?
div tagh3 tagul tagli tagng-template tagp tagQuestion
For the same code sample, which of the following shows the correct syntax for
the *ngIf statement?
*ngIf = "prepWork.length === 0; else noHW"*ngIf = "prepWork.length !== 0; else noHW"*ngIf = "prepWork.length === 0; else #noHW"*ngIf = "prepWork.length !== 0; else #noHW"