Assignment: HTML Me Something
You've learned a bit of HTML and some CSS, but you have likely only used it in bits and pieces so far, adding or modifying content in exercises or pre-existing files. Here, you are going to take another step forward by building an entire page from scratch. You will also get some practice using Git.
There are two parts to this exercise, one focused on HTML and another focused on CSS. HTML makes up the structure and content of web pages, while CSS dictates the visual style.
Best practices dictate that these should be kept as separate as possible. To that end, we'll build the HTML portion of our page first, and only afterwards will we add a few styles with CSS. This will help us avoid adding HTML elements simply to change the style of our page.
Sections:
Getting started
First, follow the steps below to create a folder for your project and initialize it as a Git repository:
Setup the Project
-
Navigate into the parent folder where you keep all your course materials (e.g.
lc101/orcode/). Only you know where that folder lives in your file system, but you want to do something like:$ cd ~/lc101/ -
Make a new folder for this assignment:
$ mkdir html-me-somethingYour directory structure should now look like the below (or something similar):
lc101/ | +------- using-python-locally/ | +------- crypto/ | +------- html-me-something/ | ... etc -
Within your new
html-me-something/directory, create and save a new file calledindex.html:$ touch index.html -
Open up your new file in a text editor. Add a single line with the following HTML:
<p>YOUR NAME</p> -
Save your file.
-
Finally, open up the file in a web browser. You can do this by selecting File > Open File in your web browser, and navigating to the location of your new HTML file. If you get stuck on this, here's a video.
You should see a blank white page with your name in the top-left corner.
Use Git
Now let's incorporate Git into the picture.
-
Initialize the project as a Git repository.
In your terminal, make sure you are inside your
html-me-somethingfolder, and then use thegit initcommand to initialize that folder as a Git repository:$ pwd /Users/adalovelace/lc101/html-me-something $ git init Initialized empty Git repository in /Users/adalovelace/lc101/html-me-something/.git/Now your project is a Git repository, which will enable you to use all of the magic Git powers:
- using version-control to manage your changes
- syncing your local repository with a remote repository on Github.com.
-
Check your status
Back in the terminal, use the
git statuscommand to check the status of your newly created repo:$ git status On branch master Initial commit Untracked files: (use "git add <file>..." to include in what will be committed) index.html nothing added to commit but untracked files present (use "git add" to track)This message says a lot of things, but for now, the most important point is that
index.htmlis currently "untracked". We need toaddand thencommitthe file so that Git can help us manage its changes. -
Add your work to the repo
Use the
git addcommand to track yourindex.htmlfile so that it will be staged for your next commit:$ git add index.html2a. Check your status
If you check your status again, you should see that your change (the creation of the new file) is staged to be committed:
$ git status On branch master Initial commit Changes to be committed: (use "git rm --cached <file>..." to unstage) new file: index.html -
Commit
Now you are ready to
committhe changes you have staged.Go ahead and commit your changes, along with an appropriate message describing what you have changed:
$ git commit -m "Created index.html file"3a. Check your status
Now that you have committed, your status should be "clean":
$ git status
On branch master
nothing to commit, working directory clean
Congrats! You are officially up and running with a version-controlled project.
Getting to Work
Now it's time to build out your page! Dive into each of the two parts below:
Submitting your work
When you are ready to submit, complete the following steps:
Github
Github.com is website that hosts Git repositories "in the cloud". A repository that is up on Github often functions as the central hub for a project, so that a developer can do work across multiple machines, or multiple developers can work collaboratively on the same project.
For the remainder of this course, you will use Github to submit your work. Here's how:
-
Create a repo on Github
In a browser, visit Github's website. Make sure you are logged onto your Github account (or create an account now if you have not already done so.)
On your profile page, create a new repository by clicking the green
Newbutton on the right side of the screen:
Give your repository the same name as your folder,
html-me-something, and toggle the rest of the options as specified here: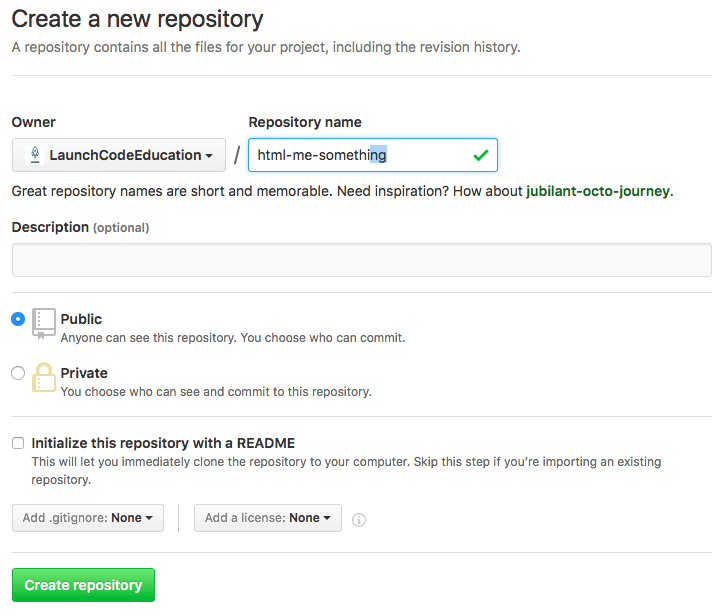
-
Inform your local repo about the existence of your remote repo
Now you have two repositories: the local one on your computer, and the remote one on Github. Now you need to sync them up.
The first step to syncing them is to give your local repo a reference to the remote repo. Using the
git remotecommand, you can inform your local repo about the existence of the remote one.Use the command below, but (keep reading below) :
$ git remote add origin PASTE_REPO_URL_HERE...replace
PASTE_REPO_URL_HEREwith the actual url for your remote Github repo, which you can obtain by copying and pasting the repository url:
By running this
git remote add ...command on the terminal, you are basically saying:"Hey local repo. Please meet your new friend,
origin, a remote repo, whose url ishttps://github.com/..."Note that the name "origin" is simply a standard naming convention for the main remote repo associated with a local repo.
-
Push your local changes up to the remote
Your local repo is currently ahead of your remote repo by a few commits. Locally, you have added and edited a few files, and committed all those changes, whereas your remote repo is still entirely empty.
Use the
git pushcommand to "push" all your local changes up to the remote:$ git push origin masterThis command says, in essence:
"Hey Git, please push all my local changes to the remote repo called
origin(specifically, to itsmasterbranch)."If you now refresh the browser window on your Github page, you should see that your HTML and CSS files have appeared!
Submit
To finish submitting and receive credit, follow steps 3 and 4 of the submission instructions on the Assignments page.
Bonus Mission
If you want to show off your hard work to all your friends, Github has a cool feature called Github Pages that makes this really easy.
Github provides free hosting for any "static" web content (like this project). All you have to do is change a setting on your GitHub repository.
- In a browser, go to the Github page for your repository.
- Click on the Settings tab
- Scroll down to the GitHub Pages section and enable the GitHub Pages feature by choosing your
masterbranch from the dropdown. Hit Save.
- In any browser, you should now be able to visit
YOUR_USERNAME.github.io/html-me-somethingand see your web page!