20.10. Exercises: Launch Form
Hello, programmer. We need you to make a Rocket Simulation form. Please follow the steps below. Happy coding!
20.10.1. Part A: Setup
From the
mainbranch in yourforms_chapterrepository, create a new branch calledrocket-form.In the new branch, create the
rocket_sim.htmlandrocket.cssfiles.Paste the following starter code into the HTML file:
 1
 2
 3
 4
 5
 6
 7
 8
 9
10
11
12
<!DOCTYPE html>
<html>
   <head>
      <meta charset="utf-8">
      <meta name="viewport" content="width=device-width">
      <title>Rocket Form</title>
      <link rel="stylesheet" type="text/css" href="rocket.css">
   </head>
   <body>
      <!-- TODO: Add your code here. -->
   </body>
</html>
Paste this code into the CSS file.
1
2
3
4
label {
   display: block;
   margin: 10px;
}
Tip
display: block;formats an element as a block-type. In this case, eachlabel(and its wrapped input) will start on a new line. Now you won’t need to use as many<br>elements to separate the rows in your form!Save and commit your work.
20.10.2. Part B: First Input
Create a
<form>with these attributes.Set
methodto"POST"Set
actionto"https://handlers.education.launchcode.org/request-parrot".
Inside the
formelement, add a<label>and<input>forTest Name:<label>Test Name: <input type="text" name="test-name"/></label>
Save your work, then open
rocket_sim.htmlin your browser. What keeps you from submitting the form right now?Add a submit button called Run Simulation to your form.
<button>Run Simulation</button>
<!-- OR -->
<input type="submit" value="Run Simulation"/>
Enter a value into the
test-nameinput and submit the form. Was the key/value pair properly sent to the server?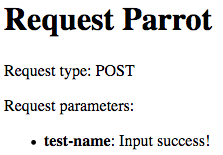
Data successfully sent to the parrot server.
Save and commit your work before starting Part C.
20.10.3. Part C: More Inputs
Add these five
inputsto your form. Pay attention to the types and required values. Be sure to add a<label>for each input.Label
Input Type
Input Name
Required Values
Test Date
datetest-dateDate format
mm/dd/yyyyRocket Type
selectrocket-typeOptions for
Falcon,Saturn,Orion, andTerrier.Number of Engines
numberengine-countA whole number from 1 - 9.
Wind Rating
radiowind-ratingOptions for
No Wind,Mild, andStrong(see note below).Use Autopilot
checkboxautopilotonoroffNote: Each
wind-ratinginput needs to include avalueattribute. ForNo Wind, set the value to0. ForMild, set the value to10. ForStrong, set the value to20.Add placeholder text to the
test-nameandengine-countinput fields.Include an empty
<option>element with theselectinput. Make it the default choice, setvalue="", and add thedisabledattribute.Use the
requiredattribute to add some validation. Prevent the form from being submitted if any input besidesautopilotis left blank.Add a Scrub Launch button that resets the form.
Example
Before submitting, your form should look something like:
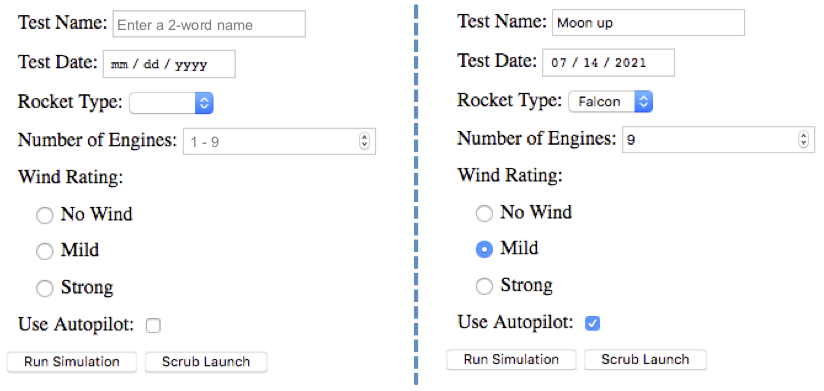
The empty and filled rocket simulation form.
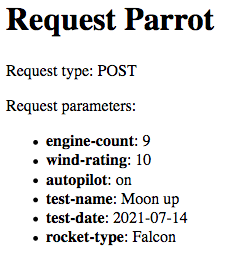
After submitting:
Save and commit your work before starting Part D.
20.10.4. Part D: Style the Form
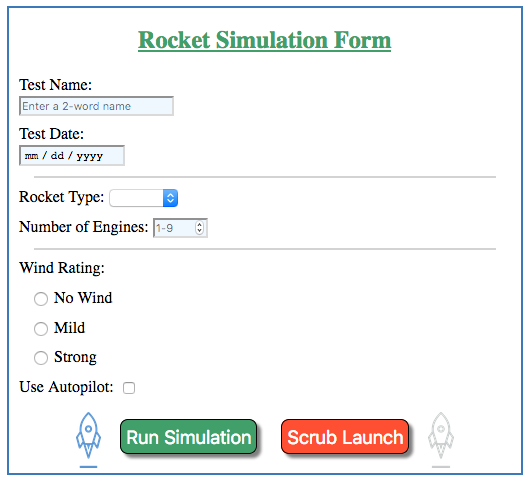
Add a centered heading to your form. Make the text a different color, font, and/or style compared to the labels.
Add a border or a background color (or both) to the form.
Center the Run Simulation and Scrub Launch buttons inside the form. Also, make them different colors.
Divide the form into three parts: One for the test name and date, one for the rocket type and engine count, and one for the wind rating and autopilot.
Align the
test-nameandtest-datefields. Also, make theengine-countfield shorter than the name and date boxes.Optional: Add more styling to the form and inputs! Feel free to include images or adjust the text/background color, margins, padding, borders, shading, font, etc. Have a little fun.
Remember to save and commit your work.
Note: The LaunchCode rocket logo is trademarked.