20.11. Project: Web Form (Part 1)
In this chapter, we coded several forms and used the Parrot Server to check the data submitted. Of course, the parrot isn’t a real server. It stores no data, and it performs no actions other than sending back the key/value pairs it receives in an HTTP request. It behaves like an electronic mirror.
In the next few chapters, we will learn how to run a local server on our computer. This will allow us to receive form data, do something with it, and then send back a carefully crafted response. By doing this, we can create truly interactive webpages and websites.
With this in mind, we are going to split this project across two chapters. In Part 1 (this chapter), you will create a form and verify that it submits its data correctly. In Part 2 (next chapter), you will write Python code to collect the data and act on it.
20.11.1. Introduction
In Assignment #2, you wrote a Python program that takes a string and encrypts it to create a coded message. The program also changes a coded message back into plain text.
Your old program ran in the console. In this project, you will adapt the program to run in a browser. To do this, you will need to create a form with inputs for the original message, the size of the character shift, and whether to encrypt or decrypt the message.
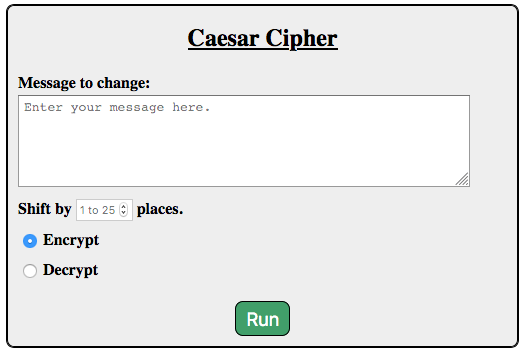
One possible form style.
You will deal with the Python code later. For now, your job is to build a nice looking form.
20.11.2. Getting Started
Launch Visual Studio Code and open your
forms_chapterfolder.Save and commit any recent work in the repository.
From
main, checkout a new branch calledweb-caesar.In the File Explorer panel, use the buttons to create a new folder. Call it
project.Inside
projectcreate empty.htmland.cssfiles. Be sure to give the files descriptive names.In the empty HTML file, type
html:5and hit Enter. Whoa! Instant starter code appears!
OK, that’s really cool.
Change the text in the
titleelement, then add a<link>to your project’s CSS file.Save and commit your work.
Tip
You will be working on this project over multiple chapters, and possibly from different locations or devices. It would be a good idea to add a remote repository on GitHub to help track your work.
20.11.3. Collect a Message From the User
The Caesar Cipher codes a message by shifting each letter a certain number of places in the alphabet. In your old assignment 2 Python code, you used the console to collect input from the user. In this updated project, you will use a web form to gather the same information.
Create a new
formelement in your HTML file. For now, assign the URL for the parrot server toaction.<form action="https://handlers.education.launchcode.org/request-parrot" method="POST">
Add a heading inside the form.
Add a
textareaelement where the user will enter their original message. Be sure to give this input alabel. Also, add some placeholder text.Add a Submit button to the form. However, label it something more clever than Submit.
Save your code, then open the
.htmlfile in your browser. Test your form to make sure it works.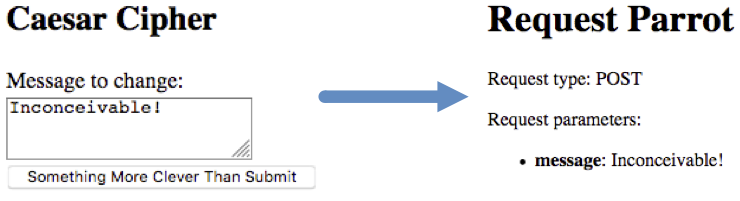
Check that the form sends a key/value pair for the
textareainput.¶Commit your work before moving to the next section.
20.11.4. Add Number and Radio Inputs
Now that you have the textarea element working, you need to gather the rest
of the required information.
Below the
textarea, add aninputelement that accepts an integer. The user will use this field to set how many places to shift each letter in the original message.Use the
maxandminattributes to add validation to the field. Allowed values for this input run from1to25.Add placeholder text to this input to tell the user the allowed range.
Below the number field, use radio buttons to let the user select if the message should be encrypted or decrypted. Use the
checkedattribute to select one of the choices as the default.Save your code, then refresh the page in your browser. Test the form to make sure it sends three key/value pairs to the server.
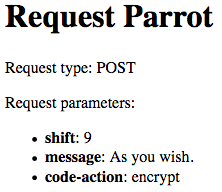
The form sends key/value pairs for the message, shift value, and whether to encrypt or translate the message.
Commit your work before moving to the next section.
20.11.5. Style the Form
Now you need to make your form look nice.
Open the empty
.cssfile. Add style rules for the form, input fields, and submit button.Center the form on the page. By default, the browser displays it on the left side of the screen. Here’s one way to change this:
In the CSS file, define a new class called
centered. Inside this class, add the ruletext-align: center;.Wrap the
formelement between<section>tags.Add the
class="centered"attribute to the<section>tag.Back in the CSS file, add
display: inline-block;to theformselector.
Save your CSS code, then refresh the page in the browser. Properly done, your form should now be horizontally centered on the screen. Try changing the
text-alignvalue toleftorrightto see how this affects the view.Commit your work. If you created a remote repository, don’t forget to
pushthe changes up to GitHub.