Assignment: TechJobs (Object-Oriented Edition)
Introduction
Your apprenticeship at LaunchCode is going well! Only a few weeks in and you're regularly making contributions to code that will eventually be used by all LaunchCode staff.
Your last task was to get the controller and view layers in good shape, so now it's time to turn your attention to the Model.
Your mentor on this project is Cheryl, one of the developers at LaunchCode. She regularly mentors developers that are just getting started with their careers.

(If you're interested, you can listen to Cheryl talk about mentorship on the Greater Than Code podcast.)
She's done some initial work on the project and left you some TODOs. After seeing your strong work on your last project, Eliot reported that you've been doing great work, and learning quickly, so the tasks in this project are a notch up from the last in difficulty.
Learning Objectives
In this project, you'll show that you can:
- Read and understand code written by others
- Work with model classes via a data access layer (in this case,
JobData) - Use model binding and validation with model class annotations
TechJobs (Object-Oriented Edition)
Cheryl has gotten the ball rolling in the Model, having added a Job class, along with classes to represent the individual properties of a job: Employer, Location, PositionType, and CoreCompetency. She has also refactored the View and Controller layers to use these new classes. Finally, she has modified the JobData class to properly create Job and related objects when importing data from job_data.csv.
As the team gets closer to hooking the app up to a database - and abandoning the test data they've been using - they'll want an easy way to add new jobs via the user interface.
Your Assignment
You've been tasked with completing a feature that allows new Job objects to be created and added to the system. You'll touch all layers of the application, but you'll be primarily working with model classes to complete this feature.
Getting Started
Set up a local copy of the project:
- Visit the repository page for this project and fork the repository to create a copy under your own GitHub account.
- Open IntelliJ (if IntelliJ is currently open, save your work, close it, and reopen it.)
- If the app opens up to an existing project, select IntelliJ > Preferences > Appearance & Behavior > System Settings and uncheck Reopen last project on startup. Close and Reopen IntelliJ
- From the "Welcome to IntelliJ" dialog box, select Check out from Version Control > GitHub
- Choose your fork from the repository dropdown, select the parent directory where you'd like to store your project, and hit Clone.
- In the screens that follow:
- Choose Create Project From Existing Sources on the first pane
- Select Auto Import in the Gradle configuration pane
- Select defaults on all other panes
Go ahead and start up the application (via the Gradle pane, Tasks > Application > bootRun), so you can refer to both the code as well as the running app while we look at what's in place already.
The Model
The largest amount of new code is in the model. Open up the org.launchcode.models package and you'll see several classes, some of which you'll work with directly, and some of which you won't.
The Job Class
Working with data stored as strings in HashMaps and ArrayLists isn't a good long-term solution, for various reasons that we will discuss momentarily. The Job class introduces an object-oriented design to the application.
It contains all of the fields that you've grown used to while working on TechJobs: name, employer, location, coreCompetency, and positionType. There's also an id field which will be used to uniquely identify Job objects.
The main difference between the object representation of a job and the string-based representation is that the values of employer, location, and the other non-ID fields are no longer strings, but instead are classes of their own.
Job Fields
If you don't have it open already, open the Job class. You'll see the following fields (among others):
private String name;
private Employer employer;
private Location location;
private PositionType positionType;
private CoreCompetency coreCompetency;
Of these, only name is a string. Cheryl has created classes to represent each of the other properties. Each of these classes -- Employer, Location, CoreCompetency, PositionType -- have value and id fields.
If you look at the guts of any of these job property classes, you'll see that they each extend JobField, and don't have any additional properties of their own. We'll customize and add to these classes in a future assignment, but for now we only need to work with their inherited value and id properties.
So, for example, if you had a Job instance, you could get the name of the employer this way:
// job is an instance of Job
String employerName = job.getEmployer().getValue();
Additionally, the toString() method of the JobField class (which these other classes inherit) is set up to return the value field. Thus, using one of these objects in a template, or in another string context like System.out.println, will print the value.
// prints the name of the employer
System.out.println(job.getEmployer);
Why do we go to all of this trouble, when we could store this job-related data as strings? There are a couple of reasons.
Eliminate duplication of data
In our application we'll have multiple jobs that have the same value in a given field. For example, there are multiple jobs with position type "Web - Full Stack", and for several employers, there are several jobs with that employer. Were we to store the values of these fields as strings directly within the Job class, these strings would be repeated in several places across the application.
By using objects, we can have a single PositionType object with value "Web - Full Stack", and then have each job that wants to use that position type hold onto a reference to the given object. Similarly, we can have one Employer object for each employer.
Aside from reducing the amount of raw data / memory that the application uses, this will allow data to be updated more easily and properly. If we need to change the name of an employer (e.g. due to a typo, or a name change at a company), we can change it in one place: the single Employer object that represents that employer.
Enable extension
While the four Job properties represented by objects will primarily be used for their string values, it's not hard to imagine that we would want to add additional properties to them.
For example, it would be useful for an Employer object to have an address, a primary contact, and a list of jobs available at that employer.
For a Location object, it would be useful to have a list of zip codes associated with that location, in order to determine which location an employer or job is located in.
If we were to store these properties as strings, extending and modifying this behavior would be much more complicated and difficult in the future.
There's one more class in models that we need to introduce.
JobFieldType
The JobFieldType class is an enum that enables the view and controller layers to easily ask for data related to a specific job field, or to all fields.
The enum has the values EMPLOYER, LOCATION, POSITION_TYPE, CORE_COMPETENCY, and ALL. These take the place of the "magic strings" that we were using all across our code in the first two iterations of TechJobs. Previously, we would find all employers this way:
ArrayList<string> employers = JobData.findByColumnAndValue("employer", "LaunchCode");Now, however, we can do this:
ArrayList<JobField> employers = jobData.findByColumnAndValue(JobFieldType.EMPLOYER, "LaunchCode");By using enum values instead of strings, we eliminate the possibility of runtime errors. In other words, the compiler will force us to use a valid JobFieldType, whereas if we had misspelled "employer" in the first example, we wouldn't have found out until running our code.
Many of the methods in JobData now work by taking in a JobFieldType parameter rather than a string.
We also use the JobFieldType values to render search and list options in the view, and to collect these options in the controller layer.
The Data Layer
JobData and JobDataImporter
In this updated version, the data access functionality has been moved into its own package, org.launchcode.models.data. This is partly to better organize our code as the application grows, and also to anticipate the move to a database in the near future. Additionally, we've moved the logic to import data from the CSV file into JobDataImporter.
The JobData class has been refactored to work with Job objects, and the objects that a Job has references to (Employer, Location, etc), rather than strings. You won't need to understand the internals of how this works. Instead, you'll need to understand how to use the class.
Rather than having a collection of static methods, JobData now has several instance methods, with usage outlined below. Each controller already has a JobData object set up for you, named jobData.
| Method | Return Type | Description |
|---|---|---|
findById(int) |
Job |
Find a job by its ID |
findByColumnAndValue(JobFieldType, String) |
ArrayList<Job> |
Find all jobs matching the given string in the given column/property |
findByValue(String) |
ArrayList<Job> |
Find all jobs matching the given string in any fields |
Examples:
// Find the job with id 42
Job someJob = jobData.findById(42);

// Find all jobs at LaunchCode
ArrayList<Job> jobsAtLaunchcode =
    jobData.findByColumnAndValue(JobFieldType.EMPLOYER, "LaunchCode");

// Find all jobs involving Ruby
ArrayList<Job> jobsInvolvingRuby = jobData.findByValue("ruby");
To work with the list of Job objects itself, you can do the following:
// Get the full list of jobs
ArrayList<Job> allOfTheJobs = jobData.findAll();

// add a new Job object to the list
jobData.add(newJob);
Additionally, collections of classes that make up the individual properties of a Job object -- Employer, Location, CoreCompetency, PositionType -- are available as properties of JobData. For example, all employers are contained in a property called Employers.
There are two methods that you might want to use here. Here they are:
// Find the employer with id=7
Employer anEmployer = jobData.getEmployers().findById(7);

// Get all employers
ArrayList<Employer> allEmployers = jobData.getEmployers().findAll();
Examples for locations, position types, and core competencies are similar.
The models.forms package
There are two model classes within the org.launchcode.models.forms package. Open up SearchForm and you'll see three fields near the top:
// The search options
private JobFieldType[] fields = JobFieldType.values();

// The selected search options
private JobFieldType searchField = JobFieldType.ALL;

// The search string
private String keyword;
These fields represent the data associated with the search form. In other words, each is necessary to display and process the form. If you look within SearchController, you'll see that we use model binding with a SearchForm object to process the form, and we pass a SearchForm object into the view to display the form.
We do this because there isn't a natural model object to use with the search form, but we'd like to have the benefits of model binding and validation.
Similarly, JobForm contains (some of) the data needed to display and process a form to create a new job. More info on this class is below.
Controllers
You won't be working on search and list functionality in this assignment, but you should know that Cheryl has refactored all of the code in ListController and SearchController to use model classes. While you won't be working in these classes, you'll likely learn something new by reading that code, so we encourage you to dive into those files.
There's one new controller, JobController, that you will work in to enable full creation of a Job object, including all necessary fields.
The View
Previously-existing view templates are still in place, though they've been refactored to use the new model structure.
There are two new view templates in resources/templates/: job-detail.html and new-job.html. You'll be adding code to each of these. The first will be used to display data associated with a single job, while the second will display the form used to create a new job.
Your Tasks
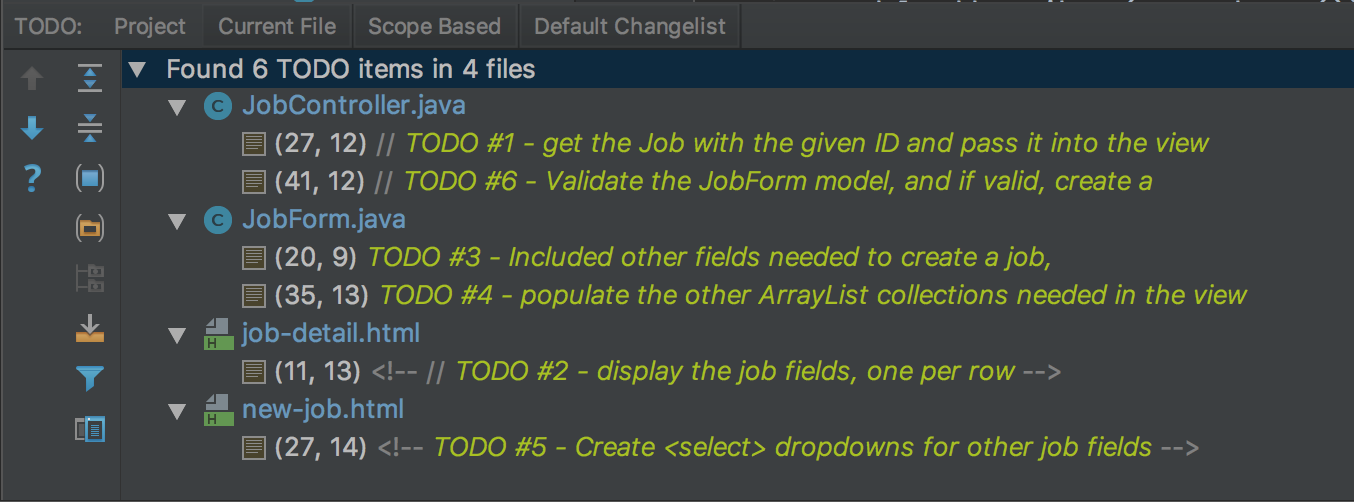
Once you understand the controllers and views that are already in place, you're ready to begin your work. In IntelliJ, select View > Tool Windows > TODO to pop open a small pane at the bottom of the window. This list is populated by any code comments that start with TODO. In particular, you'll see your 6 tasks listed.
As you work on your tasks, refer to the demo app to see how your application should behave.
Display A Single Job
Your first two tasks involve displaying data associated with a single job. When you're done, visiting the URL /job?id=X will display the details of the job with an id equal to X.
Within the index handler method of JobController, you should retrieve the job with the given ID, and then pass it into the view.
Within the job-detail.html template you need to display the properties of the job in a table.
Create New Jobs
Our JobController class and the new-job.html template is set up to allow a user to create new jobs through the interface, but it isn't complete. Getting this to work comprises your next set of tasks.
First, you'll need to work within JobForm to set up the properties to allow for both form display and form submission. Cheryl has put in place the code to display and process the name and the data associated with an employer.
Notice that rather having a field for employer, we have a field for employerId.
@NotNull
private int employerId;
In the user interface (that is, on the web page) we'll only need to display the name of each employer, and when processing the form, we'll use the ID to retrieve the employer from the data layer. Using the ID of an employer is the only way to uniquely identify which employer has been selected in the form, outside the cozy confines of our Java application.
In the JobForm constructor, we initialize the list of Employer objects. Initializing the other lists is up to you.
For tasks #3-5, you'll need to mimic the code that's in place for employerId and the employers list for the other job field types.
Once you have that stuff in place, you'll be ready to process the form in task #6. Validate the form in the add handler of JobController, and if it's valid, create a new Job object and add it to the data layer by calling jobData.add(newJob).
To create the new job, you'll need to find the pre-existing objects for all fields other than name (employer, location, etc). Do this using the methods discussed above. Refer to the constructor in Job to make sure you list the objects in the correct order when calling it.
Once you've created the new job, redirect to the single job display page that you created above. If the jobForm model object fails validation, display the form again.
Once you've knocked that out, you'll be able to create new jobs in the system via the application interface! Note that these job objects won't survive an application restart, because they live only within our in-progress application's temporary data storage system. (This is one difference between how your app will behave compared with our demo app. If you add a new job to our demo app, it will persist.)
Sanity Check
Before submitting, make sure that the following are true of your application:
- You can create a new job from
/job/addby entering the name of a job, and selecting employer, location, skill, and position type values from dropdown selects. - If you leave off the name of a job, you are presented with the form again, and a message describing the error is presented on the page.
- Upon creating a new job, you are sent to a screen displaying the data for only the new job. The URL for this new job is of the form
/job?id=XwhereXis the numeric ID of the new job. - When searching and listing data, your new job shows up when appropriate. For example, you can see the job when searching for it by employer, or by its location, skill, or position type.
Refer to the demo app if you're not sure how thing are supposed to work.
How to Submit
To turn in your assignment and get credit, follow the submission instructions.