22.5. Conditionals in Templates
In addition to loops, we can also include conditionals inside our Jinja3 templates. These evaluate boolean expressions and then add or remove HTML elements to the webpage.
Conditionals come in handy when we need to choose whether or not to display specific content.
22.5.1. if/elif/else Syntax
The general syntax for a Jinja3 conditional is:
1 2 3 | {% if condition %}
<!-- HTML code block -->
{% endif %}
|
Just like in Python, condition is a boolean expression that evaluates to
True or False. If True, then the code block is added to the
webpage. If False, the HTML is NOT generated, and the content stays off the
page.
We can include elif and else clauses to provide more flexibility for our
page design.
1 2 3 4 5 6 7 | {% if condition_1 %}
<!-- HTML code block -->
{% elif condition_2 %}
<!-- Different HTML code block -->
{% else %}
<!-- Third HTML code block -->
{% endif %}
|
Depending on the results of condition_1 and condition_2, one of the
three code blocks will appear on the page. The HTML in each part can be any
length and include any number of elements.
Note
A conditional determines if content is added or removed from a page. This is different from deciding if content should be displayed or hidden.
Hidden content still occupies space on a page and requires some amount of memory. Removed content is absent from the page, requiring neither space nor memory. This is an important point to consider when dealing with things like images or videos.
22.5.2. Try It!
Return to the pizza toppings form. Your next goal is to display the user’s selections after they click Submit. It doesn’t matter if the choices appear below or next to the form.
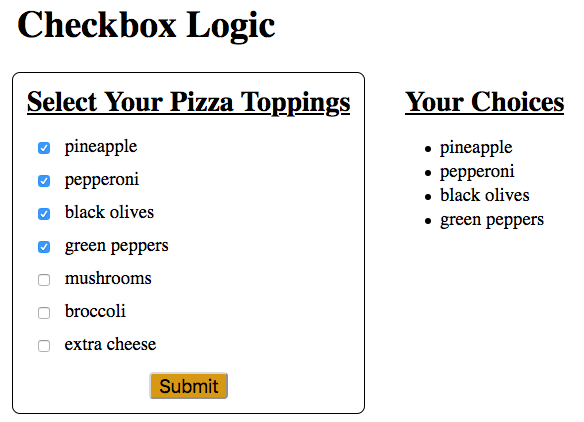
When the page first loads, the Your Choices heading and list should not appear.
Begin with the Python code. Open
main.pyand add statements to collect the user’s toppings and save them to a list.6 7 8 9 10 11 12 13 14 15
@app.route('/', methods=['GET', 'POST'])
def checkbox_form():
   if request.method == 'POST':
      choices = request.form.getlist('toppings')
   else:
      choices = []

   pizza_toppings = ['pineapple', 'pepperoni', 'black olives', 'green peppers',
      'mushrooms', 'broccoli', 'extra cheese']
   return render_template('checkbox_form.html', pizza_toppings=pizza_toppings, choices=choices)
Note the new syntax in line 9. Since the
toppingsinput is a set of checkboxes, it is very likely that the user will select more than one option. The commandrequest.form.getlist('toppings')collects the value from every checked box and adds it as an entry in thechoiceslist.When the page first loads, it does so in response to a
GETrequest. In this case, theelseclause runs, andchoicesis assigned an empty list.Line 13 is outside of the
if/elseblock, so it executes for bothGETandPOSTrequests.
Return to
checkbox_form.html. Right after the form, add a new section to display the user’s topping choices.21 22 23 24 25 26 27 28
<section>
   <h2>Your Choices</h2>
   <ul>
      {% for choice in choices %}
         <li>{{choice}}</li>
      {% endfor %}
   </ul>
</section>
Save your work, then run the Flask application. Test the form to make sure the submission process works. Note how the
Your Choicesheading always shows up on the page.
22.5.2.1. Add the Conditional
The Your Choices heading and list should only appear after the user
submits the form. Make this happen by adding a conditional to the template!
Just above the
<section>tag, add the statement{% if choices|length > 0 %}. Just after the</section>closing tag, finish the conditional with{% endif %}.21 22 23 24 25 26 27 28 29 30
{% if choices|length > 0 %}
   <section>
      <h2>Your Choices</h2>
      <ul>
         {% for choice in choices %}
            <li>{{choice}}</li>
         {% endfor %}
      </ul>
   </section>
{% endif %}
Save, then reload the page. Try submitting the form with one or more boxes checked. Also, submit the form with nothing selected. You should see the heading and list appear, update, or disappear from the screen.
You can also nest conditionals inside each other. Use this to display a different message if the user goes overboard with their number of toppings. Modify your code as follows:
20
21
22
23
24
25
26
27
28
29
30
31
32
33
{% if choices|length > 0 %}
<section>
   <h2>Your Choices</h2>
   {% if choices|length > 4 %}
      <p>Sorry, please choose 4 or fewer toppings.</p>
   {% else %}
      <ul>
         {% for choice in choices %}
            <li>{{choice}}</li>
         {% endfor %}
      </ul>
   {% endif %}
</section>
{% endif %}
Line 23 checks if the user made a reasonable number of topping choices. If they select more than 4, the page displays a warning message instead of the list.
If
choices|length > 4returnsFalse, theYour Choiceslist appears as expected (lines 26 - 30).
Take a moment to save and commit your work.
22.5.3. Check Your Understanding
Examine the following code:
1 2 3 4 5 6 7 8 9 10 11 12 13 14 15 | <section>
<h3>Homework</h3>
<ol>
{% for task in homework %}
<li>{{task}}</li>
{% endfor %}
</ol>
<p>This space intentionally left blank.</p>
</section>
|
Question
Assume we define a homework list to hold the tasks due next class. The
heading should always appear on the webpage. Below that, we want to show our
tasks. If the homework list is empty, the paragraph text should appear
instead.
Where should we put the {% if %} statement to make this happen?
- On line 2
- On line 4
- On line 6
- On line 10
- On line 12
Question
For the same code sample, where should we put the {% else %} statement?
- On line 4
- On line 6
- On line 10
- On line 12
- On line 14
Question
For the same code sample, which of the following shows the correct syntax for
the {% if %} statement? Select ALL of the options that will work.
{% if homework|length > 0 %}{% if homework|length >= 0 %}{% if homework|length != 0 %}{% if len(homework) > 0 %}{% if homework %}