17.7. Local HTML/CSS Files
Visual Studio Code recognizes many different programming languages. We can use the application for our Python projects and our HTML/CSS work.
Let’s build a simple webpage just like we did in the HTML and CSS chapters. However, this time we will do it locally.
17.7.1. Hello, Web
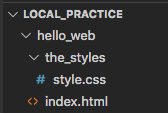
Add a new directory to local_practice called hello_web. Next, create
two files in the directory called index.html and style.css.
Our file tree should look something like this:
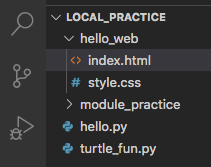
The hello_web directory tree.
Notice that VS Code displays different symbols next to the files. It uses the
.html, .css, and .py extensions to identify the programming
language they contain.
Paste this code into index.html:
1 2 3 4 5 6 7 8 9 10 11 12 | <!DOCTYPE html>
<html>
<head>
<meta charset="utf-8">
<meta name="viewport" content="width=device-width">
<title>Hello, Web!</title>
</head>
<body>
<h1>Hello, Local Webpage!</h1>
</body>
</html>
|
Even though the code only contains a single h1 element inside the
<body> tags, it is still a fully functional HTML file. Let’s see what it
looks like in a browser!
17.7.2. Viewing Local Files in a Browser
There are two ways to view our local HTML file in a browser.
Option 1: Open a web browser. Click on File –> Open File from the menu options. In the box that pops up, navigate to the
.htmlfile we want. Click Open.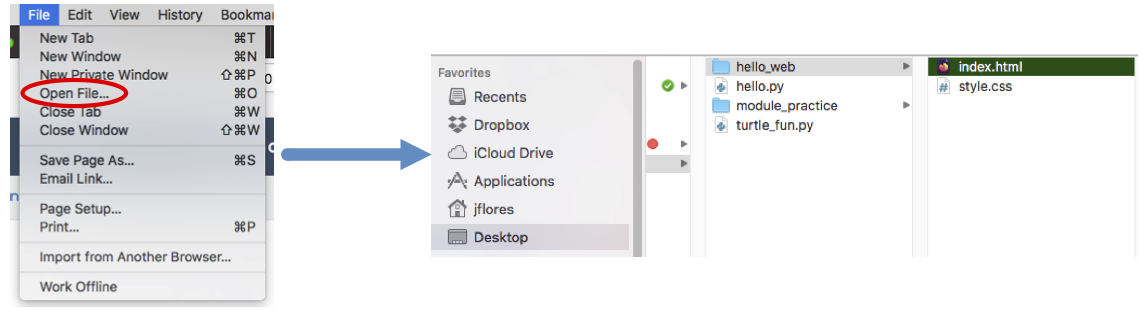
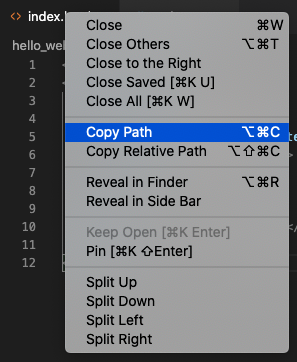
Option 2: In VS Code, right-click on the tab of the file we want. Choose the Copy Path option. Next, open a web browser and paste the path into the address bar.
Ta da! Our webpage appears. Notice the path in the address bar. It looks very
similar to the result we would see from the pwd command in the terminal.
The copied path changes depending on the file chosen.

17.7.2.1. Add More Elements
Return to VS Code and add a few more elements to the
index.htmldocument. Be sure to use some of the semantic HTML we learned earlier.Save your work.
Go back into the browser and refresh the tab for your HTML file. You should see the results of your changes.
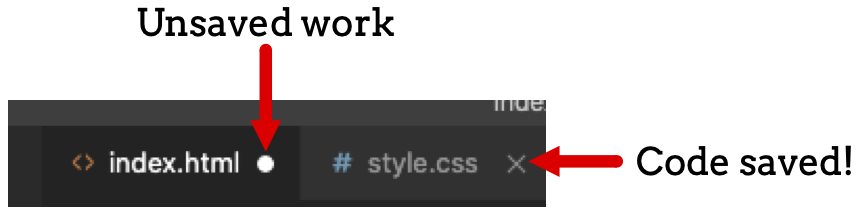
Tip
VS Code has a nice feature to let us know if we have saved our work
recently! In the editor tabs, if we see a solid dot (•) next to a
filename, that means we have unsaved changes in our code. If we see an
X instead, then all of the code in the file has been saved.
17.7.2.2. For Your Eyes Only
Only you can see your local webpage. Looking at the address bar tells us this.
Instead of https://www.etc., we see the file:// prefix. This indicates
that the browser opened a file on your personal machine. No one else in the
world can view your page unless they are looking over your shoulder right now
(or hacked into your device).
Much later in this course, we will learn how to deploy a website and make it visible to anyone who accesses the web.
17.7.3. Adding CSS
Since the index.html and style.css files are in the same directory, we
can link them together by adding one statement to our head element:
3 4 5 6 7 8 | <head>
<meta charset="utf-8">
<meta name="viewport" content="width=device-width">
<title>Hello, Web!</title>
<link rel="stylesheet" type="text/css" href="style.css">
</head>
|
Line 7 uses the identical format to what we learned in the Linking CSS to HTML section.
17.7.3.1. Try It!
Paste this code into the
style.cssfile:1 2 3 4 5 6 7 8 9 10 11 12 13 14 15 16 17 18 19
h1 {
   color: purple;
   text-align: center;
   text-decoration: underline overline wavy;
   font-family: impact, helvetica;
}

section {
   background-color: lightgreen;
   text-align: center;
   font-size: 36px;
   border: solid 2px;
   width: 50%;
}

.shadow {
   color: green;
   text-shadow: 3px 3px 4px blue;
}
Save your work in both the
index.htmlandstyle.cssfiles. Return to the browser and refresh the tab. Properly done, theHello, Local Webpage!heading changed appearance. Also, if you added any<section>elements on the page, they will also look different.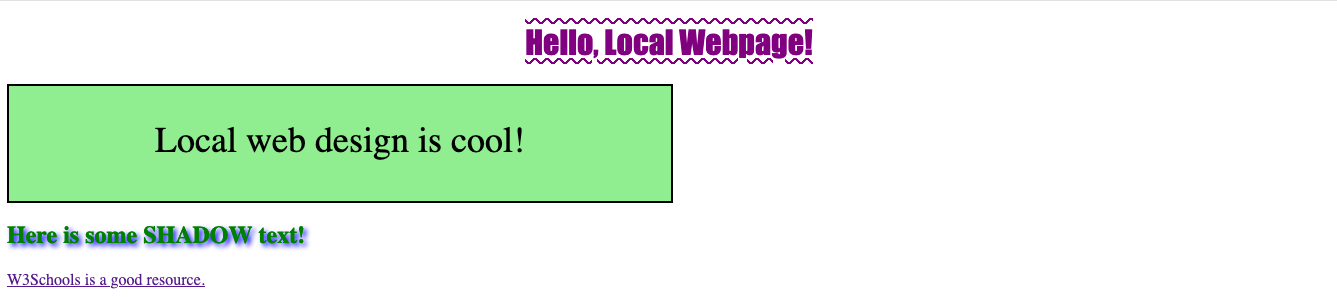
A styled local webpage.
Notice that the CSS code defines a class called
shadow. Add this class inside one of your HTML tags and save your work. Refresh the page in your browser to see the result.Add other style rules to the CSS file to change the appearance of other elements in your webpage. Be sure to practice using element, class, and id selectors.
17.7.3.2. style.css in a Different Directory
If the CSS file is located in a different directory from the HTML page that
uses it, we need to add the proper path inside the <link> tag. Let’s take a
look at three possible cases:
Example
style.css is inside the subfolder the_styles.
When the stylesheet is one level down from our HTML file, update the
href attribute by adding a relative path that points to the CSS file.
<link rel="stylesheet" type="text/css" href="./the_styles/style.css">
The path ./the_styles/style.css tells VS Code, From the current
directory, find the folder called the_styles. Move into that folder and find
the file called style.css.
Example

style.css is inside the parent directory of hello_web.
When the stylesheet is one level up from our HTML file, use the ..
shortcut in the relative path.
<link rel="stylesheet" type="text/css" href="../style.css">
The path ../style.css tells VS Code, From the current directory, move
up one level into the parent folder. Find the file called style.css.
Example
If we pull a stylesheet from a website (like Bootstrap),
use the web address for the href attribute.
<link rel="stylesheet" href="https://websiteURL">
Notice that the external link does not include the type attribute.
Finally, we can always use the full path to the stylesheet. Right click on the
style.css tab and choose the Copy Path option. Paste the path inside the
quotes for the href attribute.
17.7.4. Local Project
In the HTML Me Something assignment, you built and styled your own webpage in repl.it or Trinket. Login to your account now and open up that project.
In VS Code, create a new directory called
html_me.Inside this directory, create an
index.htmlfile.Copy your HTML code from your repl.it/Trinket project and paste it into VS Code.
Repeat this copy/paste process for the
style.cssfile.If your repl.it/Trinket project contains any other files (like images, gifs, etc.), drag and drop copies of these files into the
html_medirectory.Open your new
index.htmlfile in a browser. Properly done, you should see your awesome webpage! However, now you have it saved on your personal device.
17.7.5. Check Your Understanding
Question
Visual Studio Code automatically saves our work.
- True
- False
Question
Visual Studio Code works with other languages besides Python, HTML, and CSS.
- True
- False
Question
After making a change in our HTML or CSS code, how do we see those updates in a web browser?
- Refresh the tab in the browser.
- Save our work in VS Code.
- Save our work in VS Code, then refresh the tab in the browser.
- Refresh the tab in the browser, then save our work in VS Code.