18.5. Merging in Git
Let’s say we branch off of main to work on a new feature for our program.
After some work, debugging, and several commits, we finally get the new code
running (yay). Our next step is to git that code into the main branch of our
program.
We do this by merging two separate branches. A merge takes the files and code from one branch and combines them to the files and code in another. As long as no problems occur, Git will automatically commit the combined files. The two branches become one, with a combined history and Git log. (We’ll talk about the case when problems do occur a bit later).
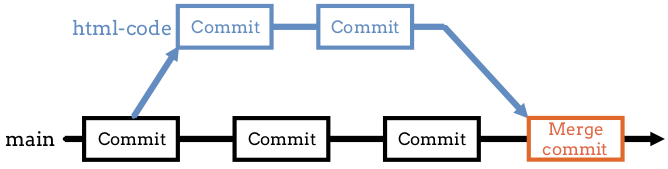
The html-code branch is merged into main.
18.5.1. How to Merge
To combine two branches, we must check a few things first:
Use
git statusto check both branches for uncommitted changes. If found, save them to the repository withgit add .andgit commit -m.Once the line
nothing to commit, working tree cleanappears in thestatusoutput for both branches, they are ready to merge.Use
git checkoutto switch to the branch that will receive the other one. For example, if we want to mergehtml-codeintomain, then we need to switch intomain.
After completing these checks, the terminal syntax for a merge is:
git merge branch-name
This merges branch-name into the current one.
Example
Use the figure at the top of this page as a model. We want to merge the
html-code branch into main.
After we finish the git status checks, the terminal output would look
something like this:
$ git branch
 * html-code
   main
$ git checkout main
Switched to branch 'main'
$ git merge html-code
Updating db231f2..5e43d6f
index.html | 5 ++++-
1 file changed, 4 insertions(+), 1 deletion(-)
The output after the git merge command will vary depending on the
branches involved and how many changes need to be combined.
18.5.2. Try It!
On the previous page, you created a second branch in
the git_practice repository. Let’s merge that branch into main.
In VS Code, use the terminal pane to navigate into the
git_practicefolder.Enter
git branchto see a list of the branches in the repo. This will also indicate the current branch.Use
git checkoutto move intohello-branch.Use
git statusto check for uncommitted changes in the branch. If necessary, add and commit those changes to the repo.Repeat steps 3 and 4 for the
mainbranch.Make sure you are in
main, then entergit merge hello-branchto combine the two branches. Properly done, you should seegreeting.pyappear in the file tree.Enter
git logto see the updated history for the repo. Notice that it includes the commit messages fromhello-branchin addition to one about the merge.
18.5.3. Merge Conflicts
The merge process usually runs smoothly. In the examples above, we changed the code in different files across two branches. These edits were small and didn’t interfere with each other, so the merge was quick.
However, sometimes there is a catch.
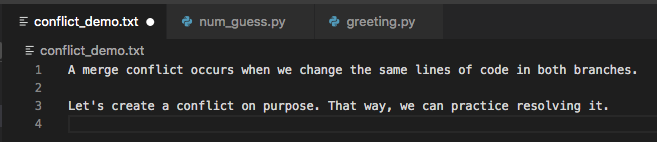
A merge conflict occurs when we change the same lines of code in both branches. Git doesn’t know which change to accept, so it flags the issue in an error message. The programmer must then fix the conflict by deciding which edits to keep and which ones to ignore.
Merge conflicts might sound scary to new Git users. However, after fixing a few conflicts, solving the problems becomes routine. Merge conflicts don’t always happen, but we need to git used to dealing with them when they appear.
Every programmer deals with merge conflicts, and the best way to deal with them is to face them head on. Let’s create a conflict on purpose. That way, we can practice resolving it.
18.5.3.1. Conflict Demo
Let’s return to the main branch in our git_practice repo. Make sure you
have committed all recent changes before diving into the steps below.
18.5.3.1.1. Setup
Add a new file called
conflict_demo.txt. The.txtextension means that this will be a simple text file instead of one that holds active code. For now, there is no need to type anything in the file.Use the usual
status/add/commitprocess to save the text file to the repository.Use
git checkout -bto create a new branch calledmake-conflict.1 2 3 4 5
$ git checkout -b make-conflict
Switched to a new branch 'make-conflict'
$ git branch
* make-conflict
  main
OK. Let’s do some typing in conflict_demo.txt.
18.5.3.1.2. Add Text In Both Branches
Open
conflict_demo.txtin the VS Code editor.Add a few lines of text to the file. It doesn’t matter what you write, as long as it’s school-appropriate.
Save the file, then add and commit the changes to the repo.
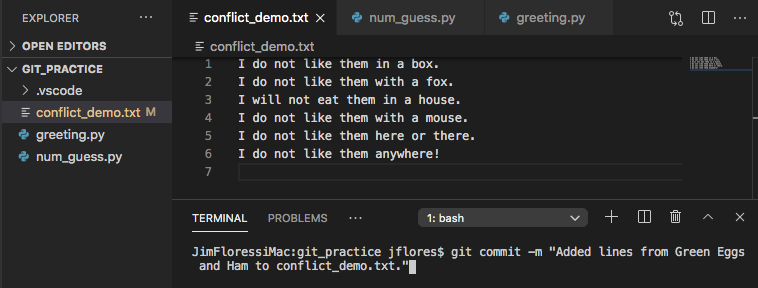
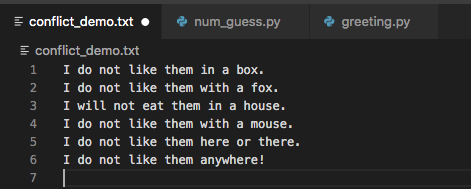
Changes made to
conflict_demo.txtin themake-conflictbranch.¶Use
git checkoutto switch back to themainbranch.Add a few lines of text to
conflict_demo.txt. Make sure these lines are different than the ones you used before. Save and commit the changes to the repo.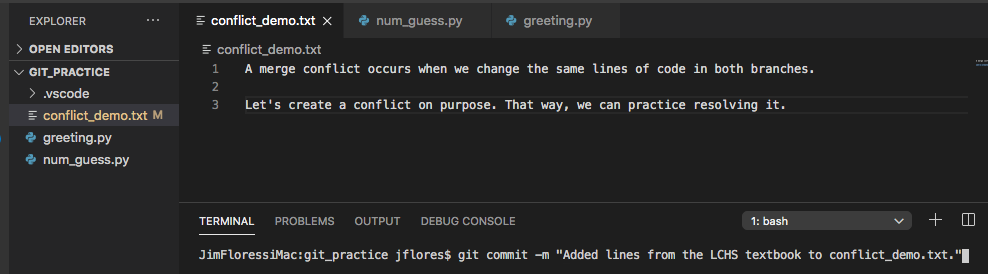
Changes made to
conflict_demo.txtin themainbranch.
18.5.3.1.3. Resolving the Conflict
Try merging the
make-conflictbranch intomain.$ git branch make-conflict * main $ git merge make-conflict Auto-merging conflict_demo.txt CONFLICT (content): Merge conflict in conflict_demo.txt Automatic merge failed; fix conflicts and then commit the result.
The CONFLICT line tells us that Git hit a problem when it tried to merge the changes in the
conflict_demo.txtfile. The last line offers us some encouragement! Although the automatic merge failed, we can still fix things and save the result.Notice that the text in the editor is now highlighted:
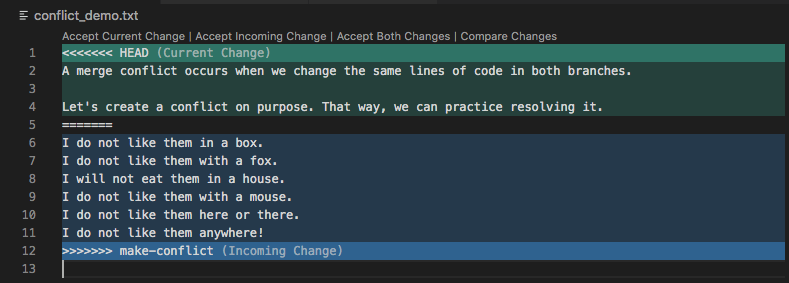
conflict_demo.txtwas changed in both branches.¶The green area points out the changes made in our current branch (
main), and the blue area shows the changes coming in frommake-conflict.Just above the green area, we see several options for resolving the conflict:
Accept Current Change keeps the green highlighted text and ignores the the text coming in from the other branch (the blue content). Clicking on this option causes the result:
Accept Incoming Change keeps the blue highlighted text and uses it to replace the green content. The work from the incoming branch overrides the current one. Clicking on this option causes the result:
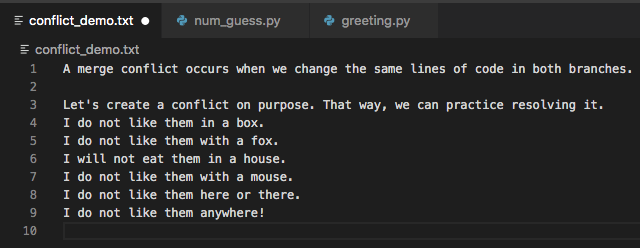
Accept Both Changes combines all of the changes. The incoming content gets inserted just after the existing lines. Clicking on this option causes the result:
Compare Changes sets up a side-by-side comparison of the overlapping lines. You might find this view helpful at times.

Choose one of the
Acceptoptions, then save. Usegit statusto check the state of the branch, thenaddandcommitto the repo.
Congratulations! You just fixed your first merge conflict.
$ git log
commit 47f150deb908f93cc0161fd4bc5f3a4374cb29e3
Merge: ffc3860 2c5619e
Author: Conflict Resolver <[email protected]>
Date:   Thu Oct 29 10:18:47 2020 -0500

   Resolved first merge conflict.
18.5.4. Avoiding Conflicts
Git happens. Merge conflicts will pop up, but they’re not a big deal. Still, the best way to handle them is to try to avoid them in the first place. Here are some tips:
Deal with any uncommitted work before trying to merge.
Try to avoid working on the same file, at the same time, in two different branches.
Try to avoid adding code directly into
main. New ideas should be explored in a different branch first and then merged.
18.5.5. Check Your Understanding
Question
$ git log
  feature
  main
* test
A programmer is on the branch test and wants to merge feature into
main. What should they enter in the terminal? Assume that the status
for all branches is clean.
-
git checkout feature, thengit merge main. -
git checkout main, thengit merge feature. -
git checkout main, thengit merge test. -
git checkout feature, thengit merge test. - Just
git checkout feature.