18.4. Branching Out
What if we want to experiment with a new feature, and we know that we will need to make several commits before it’s done? Similarly, what if two students want to work on different parts of a project at the same time?
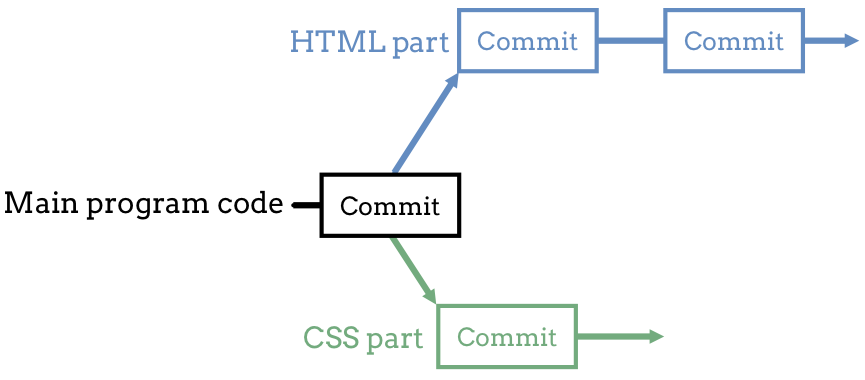
For example, one student could work on some HTML code while their partner completes the CSS. They can both work during class to save themselves some time. However, their commits won’t follow the same path. Each person will have their own version of the Git history for the same project.
Eventually, they will combine their work. What happens if they need to roll back to an earlier commit? With different histories, this becomes complicated.
Unless…
Branches to the rescue.
Not only does Git allow us to store the version history of our project, it also lets us split the development into different paths.
18.4.1. Branching in Git
A Git branch is a separate version of the same main code. Like a branch
on a tree, a branch in Git shares the same trunk as the other limbs. However,
each branch is distinct from all of the others.
With branches, the two students can work on separate versions of the same project. They won’t need to worry about messing up each other’s work every time they want to make a new commit. They share the same base code, but they update their own parts of it. Eventually, they will merge their separate branches back into the main program.
Branches let programmers start, update, store, and test new features for their code without disrupting the main flow of the Git history.
18.4.2. On Branch main
In the previous section, we used git status to
check the state of the git_practice repository. The first line in the
output was On branch main.
1 2 3 4 5 6 7 | $ git status
On branch main
Changes not staged for commit:
(use "git add <file>..." to update what will be committed)
(use "git checkout -- <file>..." to discard changes in working directory)
modified: num_guess.py
|
Note
When we run git init to start a new repo, part of the process creates a
single, default branch. For all of the examples in this book, we refer to
this branch as main.
If your installed version of git gives the default branch a name other
than main, you can rename it with the command:
$ git branch -m old-branch-name main
In this case, old-branch-name becomes main.
Many programmers consider main like the trunk of a tree. They use it to
store and track the central, working part of their code. They use other
branches to experiment with new features and split up work between partners.
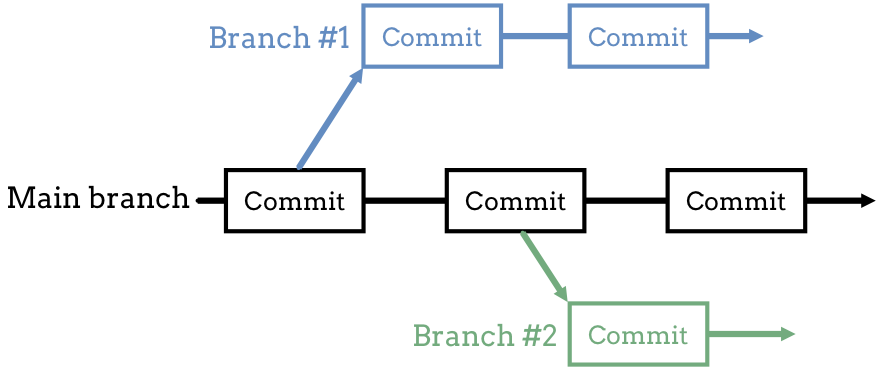
main contains the central, working code for the project. Branches 1 & 2 contain separate copies of the main code.
Tip
Working on a new piece for your project? Do it in a different branch! That way your commits won’t interfere with the working copy of your program.
To see a list of all the active branches in a project, enter git branch in
the terminal.
Try It!
Open VS Code and navigate into the git_practice directory.
1 2 | $ git branch
* main
|
For our git_practice repo, we only have one branch so far. Let’s add
another.
18.4.3. Create a New Branch
To create a new branch, the general terminal syntax is:
git checkout -b branch-name
-b creates a new branch called branch-name, and checkout switches
us into that branch.
Try It!
In VS Code, enter the following commands in the terminal pane. Feel free to think up your own name for the new branch, but it cannot contain any spaces.
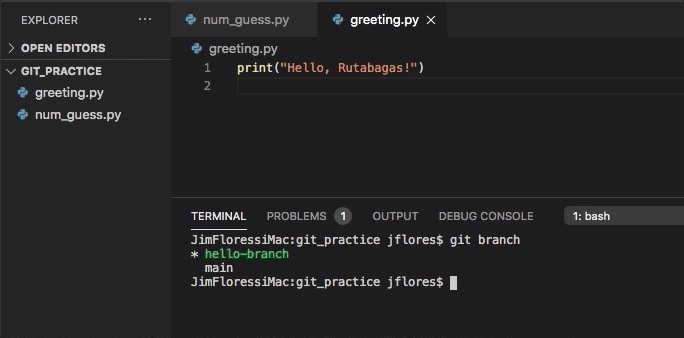
$ git checkout -b hello-branch
Switched to a new branch 'hello-branch'
$ git branch
* hello-branch
  main
Notice that in the list of branch names, the one we are currently on is highlighted with a
*. The name might also appear in a different color.Enter
git loginto the terminal. Notice that the repo history is the same as before. When we createdhello-branch, we split it off ofmainand made a copy of all its code.Add a new file to
git_practicecalledgreeting.py. Inside this Python file, add statements to print a simple, polite greeting.Save and commit your changes. The terminal output will look something like:
$ git status
On branch hello-branch
Untracked files:

   greeting.py

$ git add .
$ git commit -m "Added greeting.py file to the project."
[hello-branch d99e424] Added greeting.py file to the project.
1 file changed, 1 insertion (+)
create mode 100644 greeting.py
Just like before,
git statusidentifies our current branch (hello-branch), and it lists the files that contain changes.Enter
git logagain and notice that there is a new entry at the top of the output.
OK. We created a new branch, added a file, put in some code, and committed all
of those changes to the repository. What’s going on back in main?
18.4.4. Switching Between Branches
Now that git_practice has two different branches, we can switch between
them with the syntax:
git checkout branch-name
Enter git checkout main into the terminal. Pay close attention to the
file tree in VS Code and the greeting.py tab in the editor.
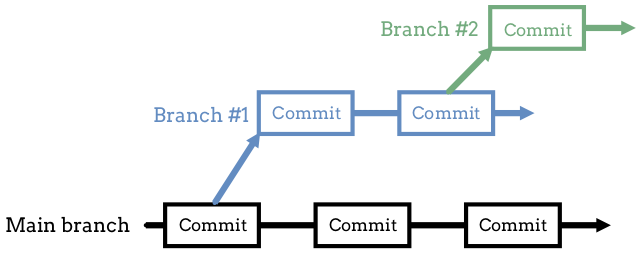
Branches contain different versions of the project files and code.
Notice that greeting.py disappears from the file tree. Also, note that
(deleted) appears in its editor tab.
Fear not! Our work hasn’t gone away. Enter git checkout hello-branch in the
terminal to see the file and its code reappear.
The checkout command switches between branches. When we first made
hello-branch, it was identical to main. However, once we commit some
changes, the two branches no longer match. By flipping back and forth between
them, we call up different versions of our project.
Try It!
Return to the
mainbranch in thegit_practicerepository.Create a new branch off of
main.In the new branch, add some comments to
num_guess.py.Save the changes in VS Code, then use
git status,git add ., andgit commit -mto commit the changes to the repository.Use
git branchto see the list of branches in the repo.Use
git checkoutto switch between the branches. Notice how the file tree and code both update.
18.4.4.1. Uncommitted Work
Usually, switching between branches occurs smoothly. However, Git will block the process if the current branch contains uncommitted work. Even if we saved our code in the editor, Git will return an error message.
Example
Assume we make some changes in hello-branch and then try moving back
to main. We will receive an error message that looks something like:
$ git checkout main
   error: Your local changes to the following files would be overwritten by checkout:

      greeting.py

   Please, commit your changes or stash them before you can switch branches.
   Aborting
Without committing before using checkout, we could easily wipe out any
changes we made in the old branch! Git prevents us from accidentally erasing
our work by forcing us to make a commit before switching branches.
18.4.5. Check Your Understanding
Question
What is a reason for creating a branch in Git?
- To split work between team members.
- To try out a new feature before adding it to the main program.
- To keep the commit history clear and reliable.
- All of the above.
Question
Do you think we can create a branch off of a branch, like this?
- Yes we can, but we should really keep branches only one layer deep.
- No.