20.2. Submitting Forms
Forms collect data from the user. Our first basic web form included two simple
text inputs, one for a Username and one for a Team Name. We can type
whatever we want into the two fields, but that’s it. The form doesn’t actually
send the information anywhere.
As we learned in the HTTP chapter, actions on the web involve a series of requests and responses. When we click on a link or enter a URL in the browser’s address bar, we request a specific page stored on a server somewhere. Data moves from the server to our browser (the client). A form submission, on the other hand, is an HTTP request that contains values collected from a form. In this case, data moves from the client to the server.
To collect the data entered by a user and send it on its way, we need to trigger the form submission.
20.2.1. Submit a Form
Form submission is triggered by clicking a button. This often has a label like
Submit, OK, or Login. Regardless of the label, we call this a submit
button. We add it to our forms one of two ways:
Using a separate
inputelement with thetype="submit"attribute.Using a
buttonelement.
Each of these methods is shown in the box below.
Example
Here is our basic form again, but this time we added two buttons inside the element.
13 14 15 16 17 18 19 20 | <form>
<label>Username <input type="text" name="username"/></label><br>
<label>Team Name <input type="text" name="team"/></label>
<!-- clicking either of these will cause a form submission -->
<input type="submit"/>
<br>
<button>Login</button>
</form>
|
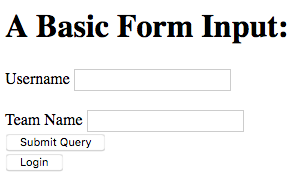
Adding two buttons to our basic form.
Note that the <input type="submit"/> syntax automatically adds the words
Submit Query inside the button. To change the text, we add the
value="button-text" attribute inside the tag and replace button-text
with the label we want.
The <button> element has no default value. The text we put between the
tags appears inside. If we leave this out, an empty button appears with
the form.
We only need one button in our form, but we used both here just to see the
HTML code for each option. Note that without the <br> element on line
18, the two buttons would appear side by side.
20.2.1.1. Try It!
In Visual Studio Code, open the
index.htmlfile that contains your form.Select one of the button options and add the new element to your HTML code. Make the text inside the button say something other than
Submit QueryorLogin.Save your work.
Open the
index.htmlfile in your browser.Type something into each input field, then click the button. Pay attention to what happens inside the address bar of your browser.
Did you catch the change? Try it again, but this time enter Bob for the
username and Python for the team.
When you first loaded your form, the URL probably looked something like this:
file:///username/Desktop/local_practice/forms_chapter/index.html
After filling in the input boxes and submitting the form, the address changes to something like:
file:///username/Desktop/local_practice/forms_chapter/index.html?username=Bob&team=Python
Let’s explore why this happens.
20.2.2. Taking action
When a form is submitted, an HTTP request is sent to a server. However, we need
to identify where to send the data. To do this, we must include an attribute
inside the <form> tag, and this attribute is called action.
We will learn more about using action later. For now, recognize that when
the attribute is missing or empty, the form submits all of the collected data
to the current URL. This is why we saw a change in the address bar after we
clicked Submit.
The start of the new address matches the old one. However, it also contains
some extra information. The URL now includes a query string
after the ? in the address. The query string is made up of separate
query parameters, which contain the data collected from each input in the
form.
For example, the query string ?username=Bob&team=Python contains two
parameters. The first indicates that Bob was collected from the
username input. The second shows us that Python was entered in the
team field.
Note
Since spaces are not allowed in URLs, the browser replaces them with +.
Try it! Submit the form again, but type several words into one of the input boxes.
20.2.2.1. Key/Value Pairs
When a form is submitted, a key/value pair is created for each input field. The
keys match the name attributes used in the input tags. The values
match the data entered into each box of the form.
Example
Let’s take a close look at the HTML code for our form as well as the query string from the URL.
HTML Code:
14 15 | <label>Username <input type="text" name="username"/></label><br>
<label>Team Name <input type="text" name="team"/></label>
|
URL After Submit:
file:///username/Desktop/local_practice/forms_chapter/index.html?username=Bob&team=Python
Line 14 in the HTML gives us the first key in the query string,
username. The value assigned to that key is whatever we typed into
that input box (Bob, in this case).
The second key, team, comes from the name attribute in line 15. The
second value is Python, or whatever else we typed into the field before
submitting the form.
When we submit a form, the HTTP request always contains a set of key/value pairs. This data gets transmitted to the server, which does something with the information.
20.2.3. Submitting Passwords
What about entering a password into an input box? Obviously, we don’t want our super-secret code to appear on the webpage for anyone to see.

It’s hard enough thinking up a good password. Don’t just give yours away!
Fortunately, the most recent versions of HTML include a special input type to deal with this exact situation.
Try It!
Return to your form in
index.html. Save and commit your work before moving on.Modify the
formelement to include only one input field and a single button:13 14 15 16 17 18
<form>
   <label for="pass-code">Password: </label>
   <input id="pass-code" name="login" type="text"/>
   <br>
   <button>Login</button>
</form>
Save your work, then open
index.htmlin your browser.Note that anything you type into the input appears as plain text. This is NEVER a good idea when dealing with passwords. To fix this, change the
type="text"attribute totype="password".Save the change, then refresh the page in your browser. Now what do you see as you type in the input box?
By changing the
typein theinputtag, we hide what the user enters in the field!
HOWEVER…
Enter a simple string of characters into your form and click Login. Now check the updated URL.
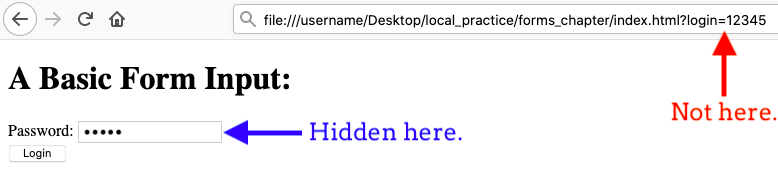
Yikes! There’s a password in the address bar.
Even though your password was hidden inside the form, it appears as plain text in the URL after submitting. We need to fix this. Even if nobody is looking over your shoulder to see the URL, it is possible to intercept an HTTP request on its way to the server. If that happens, someone could capture your password.
The reason the password appears in the address bar is due to another default
setting. When we submit a form, it automatically creates a GET request,
which adds the query string to the URL.
In the next section, we will learn how to submit a form with a POST
request. Unlike GET, POST hides form data.
20.2.4. Check Your Understanding
Question
What must be added to a form element in order to submit the collected
data?
- A
nameattribute. - A button.
- An
actionattribute. - A POST request.
Question
By default, are HTTP forms submitted as GET or POST requests?
-
GET -
POST