20.3. POST Form Submission
Data submitted by GET requests is less secure, because the URLs and the
query parameters are saved in the browser’s history. This makes sensitive data
easy to find.
Instead of using GET to submit form data, we should use POST. Data
submitted with POST gets sent in the body of the HTTP request. This
prevents the data from appearing in the address bar of the browser.
To submit using a POST request, we need to add the method attribute
inside the <form> tag:
<form method="POST">
Try It
Return to your
index.htmlfile and update the<form>tag.13 14 15 16 17 18
<form method="POST">
   <label for="pass-code">Password: </label>
   <input id="pass-code" name="login" type="text"/>
   <br>
   <button>Login</button>
</form>
Save the change, then refresh the page in your browser. Make sure you see a URL in the address bar without any query string. If one appears after the refresh, just delete that part of the address and hit Enter.
Type in some characters into the Password field, then click Login.
Properly done, the URL in the address bar no longer spoils your secrecy!
20.3.1. Send Data to a Server
The method attribute lets us choose the type of request to make when our
form gets submitted. However, our code still doesn’t send the data anywhere.
Let’s fix this.
The action attribute allows us to choose where the form request will be
sent. Usually, the value assigned to action is the address of the target
server.
<form action="URL-of-server" method="POST">
Once the server receives a form request, it processes the information and sends a response back to the client. How the server responds is determined by its own operating code. For example, it could send back a webpage showing the user their email inbox, or it could send back a warning that they entered the wrong password.
Form handlers are blocks of code on a server. These control the actions
that receive, inspect, and process requests. For the example below, we will use
a LaunchCode server and set of simple handlers. The server will collect and
spit back the data received from a form. This allows us to practice using the
the action attribute without getting too deep into the weeds.
Try It!
Update your code to send a POST request to an external server. The
response will send back a new HTML page that displays the key/value pairs
collected from your form.
Take a moment to save and commit the work you’ve done in the
forms_chapterrepository.In
index.html, add theactionattribute inside the<form>tag. Assign it the URLhttps://handlers.education.launchcode.org/request-parrot.<form action="https://handlers.education.launchcode.org/request-parrot" method="POST">
Inside the
formelement, include at least threeinputelements, with labels. At least oneinputshould usetype="password".Include a submit button called Send to Parrot. Why Parrot? Because all the server does is send the form data back to us, just like a parrot repeats what it hears.
Save your work for
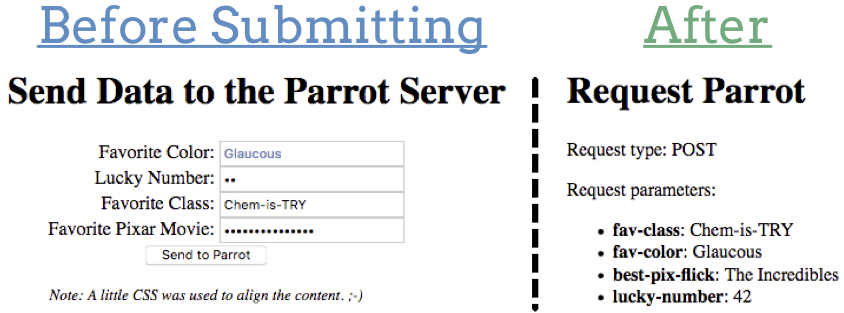
index.html, then refresh its page in your browser. Fill in each of the input fields and submit the form. An example of the form and response is shown below:
On left: Form before submitting. On right: The HTML page sent in the server’s response.
Use the Back button to return to your form. Feel free to edit your HTML to change the number, type, or names of the input fields.
20.3.2. Security and POST
Using POST for form submissions is better than GET. However, POST
only adds a small amount of extra safety. An even better option is to combine
POST with HTTPS instead of HTTP.
HTTPS adds a much higher level of security, since it encrypts a request
before sending it out.
Unfortunately, setting up HTTPS is beyond the scope of this class.
20.3.3. Check Your Understanding
Question
What attribute inside the <form> tag determines if the data is submitted
with GET or POST?
-
action -
type -
submit -
method
Question
What attribute inside the <form> tag determines where the request is
sent?
-
action -
type -
submit -
method
