20.5. Checkboxes and Radio Buttons
The type examples on the previous page all involved some form of text
input. However, the attribute also provides other options for collecting data
from the user.
For example:
Checkboxes |
Radio Buttons |
Select Menu |
|---|---|---|
Select any number of options. Boxes can be checked or unchecked by clicking in the box or on the label. |
Only one choice per group is allowed. Once selected, a radio button CANNOT be unchecked by clicking on it again. (More on this below). |
A drop-down menu that allows the selection of at least one item. |
Let’s explore what we can do with each of these non-text inputs. We will start with checkboxes and radio buttons, and then explore select inputs on the next page.
20.5.1. Checkboxes
A checkbox input gives the user a single box to click. Checkboxes can be used
by themselves or in groups. For clarity and ease of use, each one should be
paired with its own label element.
The general syntax is:
<input type="checkbox" name="..." />
When a form is submitted, a key/value pair is sent for every clicked
checkbox. The key is the same as the name attribute, and the default value
is on.
Example
Let’s use the Parrot Server again to see the data received from a set of
checkboxes. Note that each input element has its own name.
1 2 3 4 5 6 | <form action="https://handlers.education.launchcode.org/request-parrot" method="POST">
<label><input type="checkbox" name="red"/> Red</label><br>
<label><input type="checkbox" name="green"/> Green</label><br>
<label><input type="checkbox" name="blue"/> Blue</label><br>
<button>Send to Parrot</button>
</form>
|
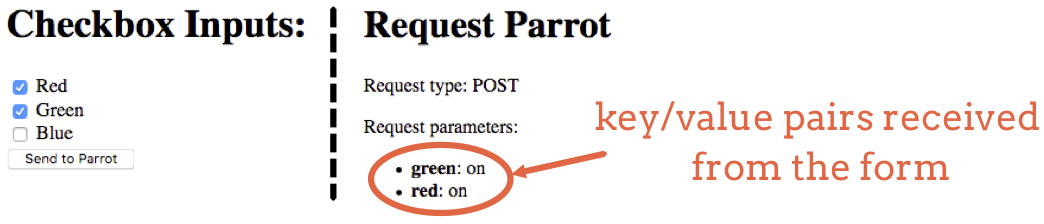
Checking a box assigns the value on to the name of the input element.
If we want a checkbox to stand for something other than on, we can include
the value attribute inside the input tag.
<input type="checkbox" name="..." value="value-when-checked" />
Example
We’ve added value attributes to each input tag. Note that we also
changed the name for each element.
1 2 3 4 5 6 | <form action="https://handlers.education.launchcode.org/request-parrot" method="POST">
<label><input type="checkbox" name="option_1" value="red"/> Red</label><br>
<label><input type="checkbox" name="option_2" value="green"/> Green</label><br>
<label><input type="checkbox" name="option_3" value="blue"/> Blue</label><br>
<button>Send to Parrot</button>
</form>
|
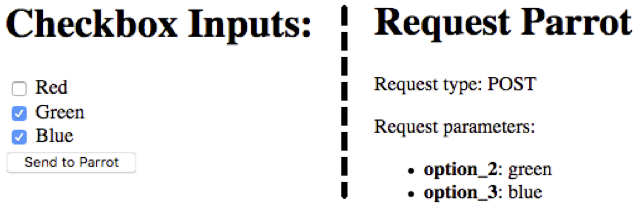
The value attribute lets us choose what gets assigned to the key.
20.5.1.1. Same vs. Different name
In the examples above, each input element had a different name
attribute. Let’s see what happens when we give all the checkboxes in a group
the same name:
Example
Each of the input elements in this form is named colors. When
submitted, the form will assign all of the selected values to that key.
1 2 3 4 5 6 | <form action="https://handlers.education.launchcode.org/request-parrot" method="POST">
<label><input type="checkbox" name="colors" value="red"/> Red</label><br>
<label><input type="checkbox" name="colors" value="green"/> Green</label><br>
<label><input type="checkbox" name="colors" value="blue"/> Blue</label><br>
<button>Send to Parrot</button>
</form>
|
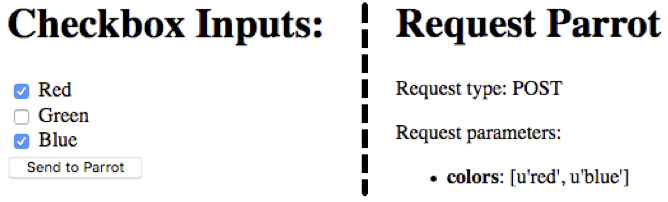
Multiple checkboxes contribute to a single key/value pair.
Note that the value assigned to the colors key is a list containing
the individual values of the clicked checkboxes.
When we give a set of checkbox inputs the same name, each one contributes
to a single key. In this case, we have a single colors key that accepts
the results from the entire set of boxes.
Try It!
Return to your local index.html form.
Save and commit your previous work to the repository.
Use
git checkout -bto make a branch off ofmain. Call itcheckboxes.In this new branch, modify your form to use at least three checkboxes.
Experiment with the
nameandvalueattributes to see how they behave.
20.5.2. Radio Buttons
Radio buttons appear as small circles instead of boxes. They allow a user to
pick one option from a group of choices. Only one radio input in a group can be
chosen at a time. The value attribute for that input will be submitted with
the form. Just like with checkboxes, every radio input should have its own
<label> tags.
The general syntax is:
<input type="radio" name="..." value="value-when-selected"/>
To make a radio group work, all of the input elements must have the same
name attribute.
Example
Let’s convert the color checkboxes to a set of radio buttons. We do this by
updating the type and name attributes in each <input> tag.
1 2 3 4 5 6 | <form action="https://handlers.education.launchcode.org/request-parrot" method="POST">
<label><input type="radio" name="color" value="red"/> Red</label><br>
<label><input type="radio" name="color" value="green"/> Green</label><br>
<label><input type="radio" name="color" value="blue"/> Blue</label><br>
<button>Send to Parrot</button>
</form>
|
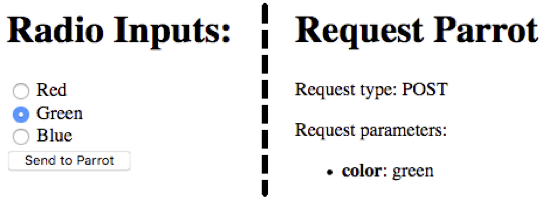
The selected radio input sets the value for the color key.
20.5.2.1. Unselecting a Radio Button
Take a look at the checkbox and radio options below. Try selecting and then unselecting each one to see a key difference between the two input types.
Hmmm. Once we click the radio input, there is no quick way to undo that choice.
Depending on the browser settings, refreshing the page may or may not clear the
button. Try it. If that doesn’t work, try a hard refresh by pressing
control+shift+R on the keyboard (command+shift+R on a Mac).
How to we clear a radio input without refreshing the page? The quick answer is, we can’t. Once a user clicks a radio button in a group, one of the options WILL be submitted with the form. The only way to avoid this is to not click any of the choices in the first place, but that defeats the whole purpose of the form.
The longer answer involves the user experience. It IS possible to clear a radio group, but doing so is not straightforward. One option is to do a hard refresh, but this clears the entire form. The user would have to fill in their answers all over again, which is annoying. Other options involve hacking into the form HTML inside the browser. As good web developers, we shouldn’t create a situation where our users need to do this.
For a radio group, the best approach is to avoid the need to undo a choice. We will revisit this idea later in the chapter. For now, here is one easy, excellent tip:
Tip
In a radio group, ALWAYS include some kind of No Choice option. This gives the user an escape route if they don’t like any of the other options.
Try It!
Return to your local index.html form.
Save and commit the work in the
checkboxesbranch.Return to
mainand checkout a new branch calledradio.In the new branch, modify your form to include at least three radio inputs.
Submit your form to the parrot server to see how the data gets reported.
What happens if you submit the form without clicking any of the radio buttons?
What happens if you give each radio input a different
nameattribute?
20.5.3. Check Your Understanding
Question
What is the default value submitted when a checkbox is selected?
-
on -
off -
True -
False
Question
True or False: A group of radio inputs should have different values for
their name attributes.
- True
- False