In this chapter, you learned about the Angular file structure, templates, and components. Over the next three classes, you will build a Mission Planning Dashboard using your Angular skills.
A useful and common front end application is a dashboard. It shows a summary of information about a topic, helping users of the web app make informed decisions.
You will create a Space Mission Planning Dashboard.
Launch Visual Studio Code. If you created an angular_practice folder earlier in
the chapter, use the File menu to open it. If you did not create a practice
folder, make one!
Open a terminal at the root of your angular_practice folder.
Create a new Angular project by running ng new angular-studio-part1.
$ ng new angular-studio-part1
? Would you like to add Angular routing? No
? Which stylesheet format would you like to use? CSS
When the process finishes, use the File menu to open angular-studio-part1
in VS Code.
In the terminal, use pwd to check your position in the file tree. If necessary,
navigate into the angular-studio-part1 directory.
Install dependencies by running npm install
Verify that the application will run by running ng serve
View the site in your browser at http://localhost:4200
Stage and commit the files before starting on the features.
Tip
You will likely still have ng serve running in your terminal. You can
stop ng serve by pressing the keys "control+c", or you can open an
additional terminal window to run the git commands.
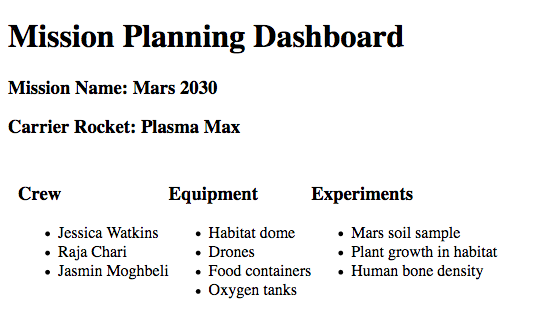
The mission dashboard you are creating will eventually look like this.
The default stater page created by Angular contains default text, images, and links. Your job is to remove the default content.
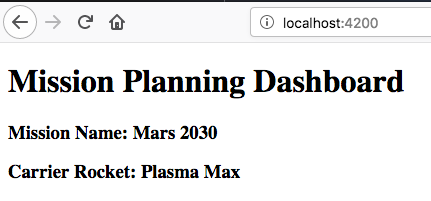
app.component.html.Add components here... into app.component.html.ng serve if it's not already running.You need to create a component that shows the title, mission name, and carrier rocket.
src/app folder.ng g component header.header.component.html add HTML:1<h1>Mission Planning Dashboard</h1>
2<h3>Mission Name: {{ missionName }}</h3>
3<h3>Carrier Rocket: {{ rocketName }}</h3>
missionName and rocketName to the header component in header.component.tsexport class HeaderComponent implements OnInit {
missionName: string = "Mars 2030";
rocketName: string = "Plasma Max";
app.component.html.<app-header></app-header>
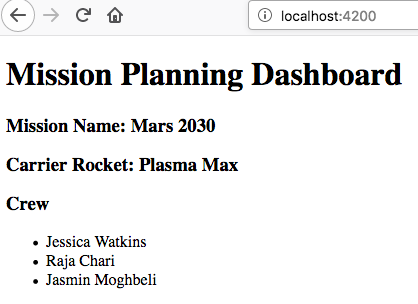
Next you need to make a component to show a list of crew members.
Create the component by running ng g component crew.
Set the contents of crew.component.html to be:
1<h3>Crew</h3>
2<ul>
3   <li>Jessica Watkins</li>
4   <li>Raja Chari</li>
5   <li>Jasmin Moghbeli</li>
6</ul>
Add a reference to the header component in app.component.html.
<app-header></app-header>
<app-crew></app-crew>
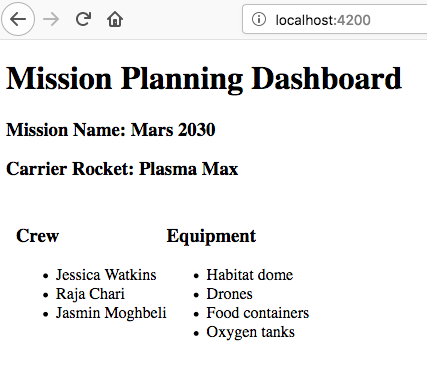
Now you need to create a component to show a list of equipment.
Create an equipment component named equipment.
The component should display the following:
<h3> that contains "Equipment"<ul> that contains <li> for: Habitat dome, Drones, Food containers, Oxygen tanksAdd the equipment component to app.component.html using the HTML below. Notice the <div> surrounding the crew and equipment components.
1<app-header></app-header>
2<div class="box">
3   <app-crew></app-crew>
4   <app-equipment></app-equipment>
5</div>
Add CSS to file app.component.css to horizontally align the crew and equipment lists. Without this CSS, the equipment list will appear below the crew list.
1.box {
2   display: flex;
3   padding: 10px;
4}
Note
A full explanation of display: flex; is beyond the scope of this book. For more information
see MDN flex box docs
and CSS Tricks flex box guide.
Finally, add an experiments component that contains the HTML below:
1<h3>Experiments</h3>
2<ul>
3   <li>Mars soil sample</li>
4   <li>Plant growth in habitat</li>
5   <li>Human bone density</li>
6</ul>
Make the list of experiments show up to the right of equipment list.
When done your dashboard should look like this:
Be sure to stage and commit your changes!
You will make different versions of the mission planning dashboard in the next two studios.
crew.component.ts add crew: string[] = ["Jessica Watkins", "Raja Chari", "Jasmin Moghbeli"];crew.component.html use references like <li>{{crew[0]}}</li> to
display the crew names.