20.6. Test-Driven Development
Now that we know more about unit testing, we are going to learn a new way of using them. Unit testing can easily be added to existing code, but what if you could build tests to verify functionality of code that doesn’t exist yet. This may sound odd, but this process has many benefits as we will learn.
As the name sounds, Test-driven development (TDD) is a software development process where the unit tests are written first. However, that doesn’t tell the entire story. Writing the tests first and intentionally thinking more about the code design leads to better code. The name comes from the idea of the tests driving the development process.
Before we can start using TDD, we need a list of discrete features that can be turned into unit tests. This will help keep our tests focused on specific functionality which should lead to code that is easy to read. Along the way we will build confidence as we add features.
Note
TDD is a process that some organizations choose to use. Using the TDD process is not required when using unit tests.
20.6.1. The Test/Code Cycle
With TDD you start with the unit test first. Each test must clearly describe the behavior it is testing.
Example
Example test case for our Car project:
We want each Car object to have 4 wheels.
Because the test is for a feature that does NOT exist yet, we need to think about how the feature will be implemented. This is the time to ask questions like: Should we add a new property? What about an entirely new constructor? Where would this data best work within our code?
Example
How could we implement our test case? Remember we aren’t writing the code yet, only thinking about the design.
With the design in mind, write the unit test as if the property you imagined already
exists. This may seem a bit odd, but considering how the new code will be used
helps find bugs and flaws earlier. We also have to use test utilities such as
Assert.AreEqual to clearly demonstrate that the proposed new code
functions properly.
Next, type out the ideas into an actual test. In this example, the test references a property that has not been created yet. In this instance, the test is expecting an int value of 4.
Example
In the Car class add the following:
10 11 12 13 14 | public double MilesPerGallon { get; set; }
public double Odometer { get; set; } = 0;
public int NumberOfWheels;
//added property only. No other code added to this class at this time.
|
In the CarTest class, add the following:
20 21 22 23 24 25 | [TestMethod]
public void TestNumberOfWheels()
{
Car test_car = new Car("Toyota", "Prius", 10, 50);
Assert.AreEqual(4, test_car.NumberOfWheels);
}
|
Note: We added the property to the Car class, but no code about where it will be used, or how it will be implemented yet. Think of this as a placeholder, that you will update as we move forward.
Now run the test! The test should fail (or not compile at all) because you have referenced code that does not exist yet.
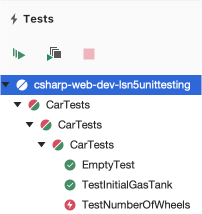
Failed the NumberOfWheels test. Let’s refactor our code.
Finally, write code to pass the new test. In the earlier chapters, this is where you started, but with TDD writing new code is the last step.
To make the new test pass, we will need to update our Car class in a few places. First, we have the property, but how would it used in the program? Let’s implement this property when we create a Car object.
Example
- In the Car class
10
11
12
public double MilesPerGallon { get; set; }
public double Odometer { get; set; } = 0;
public int NumberOfWheels { get; set; }
Now that we have updated the Car properties, we should look at our constructor.
Add NumberOfWheels to the constructor.
Example
- In the Car class, added
numberOfWheelsto the constructor 13 14 15 16 17 18 19 20 21 22
public Car(string make, string model, int gasTankSize, double milesPerGallon, int numberOfWheels)
{
   Make = make;
   Model = model;
   GasTankSize = gasTankSize;
   // Gas tank level defaults to a full tank
   GasTankLevel = gasTankSize;
   MilesPerGallon = milesPerGallon;
   NumberOfWheels = numberOfWheels;  //<-- added NumberOfWheels here
}
Once you have updated your constructor, you will need to update your Car objects
by adding an int for number of wheels.
You will most likely see some red squiggles under your new Car objects.
Example
20 21 22 23 24 25 26 27 | //within the CarTests class
[TestMethod]
public void TestNumberOfWheels()
{
Car test_car = new Car("Toyota", "Prius", 10, 50, 4);
Assert.AreEqual(4, test_car.NumberOfWheels);
}
|
Notice: The values within the new Car object in line 25.
Now when you run your tests, they should all pass. Great job!
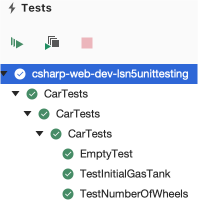
All green! All tests passed!
Coding this way builds confidence in your work. No matter how large your code base may get, you know that each part has a test to validate its functionality.
Now that we have one passing test for our Car class, we could confidently move on to writing tests and code for any other remaining features.