30.6. Events Can Call Functions
For the user input practice, we set the keyup and click events equal to
true. This just checks to see if these events occur. When they do, the
input is stored in newMovie, and the page refreshes.
To perform more complicated tasks in response to the user's actions, we can call a function when an event occurs. The syntax for this is:
(event) = "functionName(arguments...)"
Changing the movie list displayed on the web page requires us to modify the
movies array in the movie-list.component.ts file. We will do this by
creating an addMovie function and linking it to our event handlers.
30.6.1. Modify the HTML
Let's change our code in movie-list.component.html to call the function
addMovie and pass the new movie title as the argument.
On lines 7 and 8, replace
truewith the function call:1 2 3 4 5 6 7 8 9 10
<div class='movies col-4'> <h3>Movies to Watch</h3> <ol> <li *ngFor ="let movie of movies">{{movie}}</li> </ol> <hr> <input #newMovie (keyup.enter)='addMovie(newMovie.value)' type='text' placeholder="Enter Movie Title Here"/> <button (click)='addMovie(newMovie.value)'>Add</button> <p>{{newMovie.value}}</p> </div>
Now when the user taps "Enter" or clicks the "Add" button after typing, the input
newMovie.valuegets sent to the function.Since our plan is to use a function to add the new movie to the array, we no longer need the title to appear below the input box. Remove
<p>{{newMovie.value}}</p>from line 9.
30.6.2. Define the Function
Open movie-list.component.ts and examine the code:
1 2 3 4 5 6 7 8 9 10 11 12 13 14 15 | import { Component, OnInit } from '@angular/core';
@Component({
selector: 'movie-list',
templateUrl: './movie-list.component.html',
styleUrls: ['./movie-list.component.css']
})
export class MovieListComponent implements OnInit {
movies = ['Toy Story', 'The Shining', 'Sleepless in Seattle', 'The Martian'];
constructor() { }
ngOnInit() {
}
}
|
The movies array stores the titles displayed on the web page, and we want to
update this when the user supplies new information.
Declare a function called
addMoviethat takes one parameter:1 2 3 4 5 6 7 8 9 10 11 12
export class MovieListComponent implements OnInit {
   movies = ['Toy Story', 'The Shining', 'Sleepless in Seattle', 'The Martian'];

   constructor() { }

   ngOnInit() {
   }

   addMovie (newTitle: string) {

   }
}
Notice that we have to declare the data type for the
newTitleparameter.Now add code to
pushthe new title to themoviesarray:1 2 3 4 5 6 7 8 9 10 11 12
export class MovieListComponent implements OnInit {
   movies = ['Toy Story', 'The Shining', 'Sleepless in Seattle', 'The Martian'];

   constructor() { }

   ngOnInit() {
   }

   addMovie (newTitle: string) {
      this.movies.push(newTitle);
   }
}
The keyword
thisis required.
Note
It is a common practice to put constructor and functions like
ngOnInit AFTER the variable declarations but BEFORE any custom
functions.
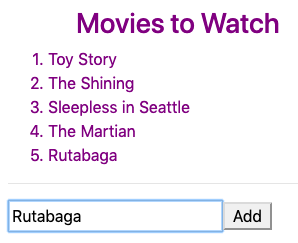
Save the changes and then refresh the page. Enter a new title to verify that it appears in the movie list. Your page should look something like:

30.6.3. Tidying Up the Display
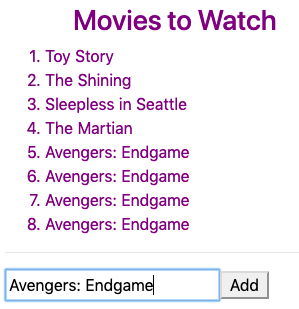
Notice that after adding a new movie to the list, the text remains in the input box. If we click "Add" multiple times in a row, we would see something like:

Let's modify the code to try to prevent this from happening.
30.6.3.1. Clear the Input Box
After the user submits a new title, we can clear the input box by setting its value to be the empty string (
''). Openmovie-list.component.htmland modify the input statement as follows:<input #newMovie (keyup.enter)="addMovie(newMovie.value); newMovie.value = ''" type="text" placeholder="Enter Movie Title Here"/>
When
keyup.enteroccurs, the code callsaddMovie. Once control returns from the function,newMovie.valueis set equal to'', which clears any text from the input box.Since the user can also click the "Add" button to submit a title, we need to modify the
<button>element as well:<button (click)="addMovie(newMovie.value); newMovie.value = ''">Add</button>
Now
newMovie.valueis set equal to'', when "Enter" or "Add" are used to submit data.
Try It
Refresh the page and verify that the input box gets cleared after each new title.
30.6.3.2. Check for Duplicates
Even though we clear the input box, there is nothing to prevent the user from entering the same movie multiple times. While some fans may want to watch a film twenty times in a row, let's have our code prevent repeats.
Recall that the includes method checks if an array contains a particular element. The method gives us several ways to check for a repeated title. One possibility is:
1 2 3 4 5 | addMovie (newTitle: string) {
if(!this.movies.includes(newTitle)){
this.movies.push(newTitle);
}
}
|
If the movies array already contains newTitle, then the includes
method returns true. The NOT operator (!) flips the result to
false, and line 3 is skipped.
Try It
Refresh the page and verify that you cannot enter a duplicate title.
30.6.4. Bonus
To boost your skills, try these optional tasks to enhance your work:
Modify
addMovieto reject the empty string as a title.Use
*ngIfto display an error message if the user does not enter a title or submits a title that is already on the list.Add CSS to change the color of the error message.
The example-solutions branch of the Angular repo shows completed code for
the bonus tasks.
30.6.5. Check Your Understanding
Assume that we have an Angular project that presents users with a list of potential pets:

Question
Which of the following calls the addPet function when the user clicks
on one of the potential pets:
<li>{{pet}}</li><li (click) = "true">{{pet}}</li><li #addPet (click) = "true">{{pet}}</li><li (click) = "addPet(pet)">{{pet}}</li>
Question
When the user moves the mouse over an animal, we want to store its name in
the newFriend variable. Which of the following accomplishes this?
<li (mouseover) = "pet.name">{{pet}}</li><li #newFriend (mouseover) = "pet.name">{{pet}}</li><li (mouseover) = "newFriend = pet.name">{{pet}}</li><li (mouseover) = "newFriend">{{pet}}</li>
