21.6. Data Collection
On the previous page, we saw how to use the render_template() function to
send data from Python to an HTML file. Our next step is to figure out how to
move data in the opposite direction.
For example, when a user clicks Submit after filling out a form, they send data to the web server. The HTTP request contains values for each of the input fields. As programmers, we need to be able to access this data and work with it in our Python code.
To collect data from a webpage, we need to add another item to the import
statement in hello.py:
from flask import Flask, render_template, request
Note
request is an object, not a function. We will use dot notation to call
its methods and access its properties:
request.property_name
request.method_name()
21.6.1. Collect Color
Let’s start by collecting one piece of data from our favorite_form.html
template. When the user fills in the input fields and clicks Submit, we will
send them to a different page that displays their choice.

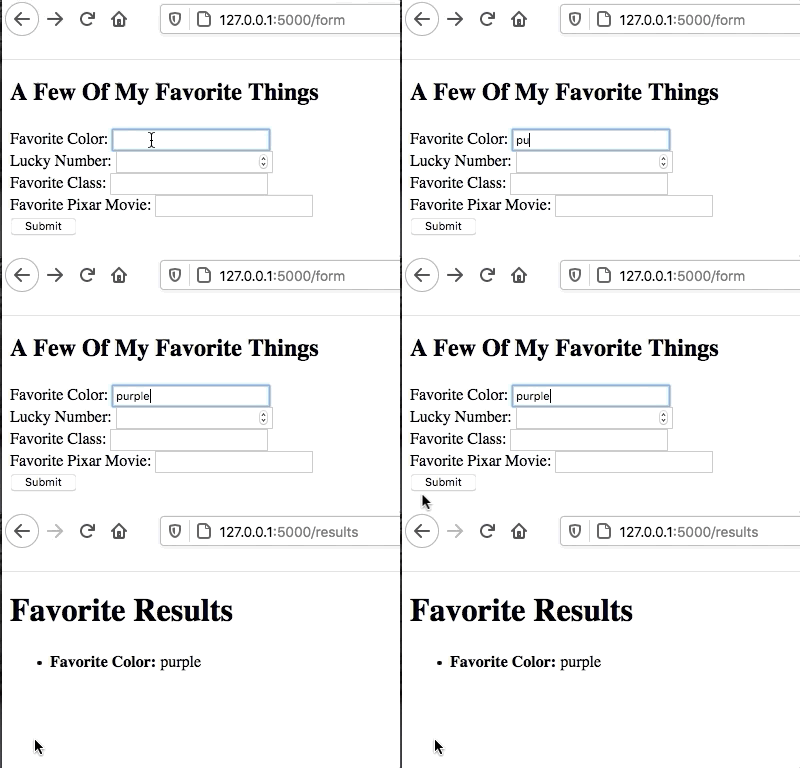
Collecting the color choice from the form.
21.6.1.1. Update favorite_form.html
The only change we need to make to our form template is to add the action
and method attributes inside the <form> tag:
9 10 11 12 13 14 15 16 | <form action="/results" method="POST"> <!-- Change this line -->
<h2>A Few Of My Favorite Things</h2>
<label>Favorite Color: <input type="text" name="color"/></label><br>
<label>Lucky Number: <input type="number" name="luck_num"/></label><br>
<label>Favorite Class: <input type="text" name="fav_class"/></label><br>
<label>Favorite Pixar Movie: <input type="text" name="best_pix"/></label><br>
<button>Submit</button>
</form>
|
Recall that action sends the form data to the URL for a server. In this
case, it’s the Flask server. The address /results identifies the route we
will use in our Python code.
21.6.1.2. Add a New Route
When we click the Submit button, we send an HTTP request to the server. In
hello.py, we need to add a function to deal with this request.
Add this function to the Python code:
23 24 25 26 27 | @app.route('/results', methods=["POST"])
def results():
color_choice = request.form['color']
return render_template('form_results.html', color = color_choice)
|
Code breakdown:
Line 23: The
/resultsin the decorator matches the value assigned toactionin the form.methodstells the program what types of HTTP requests to expect. In this case, onlyPOSTrequests will be accepted.Line 25: Recall that we included a
nameattribute for each of the input fields in our form.request.form['color']pulls the value from the field namedcolorand assigns it to thecolor_choicevariable.Line 27: Renders the template called
form_results.htmland passes it the value forcolor_choice.
If we save the changes and navigate to http://127.0.0.1:5000/form,
submitting the form produces an error. This is because the results()
function calls for a template that we haven’t created yet!
21.6.1.3. Add the form_results Template
In the templates directory, create a new file called form_results.html.
Paste in this code:
1 2 3 4 5 6 7 8 9 10 11 12 13 14 | <!DOCTYPE html>
<html>
<head>
<meta charset="UTF-8">
<meta name="viewport" content="width=device-width">
<title>Favorite Results</title>
</head>
<body>
<h1>Favorite Results</h1>
<ul>
<li><strong>Favorite Color:</strong> {{color}}</li>
</ul>
</body>
</html>
|
Notice that the code includes a {{color}} placeholder. This variable name
matches the argument from the render_template() function above.
After saving the code, our web application can now handle the form submission.

The value purple fills in for the {{color}} placeholder.
21.6.2. Try It!
Update
form_results.htmlto display the value from theLucky Numberfield.11 12
<li><strong>Favorite Color:</strong> {{color}}</li> <li><strong>Lucky Number:</strong> {{lucky_number}}</li>
Update the
results()function to collect the value from theLucky Numberinput field. Also, update thereturnstatement to send the lucky number to the template.24 25 26 27 28
def results(): color_choice = request.form['color'] fav_num = request.form['luck_num'] return render_template('form_results.html', color = color_choice, lucky_number = fav_num)
Save your code and check to make sure the form submission works.
Repeat steps 1 - 3 for the rest of the fields in the form.

The form_results.html page showing four values collected from the form.
21.6.3. Template Variable Names
Notice that with the Lucky Number field, we wound up using 3 different
variable names to refer to the same value. The input field had
name="luck_num", the Python code used fav_num, and the placeholder in
the results template used lucky_number.
To avoid confusion, many developers prefer to use the SAME variable names between
their Python code and the templates. With this in mind, we can refactor hello.py
and form_results.html to match the names used in favorite_form.html.
Example
favorite_form.html:
11 12 | <label>Favorite Color: <input type="text" name="color"/></label><br>
<label>Lucky Number: <input type="number" name="luck_num"/></label><br>
|
hello.py:
24 25 26 27 28 | def results():
color = request.form['color']
luck_num = request.form['luck_num']
return render_template('form_results.html', color = color, luck_num = luck_num)
|
form_results.html:
11 12 | <li><strong>Favorite Color:</strong> {{color}}</li>
<li><strong>Lucky Number:</strong> {{luck_num}}</li>
|
21.6.4. Video Summary
There are a LOT of details on this page. The video below is a little longer than the others in this chapter.
21.6.5. Check Your Understanding
Question
Indicate whether each of the following is a class, function, method, or object. (Click on each option to display the answer).
Flaskrequestrender_template
Question
What goes inside the brackets for request.form['___']?
- The
nameof the input field from the form. - The
idof the input field from the form. - The
typeof the input field from the form. - The
valueof the input field from the form.
