In the previous two chapters, you learned about two of the three Angular directives---components and structural. You will now use data-binding to practice attribute directives. These change the appearance of a specific HTML element within the DOM.
Open VSCode and return to the angular-lc101-projects folder. Find
lesson3/examples/src/app in the sidebar and open the
skill-set.component.ts, skill-set.component.html, and
skill-set.component.css files.
Open the terminal panel and navigate to the lesson3 examples folder. Also
make sure that you are on the master branch.
$ git branch
   * master
   solutions
$ ls
   lesson1 lesson2 lesson3
$ cd lesson3
$ ls
   examples        exercises
$ cd examples
Once you are in the folder, enter npm install in the terminal, then run
ng serve to launch the project.
You should see the following:
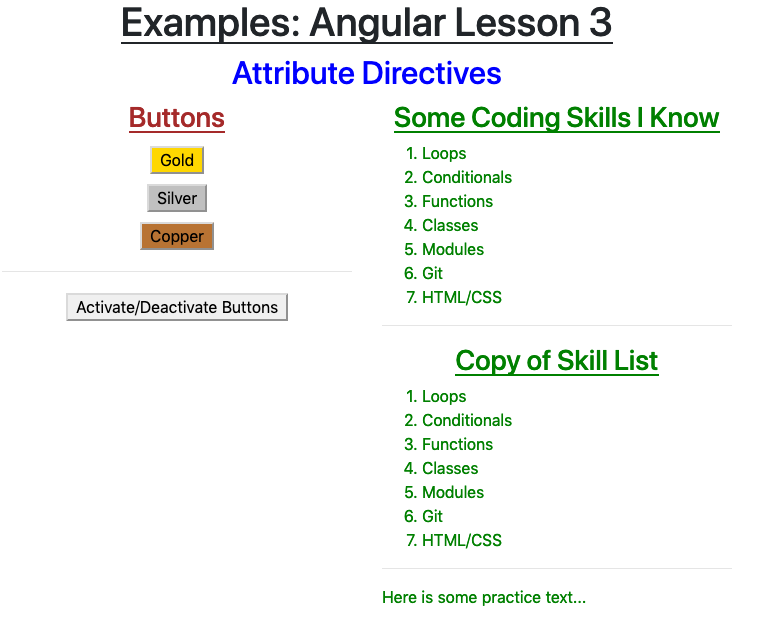
Examine the code in the skill-set.component.css and
skill-set.component.html files:
Examples
CSS
1h3 {
2   text-align: center;
3   text-decoration: underline;
4}
5
6.skills {
7   color: green;
8}
HTML
 1<div class="skills">
 2   <h3>{{listHeading}}</h3>
 3   <ol>
 4      <li *ngFor="let skill of skills">{{skill}}</li>
 5   </ol>
 6   <hr>
 7   <h3>Copy of Skill List</h3>
 8   <ol>
 9      <li *ngFor="let skill of skills">{{skill}}</li>
10   </ol>
11   <hr>
12   <p>Here is some practice text...</p>
13</div>
Right now, there is an awful lot of green on the page, which is set by the
skills class in the CSS file. Let's fix this with some attribute
directives.
To change the color and bullet type of the first list element, we could override the CSS instructions with some inline code:
<ol style="color: black" type="A">
However, we can use what we learned about data-binding to replace these hard-coded styles with variables:
<ol [style.color]="alternateColor" [type]="bulletType">
Ideas to note:
Unlike the structural directives *ngFor and *ngIf, we can add more
than one attribute directive to an HTML tag.
The style attribute has different properties that can be assigned using
dot notation. Examples include style.color and style.background. For
properties with two-word labels, like text-align, the data-binding
syntax accepts either hyphens or camel case (style.text-align or
style.textAlign).
The variables alternateColor and bulletType are assigned in the
skill-set.component.ts file.
 1export class SkillSetComponent implements OnInit {
 2   listHeading: string = 'Some Coding Skills I Know';
 3   skills: string[] = ['Loops', 'Conditionals', 'Functions', 'Classes', 'Modules', 'Git', 'HTML/CSS'];
 4   alternateColor: string = 'black';
 5   bulletType: string = 'A';
 6   changeColor: boolean = true;
 7
 8   constructor() { }
 9
10   ngOnInit() { }
11
12}
NEAT! Reassigning the alternateColor variable in the .ts file
causes EVERY tag with [style.color]="alternateColor" to change color.
Try It
Change the values for the alternateColor and bulletType variables.
Save your work and refresh the web page to see the results.
Note that bulletType takes options of numbers (1), upper and lower
case letters (A, a), or upper and lower case Roman numerals (I,
i). For a detailed description of using the type attribute in an
ordered list, check out the
W3 schools documentation.
We can accomplish the same results by applying a class to the second ol
tag:
Add the following code to skill-set.component.css:
1.ol-style {
2   color: black;
3   text-align: center;
4   list-style-type: upper-roman;
5}
Note
The CSS property list-style-type defines the look of the list item
markers, similar to the ol element's type attribute. The values
available to the CSS property are different, however. You can find a full
list at W3 schools.
Next, modify line 8 in the starter HTML:
 1<div class="skills">
 2   <h3>{{listHeading}}</h3>
 3   <ol [style.color]="alternateColor" [type]="bulletType">
 4      <li *ngFor="let skill of skills">{{skill}}</li>
 5   </ol>
 6   <hr>
 7   <h3>Copy of Skill List</h3>
 8   <ol [class.ol-style]="changeColor">
 9      <li *ngFor="let skill of skills">{{skill}}</li>
10   </ol>
11   <hr>
12   <p>Here is some practice text...</p>
13</div>
After saving these updates, the skills list changes appearance:
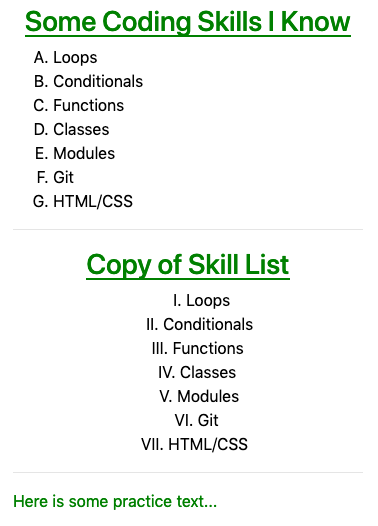
Instead of setting [class.ol-style] equal to a string, the
changeColor variable is a boolean defined in the
skill-set.component.ts file. If changeColor is true, Angular
adds the ol-style class of the tag. If changeColor is false,
the class remains absent from the tag.
Try It
changeColor to false and verify that the second ordered list
changes back to green, left-aligned, and numbered.p-style class in the CSS file and modify line 12 in
skill-set.component.html to make the color and alignment of the
p element depend on !changeColor.Nice display of eagerness! We will deal with the buttons on the next page.
The reversed attribute labels ordered lists from highest to lowest values
(9, 8, 7... instead of 1, 2, 3...). Unlike the class or style
attributes, reversed is not set equal to a string inside the HTML tag. Just
having it in the tag flips the numbering of the bullets.
<ol style="color: blue" reversed>
Question
How could we data-bind the reversed attribute in an ol tag? Indicate
ALL working options.
"reversed" or
"notReversed".true or false.variable1 > variable2."".reversed and hope for the best.