9.2. Initialize Spring
Spring Boot is a framework used to build Java web applications that implement the MVC pattern. For more about Spring, check out Spring IO.
As you code along with the videos, you will be working on your own project. Should you want to review a step or double-check
your code, fork LaunchCode’s hello-spring-demo repository to see what the code looked like at each stage. The repository is up on
Github. The starter branch contains
the code after creation and also shows the starting point for the next chapter.
We suggest you create and checkout a new branch in your hello-spring repository for each video lesson.
This will help you return to earlier states of your application to review your work, and is a convenient opportunity to practice
your git workflow.
9.2.1. Initialize a Spring Boot Project - Video
Note
In the video, Chris changes some Gradle configurations to use Java version 13 and Gradle version 6 for his project. You should follow along with him in case you also need to update your own project. However, this course uses Java version 11, which is compatible with most versions of Gradle beyond 6.x.x.
9.2.2. Initialize a Spring Boot Project - Text
Go to start.spring.io.
For Project, select Gradle Project.
For Language, select Java.
For Spring Boot, select the most recent non-SNAPSHOT release.
Note
See the figure below this list for a visual.
For Project Metadata/Group, enter
org.launchcode.Note
You can use whatever package name you want here. The convention is
topleveldomain.domainname. In other words, the reverse of what you would see in a URL.For Project Metadata/Artifact, enter
hello-spring.Note
This is the title of your project.
For Project Metadata/Options/Java, select 11.
For Dependencies, search for and add the following: Spring Web, and Spring Boot DevTools.
Note
For some projects in this book, you’ll also need to add ThymeLeaf and Validation as dependencies.
Click Generate to create a
.zipfile of the project starter code.
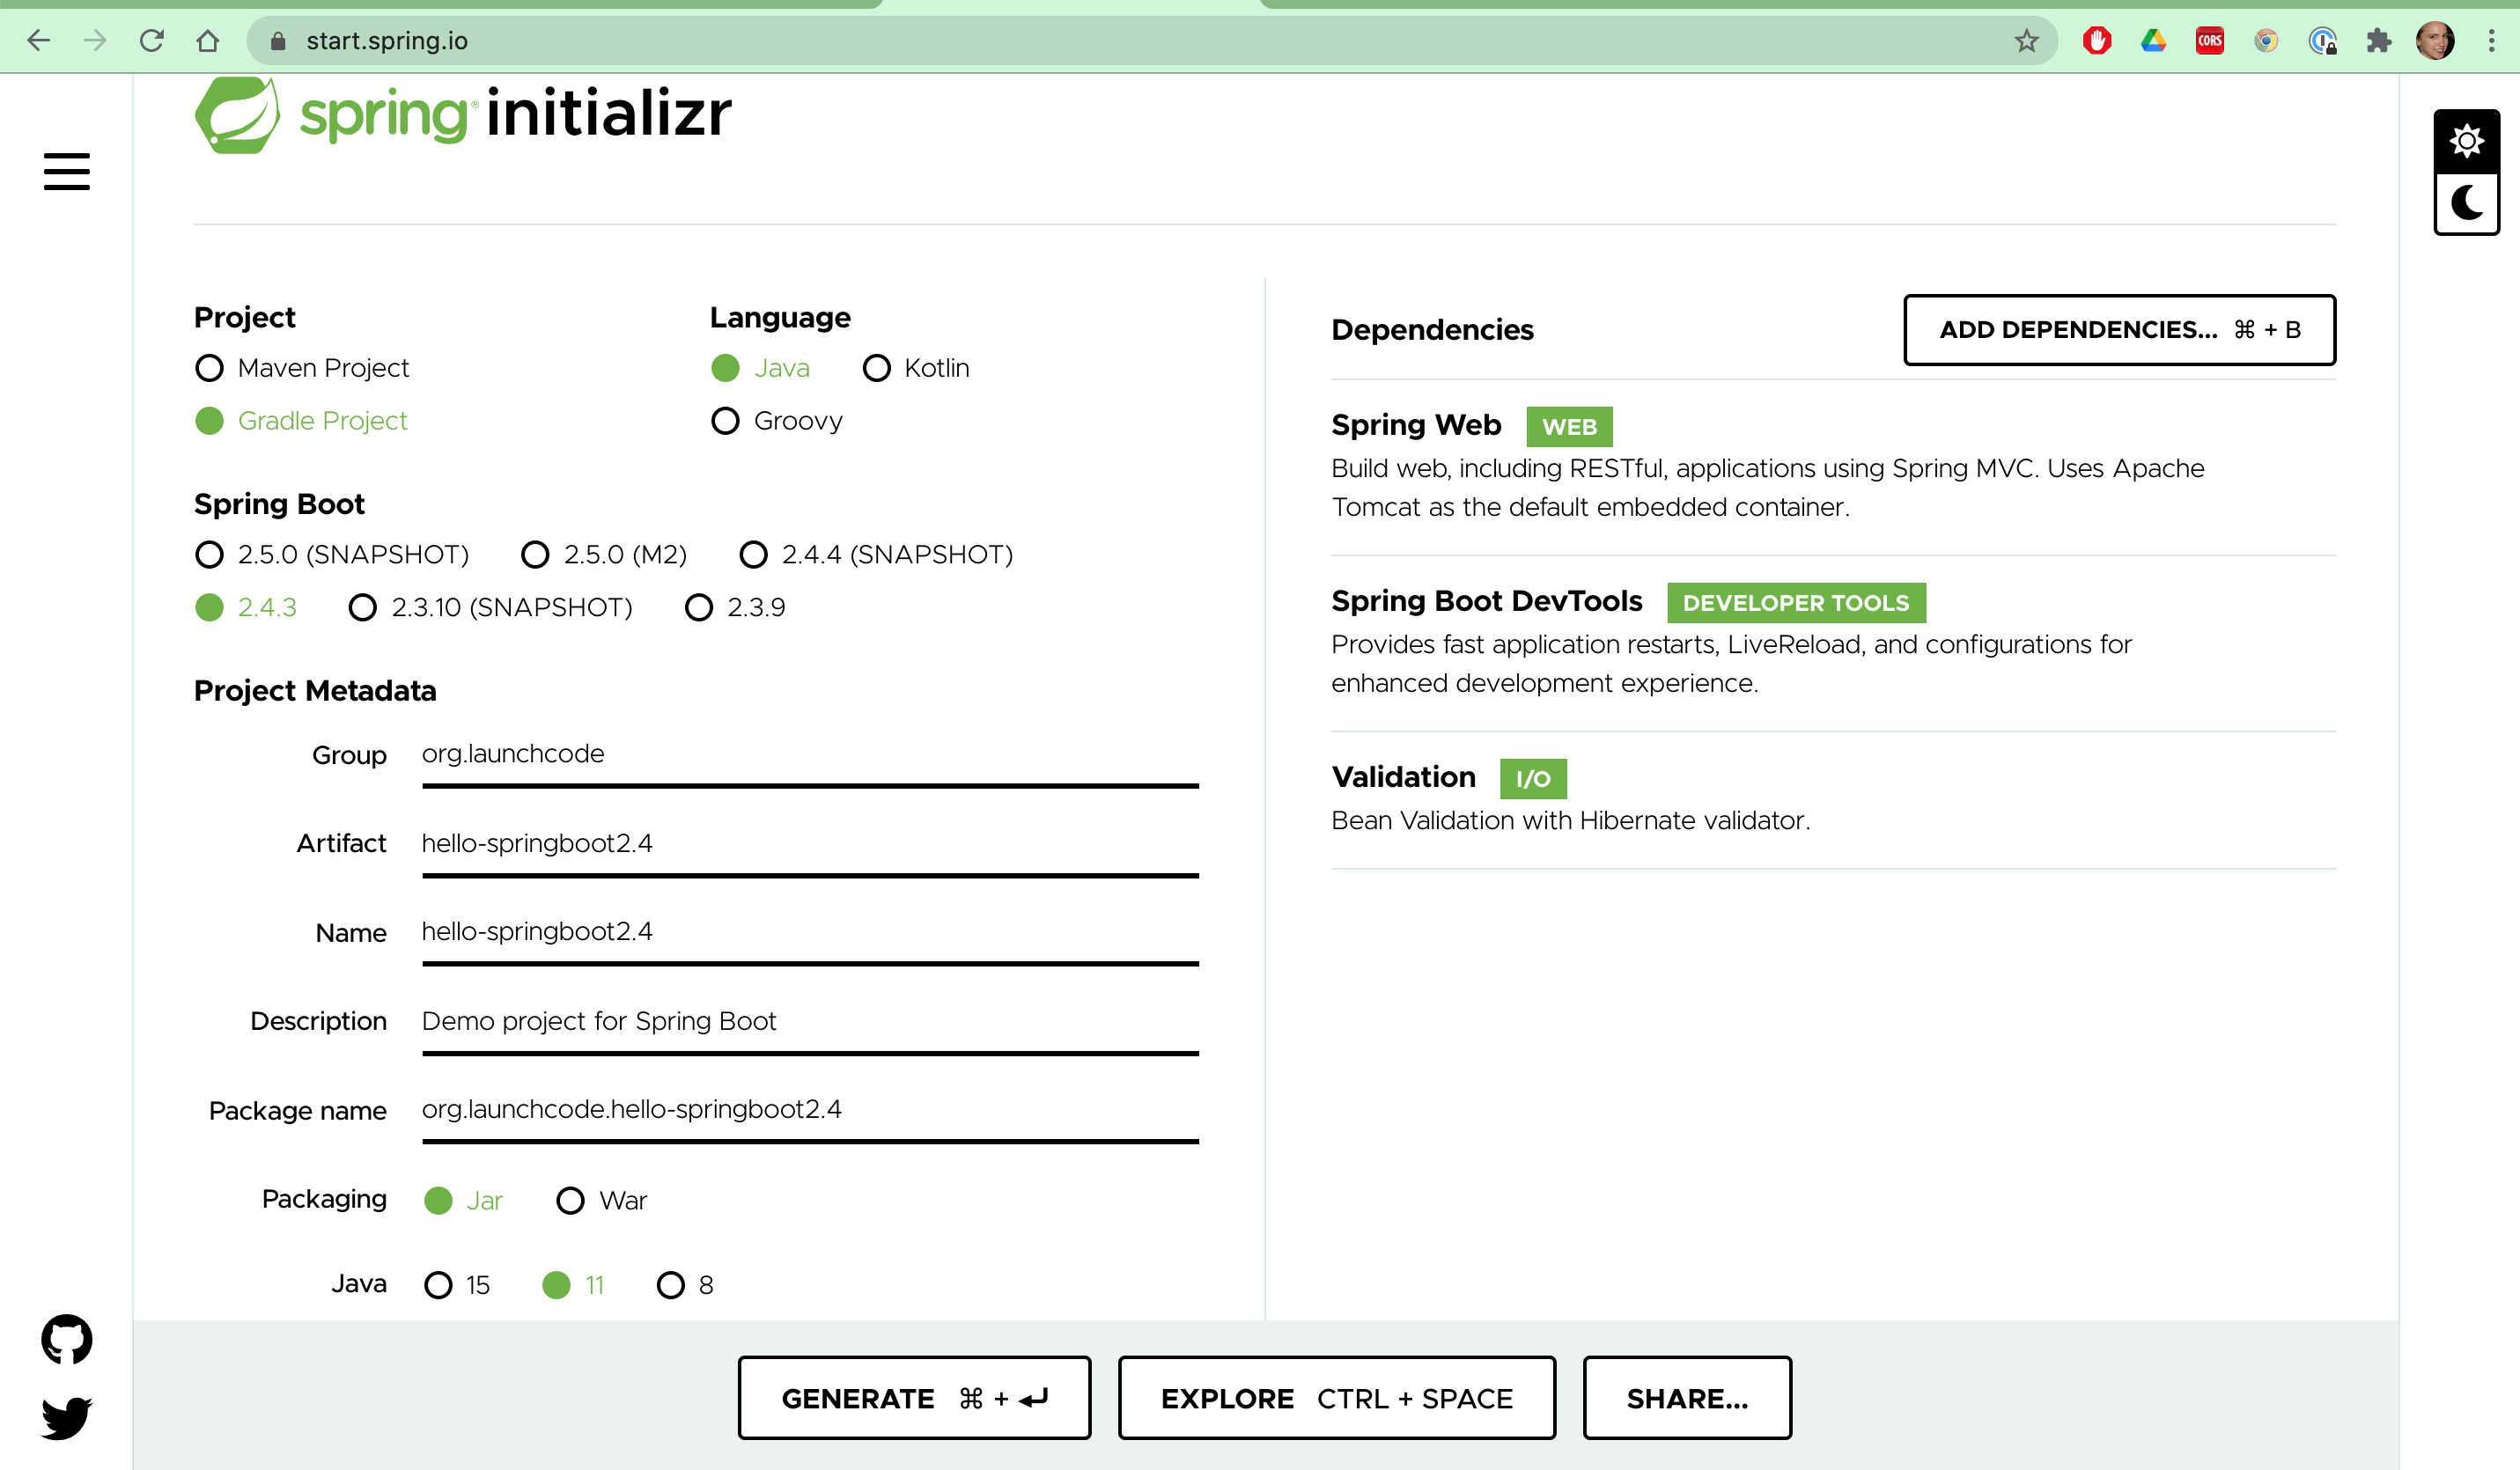
Spring Initializr with Spring Boot 2.4.3 and Java 11 selected.
9.2.3. Spring in IntelliJ
Move the downloaded, unzipped folder from your downloads folder into another location such as
LC101or your home directory.Start IntelliJ.
Select Open and browse to where you put the downloaded project. Unzip the project and select to import the top-level folder of the new Spring project.
Tips
Below are some troubleshooting tips we’ve found to be helpful. If these are not relevant to you and you experience issues, checkout https://help.launchcode.org/ for more support.
After you select to open the Spring project, if you encounter an alert that the selected folder is not empty, choose the option to overwrite it.
If you see a Gradle build popup, click Import Gradle Project. This popup is fairly small and usually located in the lower right corner of the window. After selecting import, you may be prompted again and should click the Use auto-import box. Leave other boxes as default.

A popup to suggest importing Gradle.
You may see a pop-up in the lower left-hand corner in your Event Log that reads: Unindexed remote maven repositories found.
Select Open repositories list in the Event Log message. This will open the Preferences (or Settings for Windows users) window to Build, Execution, Deployment > Build Tools > Maven > Repositories .
Select the Maven repository (https://repo1.maven.org/maven2) and click Update on the side.
Warning
This update can last up to an hour.
9.2.4. The Spring Project Structure
The Spring Initializr gives us a number of helpful files and directories to get our Spring project up and running.
Within the src directory, you’ll find a familiar setup with both a main and
test directory. Inside of main will be a java folder to house your packages and
classes. Inside the java folder is a HelloSpringApplication. Opening this for the first
time, you’ll likely see some import errors that can be resolved by clicking on the context menu
to add the corresponding library to the classpath. Expanding the main method shows you the line
that allows the application to run. We’ll run the app in the section below but won’t be working with
much else with the main method in this course.
You’ll also find that there is a resources folder in main. resources is
meant to hold your non-java code.
Outside of src, a .gitignore contains the basic items of our project that
Spring expects to not be version controlled. These are files created by the IDE, the compiled
code in the .build directory, and the gradle .jar and directory.
9.2.4.1. Gradle
Gradle is a Java tool that handles much of the work related to building and deploying software
applications in Java. Your Spring project contains a file called build.gradle. As with most new
tools, you do not need to know everything that this file does. For now, the takeaway is that
Gradle manages the external dependencies in our project.
Do you remember specifying the dependencies of the Spring project? Scroll down to the bottom of your
build.gradle file and you will see these items specified in a structure called dependencies.
22 23 24 25 26 27 28 29 | dependencies {
implementation 'org.springframework.boot:spring-boot-starter-thymeleaf'
implementation 'org.springframework.boot:spring-boot-starter-web'
developmentOnly 'org.springframework.boot:spring-boot-devtools'
testImplementation('org.springframework.boot:spring-boot-starter-test') {
exclude group: 'org.junit.vintage', module: 'junit-vintage-engine'
}
}
|
Gradle fetches these external packages from another location on the Internet so that we can use them in our project locally. That location is called the Maven central repository. The Maven central repository is a decentralized place for developers to post their code for others to use.
9.2.5. Before Running a Spring Project
Before running your project, we need to check the configuration of a few items.
In
build.gradle, locate an item calledsourceCompatibility. If it’s value is not equal to11, change it and save the file.In the
gradledirectory, open the subdirectory,wrapper, and then the filegradle-wrapper.propertiesinside of it. Ensure that thedistributionUrlincludes a gradle version of at least6.0.Open the test class,
HelloSpringApplicationTestslocated insrc/test/java/org.launchcode.hellospring. Run the single test. If you experience a JDK error, click on theGradle Settingsicon in the right-hand gradle pane and ensure that the Gradle JVM is using Java 11.
9.2.6. Running a Spring Project
To run the application, click on the Gradle icon on the side of your IntelliJ window. If you don’t see the Gradle side bar, click the panel icon in the bottom left corner of your window and select Gradle.
Hovering over this icon opens options for panels to open.
Once the Gradle panel is opened, go into Tasks. Here you’ll find the various tasks that Gradle can do for your project. Inside Tasks, open application and double-click bootRun. This will run our Spring Boot application.

Gradle panel view with bootRun selected.
Once the bootRun task is executed, you should see a new panel with output similar to this:

Output of the bootRun task.
Note
Also note that you may not see the same output in the Gradle panel as is shown above. You may see something that looks more like this:

Click the circled icon to switch the view.
If you do, click the circled icon to toggle the view so that it matches the one above.
Keep an eye out for a message that resembles:
Started HelloSpringApplication in 1.739 seconds
While this message will change depending on the application you are running, this message indicates that the Spring Boot started up successfully. You’ll see an error message or a stack trace if there is an issue with your project preventing it from starting.
You’ll also notice a message above:
Tomcat started on port(s): 8080 ...
Tomcat is the embedded web server within your Spring application. So this tells us that Tomcat is listening
for requests on local port 8080. You can then visit the corresponding web page at localhost:8080.
Right now, you’ll see an error page, but we’ll fix that soon.
Now go ahead and stop the application by hitting the red square on the left side of the Run pane.
Tip
There is also a stop button up at the top right of the IntelliJ window.
9.2.7. Check Your Understanding
Question
What is the name of the task to start a Spring Boot application?
Gradle
bootRun
run
Maven
Question
True/False: All custom code in a Spring Boot application is located in the main method.
True
False