Assignment #2: Tech Jobs (Object-Oriented Edition)
Introduction
Your apprenticeship at LaunchCode is going well! Only a few weeks in and you’re regularly making contributions to code that will eventually be used by all LaunchCode staff.
Your last task was to get the prototype Tech Jobs app in good shape. Now it’s time to advance the underlying structure of the program.
Your mentor on this project is Sally, one of the developers at LaunchCode. She regularly supports coders who are just getting started with their careers.

After seeing your strong work with your last project, Blake reported that you performed well and learned quickly. Because of your success, he and Sally feel comfortable assigning you to a set of tasks that are a notch up in difficulty.
Sally completed some initial work on the project and left you some TODOs.
Learning Objectives
In this project, you’ll show that you can:
Read and understand code written by others.
Work with objects to encapsulate data and methods.
Use the generator in IntelliJ to automate routine tasks.
Use unit testing and Test-Driven-Development (TDD) to verify and create new methods.
Apply the concept of inheritance to streamline your classes (the DRY idea—Don’t Repeat Yourself).
Get the Starter Code
In Canvas, Graded Assignment #2: TechJobs (Object-Oriented Edition) contains a GitHub Classroom assignment invitation link and then set up the project in IntelliJ. Refer back to the GitHub Classroom instructions from Assignment #0: Hello, World! for details.
Introduction
Sally has gotten the ball rolling by adding a Job class, along with classes
to represent the individual properties of a job: Employer, Location,
PositionType, and CoreCompetency. She completed the Employer class,
and she left you the task of filling in the others.
As the team gets closer to deploying the app—and abandoning the test data they’ve been using—they’ll want an easy way to add and remove jobs via a user interface. Before that, however, you need to finish shifting the project to an object-oriented design.
Why Change to Object-Oriented?
Working with data stored as strings in HashMaps and ArrayLists isn’t a good long-term solution, for reasons that we point out below.
The Job class introduces an object-oriented design to the application. It
contains all of the fields you used in the console version of TechJobs:
name, employer, location, positionType, coreCompetency.
There’s also an id field which will be used to uniquely identify Job
objects.
The main difference between the object representation of a job and the
string-based representation is that the values of employer, location,
and the other non-ID fields are no longer strings. Instead, they are classes of
their own.
Job Fields
Open the Job class file. You’ll see the following fields (among others):
1 2 3 4 5 | private String name;
private Employer employer;
private Location location;
private PositionType positionType;
private CoreCompetency coreCompetency;
|
Of these, only name is a string. Sally created classes to represent each of
the other properties. These classes—Employer, Location,
CoreCompetency, PositionType—have value and id fields.
So, for example, if you had a Job instance, you could get the name of the
employer this way:
// job is an instance of Job
String employerName = job.getEmployer().getValue();
Additionally, the toString() method of the Employer class is set up to
return the value field. Thus, using one of these objects in another string
context like System.out.println will print the data stored in value.
// Prints the name of the employer
System.out.println(job.getEmployer);
Why do we go to all of this trouble when we could store this job-related data as strings? There are a couple of reasons.
Eliminate Duplication of Data
In our app, we have multiple jobs that have the same value in a given field.
For example, there are multiple jobs with position type “Web - Full Stack”, and
each employer may list several jobs. If we store the values of these fields as
strings directly within each Job object, that data would be repeated in
several places across the application.
By using objects, we can have a single PositionType object with value “Web
- Full Stack”. Each job that wants to use that position type holds onto a
reference to the given object. Similarly, we can have one Employer object
for each employer.
Aside from reducing the amount of raw data / memory that the application uses,
this will allow data to be updated more easily and properly. If we need to
change the name of an employer (e.g. due to a typo or a name change at the
company), we can change it in one place—the single Employer object that
represents that company.
Enable Extension
While the four Job properties represented by objects will primarily be used
for their string values, it’s easy to imagine adding new properties to address
future needs.
For example, it would be useful for an Employer object to have an address,
a primary contact, and a list of jobs available at that employer.
For a Location object, useful information includes a list of zip codes
associated with that location, in order to determine the city and state for an
employer or job.
If we were to store these four new properties as strings within the Job
class, extending and modifying this behavior would be much more complicated and
difficult moving forward.
Your Assignment
Running the Autograding Tests
Before diving into your tasks, review Assignment #0: Hello, World! for details on running the autograding tests for this assignment. This assignment has many more tests than the previous two, so we’ve organized them into separate files.
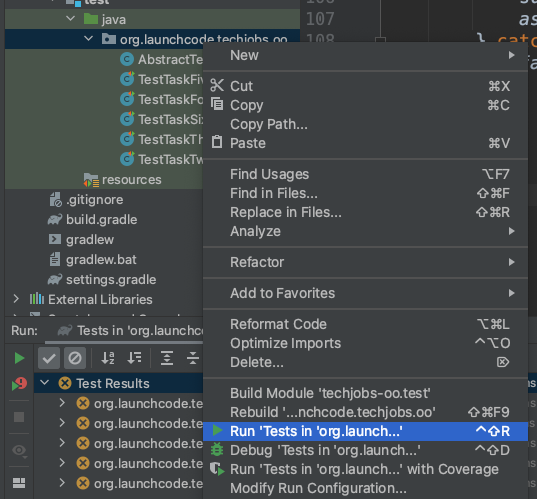
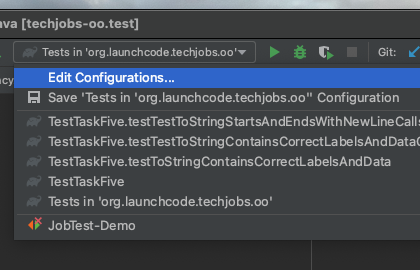
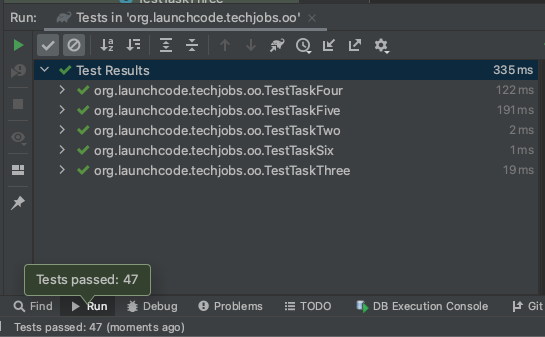
Each of the one test files, TestTaskXXXX, contains the tests to grade one of the six tasks outlined in below (there’s no coding work for your first task, so there is no TestTaskOne). Run all of the tests by right-clicking on the org.launchcode.techjobs.oo and selecting Run tests...
You should see a large number of failures along with a small number of passing tests. Your job is to get those failures to pass, while not breaking the few tests that already pass.

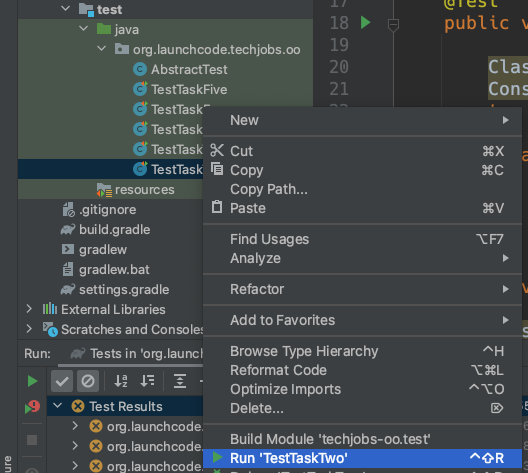
When you start on one of the tasks below, begin by running only the tests associated with that task. To do so, right-click on the test file and select Run TestTaskXXXX.
As you work on the components of the given tasks, continually re-run the tests to see the failing tests gradually turn to passing. When all tests within the file pass, you’re ready to move onto the next task.
Your tasks
The list below provides a general overview of your assigned tasks. Specific details for each part appear in the following sections, so be sure to read them carefully as you solve each problem.
Review Sally’s code in the
Employerclass to learn how to assign a unique ID.Add getters, setters, and custom methods as needed to the
Location,CoreCompetency, andPositionTypeclasses.Complete the
Jobclass using what you learned in steps 1 and 2.Use unit testing to verify the constructors and
equalsmethods for theJobclass.Use TDD to design and code a custom
toStringmethod for theJobclass.Use inheritance to DRY the code within
Employer,Location,CoreCompetency, andPositionType.
1) Explore the Employer Class
Open the Employer file in IntelliJ and examine the code. In addition to the
two fields—id and value—the class includes the standard getters and
setters as well as some custom methods like toString and equals.
You can refer to these examples as you fill in the missing pieces in the other classes, but for now let’s take a closer look at the constructors.
Assign a Unique ID
One neat trick we can use is to automatically assign each new object a unique ID number.
Example
Examine the two constructors in Employer.java:
1 2 3 4 5 6 7 8 9 10 11 12 13 14 15 16 17 | public class Employer {
private int id;
private static int nextId = 1;
private String value;
public Employer() {
id = nextId;
nextId++;
}
public Employer(String aValue) {
this();
this.value = aValue;
}
// Getters and setters omitted from this view.
}
|
Line 3 declares the variable
nextId. Since it isstatic, its changing value is NOT stored within anyEmployerobject.The first constructor (lines 6 - 9) accepts no arguments and assigns the value of
nextIdto theidfield. It then incrementsnextId. Thus, every newEmployerobject will get a different ID number.The second constructor (lines 11 - 14) assigns
aValueto thevaluefield. However, it ALSO initializesidfor the object by calling the first constructor with thethis();statement. Includingthis();in anyEmployerconstructor makes initializingida default behavior.
2) Complete the Support Classes
Sally needs you to build up the remaining classes. In each case, refer to the
Employer class for hints on how to structure your code.
The Location Class
Open the Location.java file. Note that the getters, setters, and custom
methods for this class are done, as is the constructor for initializing the
id field.
Sally left you a TODO comment with instructions for coding a second
constructor:
It should call the first constructor to initialize the
idfield.It must also initialize the
valuefield for a newLocationobject.
The CoreCompetency Class
Open the class file. In this case, the constructors and custom methods are
ready. Sally needs you to complete the somewhat tedious task of writing the
getters and setters for the id and value fields, but NOT for
nextID.
Fortunately, IntelliJ has a tool to help with this:
Right-click in the editor pane and select Generate.
Select the Getter and Setter option.
Select the
valueoption, then click OK.PRESTO! Getters and setters appear.
Since the unique value of
idis set with the constructors, we only need to add a getter for this field. Select Generate again and use the Getter option forid.
Note
Want to use fewer clicks? You could always Generate getters and setters
for both id and value, and then delete the setID method.
Be careful, though. If you forget to remove setID, then users can change
the id value, which may cause problems in the program.
The PositionType Class
Open the class file. This time the constructors, getters, and setters are done. Sally’s comments direct you to where you need to add the custom methods.
Code a
toStringmethod that just returns thevalueof aPositionTypeobject.Use the Generate option again to add the
equalsandhashCodemethods. Refer to the previous section of this chapter if you need a quick review.Assume that two
PositionTypeobjects are equal when theiridfields match.
Tip
Now would be a good time to save, commit, and push your work up to GitHub.
3) Complete the Job Class
Now open the Job file. OOF! There are a lot of fields declared and not much
else.
Code a constructor to initialize the
idfield with a unique value. This constructor should take no parameters.Code a second constructor that takes 5 parameters and assigns values to
name,employer,location,positionType, andcoreCompetency. Also, this constructor should call the first in order to initialize theidfield. Make sure the parameters are defined in the specified order.Generate getters and setters for each field EXCEPT
nextIDandid.Generate a getter for the
idfield.Generate the
equalsandhashCodemethods. Consider twoJobobjects equal when their id fields match.
Tip
Save, commit, and push your work to GitHub.
4) Use Unit Testing to Verify Parts of the Job Class
Instead of manually creating sample Job objects to verify that your class
works correctly, you will use unit tests instead.
Navigate to the package org.launchcode.techjobs.oo.test package and open the JobTest class. This file will hold all of the tests for the Job class.
Creating a JUnit Run Configuration
Since this project contains two sets of tests used for different purposses—the autograding tests and the JUnit tests you are about to write—we have to set up a run configuration to allow us to run them independently. We’ll show you how to do that now.
At the top right of IntelliJ, select Add Configuration, just left of the green Run button.
If this item doesn’t have the label Add Configuration, then open the associated dropdown and select Edit Configurations.
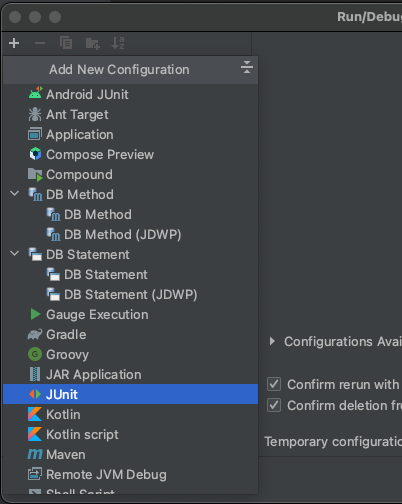
In the modal that opens, click on the + icon at the top left, and select JUnit.
Fill out the resulting form using the values:
Name: JobTest
Java version: Java 11
Module:
techjobs-oo.mainClass:
org.launchcode.techjobs.oo.test.JobTest(Click on the icon at the right side of this field and select theJobTestclass from the modal that opens.)
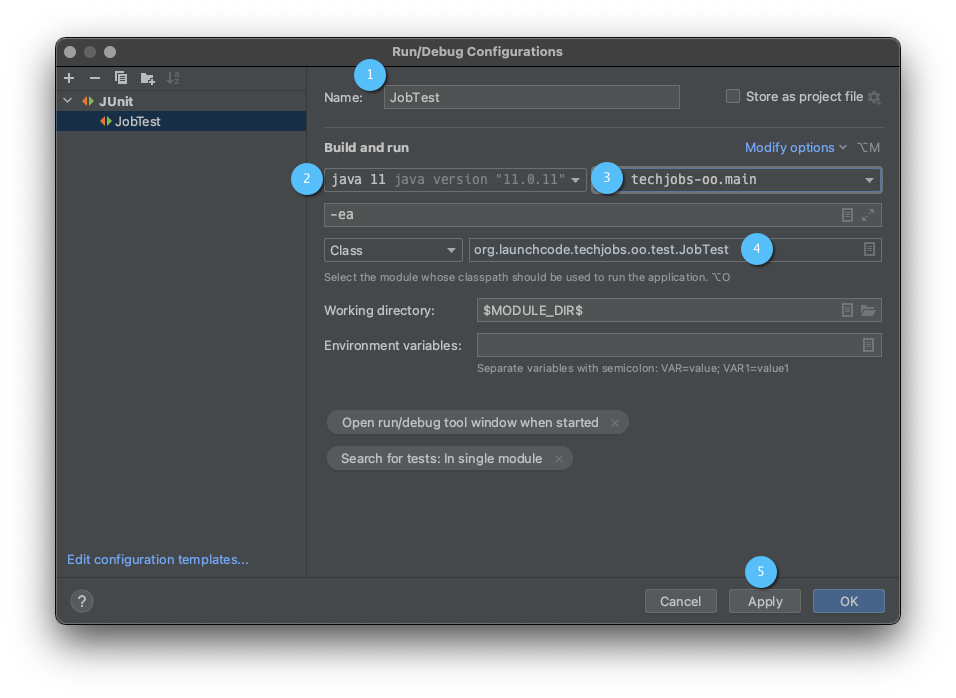
Then hit Apply and OK.
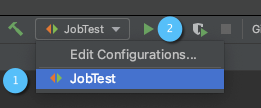
To run the tests, select the JobTest configuration from the configurations menu and hit the green Run button.
Now you’re ready to start writing some tests!
Test the Empty Constructor
Each Job object should have a unique ID that is an integer.
In
JobTest, define a test calledtestSettingJobId. Do not forget to annotate it with@Test.Create two
Jobobjects using the empty constructor.Use
assertNotEqualsto verify that the IDs of the two objects are distinct.Run the test using the run configuration that you created above.
If the test doesn’t pass, what should be your first thought?
“Drat! I need to fix the unit test.”
“Drat! I need to fix my
Job()constructor code.”
Warning
The answer is NOT “a”.
Your test code might be incorrect, but that should not be your FIRST thought. TDD begins with writing tests for desired behaviors. If the tests fail, that indicates errors in the methods trying to produce the behavior rather than in the tests that define that behavior.
Test the Full Constructor
Each Job object should contain six fields—id, name, employer,
location, positionType, and coreCompetency. The data types for
these fields are int, String, Employer, Location,
PositionType, and CoreCompetency, respectively.
In
JobTest, define a test calledtestJobConstructorSetsAllFields.Declare and initialize a new
Jobobject with the following data:new Job("Product tester", new Employer("ACME"), new Location("Desert"), new PositionType("Quality control"), new CoreCompetency("Persistence"));
Use
assertTrueandassertEqualsstatements to test that the constructor correctly assigns both the class and value of each field. Your test should have 5 assert statements of each type.Tip
The
instanceofkeyword can be used to check the class of an object. The result of the comparison is a boolean.objectName instanceof ClassName
Test the equals Method
Two Job objects are considered equal if they have the same id value,
even if one or more of the other fields differ. Similarly, the two objects
are NOT equal if their id values differ, even if all the other fields are
identical.
In
JobTest, define a test calledtestJobsForEquality.Generate two
Jobobjects that have identical field values EXCEPT forid. Test thatequalsreturnsfalse.
It might seem logical to follow up the false case by testing to make sure
that equals returns true when two objects have the same ID. However,
the positive test is irrelevant in this case.
The way you built your Job class, each id field gets assigned a unique
value, and the class does not contain a setId method. You also verified
that each new object gets a different ID when you tested the constructors.
Without modifying the constructors or adding a setter, there is no scenario in
which two different jobs will have the same ID number. Thus, we can skip the
test for this condition.
Tip
Time to save, commit, and push your work to GitHub again.
5) Use TDD to Build The toString Method
To display the data for a particular Job object, you need to implement a
custom toString method. Rather than creating this method and then testing
it, you will flip that process using TDD.
Create First Test for toString
Before writing your first test, consider how we want the method to behave:
When passed a
Jobobject, it should return a string that contains a blank line before and after the job information.The string should contain a label for each field, followed by the data stored in that field. Each field should be on its own line.
ID:  _______
Name: _______
Employer: _______
Location: _______
Position Type: _______
Core Competency: _______
If a field is empty, the method should add, “Data not available” after the label.
(Bonus) If a
Jobobject ONLY contains data for theidfield, the method should return, “OOPS! This job does not seem to exist.”
In JobTest, add a new test named testToStringStartsAndEndsWithNewLine to check the first requirement. Be sure to use assertEquals to verify that these characters are correct, and to use the exact formatting demonstrated above.
Tip
This test should check that the first and last characters of the string both the newline character, \n. Recall that can get the character at a given position in a string using the string method charAt.
Woo hoo! Failure is what we want here! Now you get to fix that.
Code toString to Pass the First Test
In the Job class, create a toString method that passes the first test.
Since the test only checks if the returned string starts and ends with a blank
line, make that happen.
Tip
Do NOT add anything beyond what is needed to make the test pass. You will
add the remaining behaviors for toString as you code each new test.
Finish the TDD for toString
Code a new test for the second required behavior, named
testToStringContainsCorrectLabelsAndData. Then run the tests to make sure the new one fails.Modify
toStringto make the new test pass. Also, make sure that your updates still pass all of the old tests.Follow the same TDD process for the third requirement, creating a test named
testToStringHandlesEmptyField.
Warning
As usual, the autograding tests are very picky about capitalization and spaces, so your code should match the format shown above exactly.
Cool! Your Job class is now complete and operates as desired.
6) Refactor to DRY the Support Classes
Review the code in the Employer, Location, CoreCompetency, and
PositionType classes. What similarities do you see?
There is a fair amount of repetition between the classes. As a good coder, anytime you find yourself adding identical code in multiple locations you should consider how to streamline the process.
DRY = “Don’t Repeat Yourself”.
Create a Base Class
Let’s move all of the repeated code into a separate class. We will then have
Employer, Location, CoreCompetency, and PositionType inherit
this common code.
Create a new class called
JobFieldin the packageorg.launchcode.techjobs.oo.Consider the following questions to help you decide what code to put in the
JobFieldclass:What fields do ALL FOUR of the classes have in common?
Which constructors are the same in ALL FOUR classes?
What getters and setters do ALL of the classes share?
Which custom methods are identical in ALL of the classes?
In
JobField, declare each of the common fields.Code the constructors.
Use Generate to create the appropriate getters and setters.
Add in the custom methods.
Finally, to prevent the creation of a
JobFieldobject, make this class abstract.
Extend JobField into Employer
Now that you have the common code located in the JobField file, we can
modify the other classes to reference this shared code. Let’s begin with
Employer.
Modify line 5 to extend the
JobFieldclass intoEmployer.5 6 7 8 9
public class Employer extends JobField {

   //Code not displayed.

}
Next, remove any code in
Employerthat matches code fromJobField(e.g. theid,value, andnextIdfields are shared).Remove any of the getters and setters that are the same.
Remove any of the custom methods that are identical.
The empty constructor is shared, but not the second. Replace the two constructors with the following:
7
8
9
public Employer(String value) {
  super(value);
}
The
extendsandsuperkeywords link theJobFieldandEmployerclasses.Rerun your unit tests to verify your refactored code.
Finish DRYing Your Code
Repeat the process above for the
Location,CoreCompetency, andPositionTypeclasses.Rerun your unit tests to verify that your classes and methods still work.
Tip
You know you need to do this, but here is the reminder anyway. Save, commit, and push your work to GitHub.
Sanity Check
At this point, all autograding tests should be passing. To be sure, right-click on the org.launchcode.techjobs.oo package in src/test/java and select Run tests in… If any test fails, evaluate the failure/error message and go back to fix your code.
Excellent! You successfully shifted the old console app into a more useful object oriented configuration.
Now that the new structure is ready, another team member can refactor the import and display methods to use the new classes. Once these are ready, our team will refine the search features and move the app online to provide a better user interface.
How to Submit
To turn in your assignment and get credit, follow the submission instructions.