Assignment #3: Tech Jobs (MVC Edition)
Introduction
Your first two tasks as an apprentice went well! You, Blake, and Sally built the TechJobs console prototype and then refactored the code to move it to an object-oriented format.
After demonstrating the prototype for the Company Team at LaunchCode, it received the green light to be fully built out as a web application.
The first step in this process will be to quickly develop a minimum viable product, or MVP. The goal is to get a functioning web app up and running with as little work as possible. That way, additional feedback and testing can be done early in the development process. After that, additional behind-the-scenes work will be carried out to fully develop the model and data side of the application.
For this next step in the project, you’ll be working with Carly.

Carly was once a LaunchCode apprentice as well, so she knows just what
it’s like to be in your shoes. She’s done some initial work on the
project and left you some TODO tasks that she knows you can handle.
Learning Objectives
In this project, you’ll show that you can:
Read and understand code written by others.
Work within the controller and view portions of a Spring Boot application.
Use Thymeleaf syntax to display data within a view.
Create new handler methods to process form submission.
TechJobs (MVC Edition)
You’ll start with some code that Carly has provided. The idea behind your current assignment is to quickly deliver a functioning Spring Boot application, so you’ll focus on the controllers and views.
In order to do this, you’ll be reusing the JobData class and
job_data.csv file from the console app. You will eventually have to go back
and rewrite the data portion of the application to make a true, database-backed
model. However, using the existing JobData class to provide some basic data
functionality lets you focus on the views and controllers for now.
Your Assignment
The list below provides a general overview of your assigned tasks. Specific details for each part appear in the following sections, so be sure to read them carefully as you solve each problem.
Review Carly’s code in the
JobDatafile as well as in the existing controllers and views.As her next step, Carly created two basic templates to show lists of jobs for each field of the data (
employer,location, etc.). You will need to add some details to these views to allow users to select and display jobs stored in the system.Carly started working on the search feature, but only got as far as writing the code to display the search form. She’s handed the project to you to finish the rest. First, you’ll create a controller method to retrieve search results.
Finally, you’ll display search results in the view.
Throughout your work, refer to our demo app as needed to clarify questions about intended application behavior.
Getting Started
Set up a local copy of the project:
In Canvas, Graded Assignment #3: TechJobs (MVC Edition) contains a GitHub Classroom assignment invitation link and then set up the project in IntelliJ. Refer back to the GitHub Classroom instructions from Assignment #0: Hello, World! for details.
Launch the application (via the Gradle pane, Tasks > Application > bootRun) to make sure it starts up properly. Then shut it down.
Run the autograding tests. The tests for this assignment are set up the same way as for assignment 2. There are four tasks for this assignment, but the first doesn’t require any coding on your part. Therefore, there are 3 tests files (for tasks 2-4). As with assignment 2, we recommend that you only run the tests for the task you are currently working on.
1) Review the Code
Tip
One essential programming skill that you will develop is the ability to read and understand someone else’s code. This assignment begins with you practicing exactly that. Make sure you carefully examine the provided code BEFORE you start changing things.
Trying to “fix” a code sample before understanding how it works leads to confusion, frustration, and a broken program. DO NOT SKIP the code review!
Carly created a Spring Boot application and filled in some features. She
refactored JobData to generate an ArrayList of Job objects based on
your TechJobs-OO work, and she added controllers and views for a “Home”,
“List”, and “Search” page. JobData now also builds ArrayLists for the
Employer, Location, PositionType, and CoreCompetency objects.
The Model
Note
When referring to Java class locations, we’ll usually omit the leading
path: src/main/java/org/launchcode/.
The “model” is contained in the JobData class, which is in the models
package. We put “model” in quotes, since this class isn’t a model in the
typical, MVC/object-oriented sense (maybe a better name for this assignment
would be TechJobs VC).
The JobData class serves the same purpose as before—it reads data from
the job_data.csv file and stores it in a format we can use. In this case,
that format is an ArrayList of Job objects. Note that Carly changed the
path to the job_data.csv file to store it in the src/main/resources
directory.
You’ll use some of the static methods provided by JobData in your
controller code. Since you’re already familiar with these, we’ll leave it to
you to review their functionality as you go.
The Controllers
Expand the controllers package, and you’ll see that you have three
controllers already in place. Let’s look at these one at a time.
The HomeController
This class has only one handler method, index, which displays the home page
for the app. The controller renders the index.html template (in
src/main/resources/templates) and provides a fairly simple view.
The ListController
This controller provides functionality for users to see either a table showing
all the options for the different Job fields (employer, location,
coreCompetency, and positionType) or a list of details for a selected
set of jobs.
If you look at the corresponding page at /list, you’ll see an “All” column
in the table. However, this option doesn’t work yet, and you will fully
implement that view as you work on the assignment.
At the top of ListController is a constructor that populates
columnChoices and tableChoices with values. These HashMaps play the
same role as in the console app, which is to provide a centralized collection
of the different List and Search options presented throughout the user
interface.
ListController also has list and listJobsByColumnAndValue handler
methods, with routes as annotated above their definitions. The first method
renders a view that displays a table of clickable links for the different job
categories. The second method renders a different view that displays
information for the jobs that relate to a selected category. Both of the
handlers obtain data by implementing the JobData class methods.
In the listJobsByColumnAndValue method, the controller uses two query
parameters passed in as column and value to determine what to fetch
from JobData. In the case of "all" it will fetch all job data,
otherwise, it will retrieve a smaller set of information. The controller then
renders the list-jobs.html view. We’ll explore the list.html and
list-jobs.html templates in a moment.
listJobsByColumnAndValue works similarly to the search functionality, in
that we are “searching” for a particular value within a particular field and
then displaying jobs that match. However, this is slightly different from the
other way of searching in that the user will arrive at this handler method as a
result of clicking on a link within the list view, rather than via
submitting a form. We’ll see where these links originate when we look at the
views. Also note that the listJobsByColumnAndValue method deals with an
“all” scenario differently than if a user clicks one of the category links.
The SearchController
Currently, the search controller contains only a single method, search.
It simply renders the form defined in the search.html template.
Later in this assignment, you will receive instructions for adding a second handler to deal with user input and display the search results.
The Views
Let’s turn our attention to the views.
The fragments File
If the application is not running, launch it and navigate to the site’s home
page in your browser. Also open up the
src/main/resources/templates/index.html file in IntelliJ. You’ll notice
that there is a fair amount of content visible on the page that isn’t contained
in index.html. This is because we’re using two fragments from
fragments.html (head and page-header). These allow for some basic
page structure and navigation to be shared across all of our views.
Have a look at the structure of fragments.html, but you will NOT need to do
any work within this file for this assignment.
Tip
We use Twitter’s Bootstrap CSS, HTML, and
JS framework to provide some styling and functionality to our views. The
appropriate files are included at the top of fragments.html and thus
are included on every page of our app.
You won’t have to explicitly use Bootstrap at all in this assignment, but it’s a great way to make your sites look good with minimal work. Consider using it in your own projects!
The List Views
Turn your attention to list.html. This page displays a table of links
broken down into several categories. Data from columnChoices is used to
fill in the header row, and information stored in tableChoices generates
the link text.
The most interesting part of this template is how we generate the links:
21 22 23 24 25 26 27 | <td th:each="category : ${tableChoices}">
<ul>
<li th:each="item : ${category.value}">
<a th:href="@{/list/jobs(column=${category.key},value=${item})}" th:text="${item}"></a>
</li>
</ul>
</td>
|
tableChoicesis a HashMap fromJobData, and it contains the names of theJobfields as keys (employer, etc.). The value for each key is an ArrayList ofEmployer,Location,CoreCompetency, orPositionTypeobjects.In line 21,
categoryrepresents one key/value pair fromtableChoices, and in line 23,itemrepresents one entry from the stored ArrayList.We’ve seen the syntax
@{/list/jobs}to generate a link within a Thymeleaf template, but we haven’t seen the other portion of the link:(column=${category.key},value=${position}). This syntax causes Thymeleaf to dynamically generate query parameters for our URL.
In line 24, we set these parameters by using column= and value=. The
values of these parameters are determined dynamically based on
${category.key} and ${item}. Since these values come from
tableChoices, the keys will be employer, location, etc. The
values will be the individual elements from the related ArrayList. When the
user clicks on these links, they will be routed to the
listJobsByColumnAndValue handler in ListController, which looks for
these parameters.
Clicking on one of the links will display a list of jobs that relate to the
choice, via the listJobsByColumnAndValue handler method. However, that
view, list-jobs.html isn’t working yet. While the handler method is fully
implemented, the view template needs some work.
For now, click one of the the Location links. This sends a request as we outlined above, but doing so only displays a page with a title and no job list.
The page you see at /list/values?column=location&value=... is generated by
the list-jobs.html template. It has a similar structure as list.html,
but the table consists of only one column.
Note
Select “Kansas City” from the list of locations, and then check the address bar of your browser:
/list/jobs?column=location&value=Kansas%20City
Thymeleaf inserts %20 for us, to represent a space, but this may
actually be hidden in your browser’s address bar.
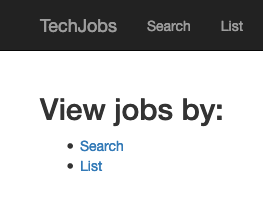
The Search View
Finally, click on Search from the home page, or the navigation bar, and open
up search.html in IntelliJ. You’ll see a search form (in both the browser
and template file) that gives the user the option of searching by a given
Job field, or across all fields. This is an exact visual analog of our
console application.
This template will be used to display search results, in addition to rendering the form. This will give the nice user experience of easily searching multiple times in a row.
Wrap Up the Code Review
Once you understand the controllers and views that are already in place, you’re ready to begin your work.
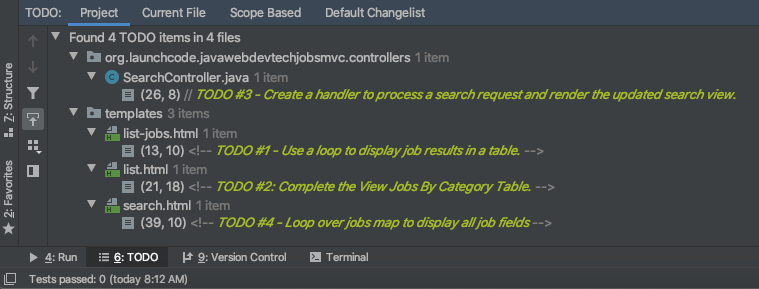
In IntelliJ, select View > Tool Windows > TODO to pop open a small pane at
the bottom of the window. This list is populated by any code comments that
start with TODO. You’ll see your tasks listed, and clicking on any one will
open the relevant file.
As you work on your tasks, refer to the demo app.
2) Complete the List Views
Open the list-jobs.html template. Currently, the page just establishes the
navigation bar and page title. You need to add code that will present relevant
job information.
Display List of Jobs
This page needs to show full job listings—ID, employer, location, etc.
In
list-jobs.html, create a loop to display each job passed in from the controller. The job data should be presented in tables, with each job in its own table. Be sure to check inListControllerto find the variable names available to the template.Adding the CSS class
"job-listing"to a table provides some nice styling, courtesy of Carly’s work!Construct a table for each job, with one job field per row.
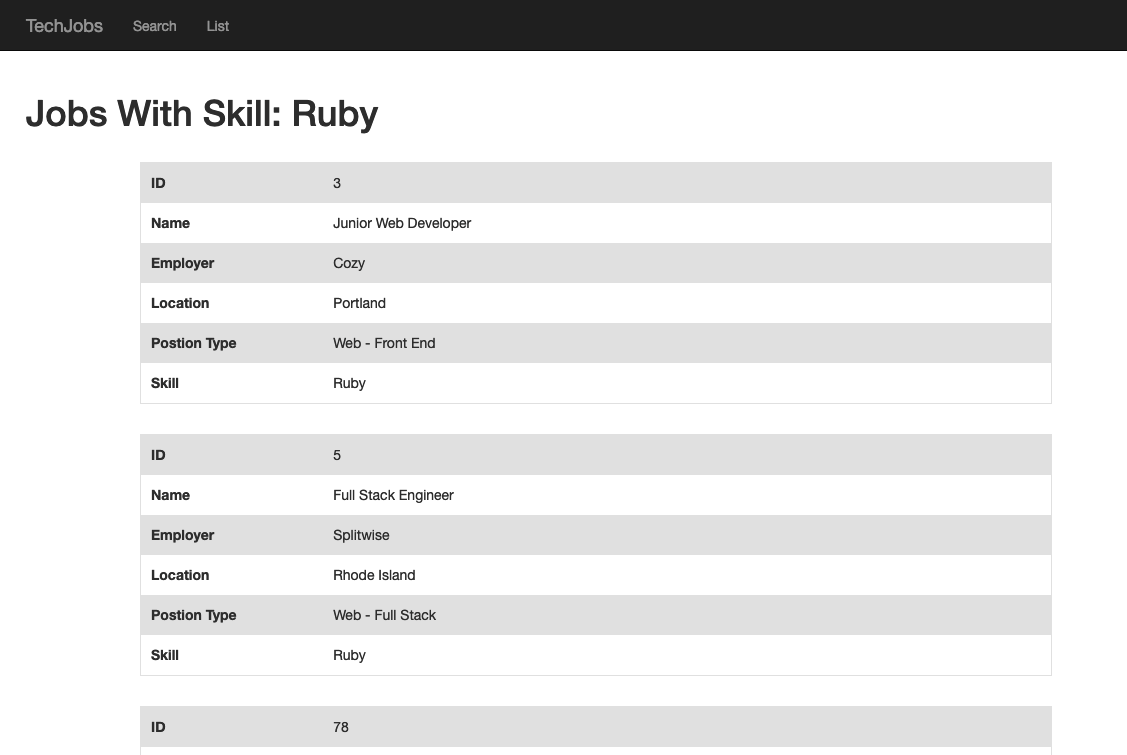
Be sure to test your code by running the program and clicking links from different categories on the
/listpage.Clicking the Web - Back End link yields 6 jobs.
iOS yields 4 jobs.
New York yields 1 job.
Etc.
Add View All Link
Open the list.html template. This file builds the table to display all of
the links for the different Job fields. However, the link for the All
column is missing.

You can fix this several different ways, but two options are presented below. Note that you only need to implement ONE option, not both.
Modify
tableChoicesinListControllerto include another key/value pair. Check the method that renders the template to help identify the name to use for the key.Modify
list.htmlto fill in the empty table cell with the necessary link. CheckListControllerto help identify the data to pass in for the query parameters.
Be sure to test your code by clicking your new View All link in the table. There are 98 jobs in the data file.
3) Complete SearchController
Add a displaySearchResults handler method to SearchController:
Use the correct annotation for the method. To configure the correct mapping type and mapping route, refer to the
formtag in thesearch.htmltemplate. (Use@GetMappingor@PostMappingrather than@RequestMapping.)The
displaySearchResultsmethod should take in aModelparameter.The method should also take in two other parameters, specifying the type of search and the search term.
In order for these last two parameters to be properly passed in by Spring Boot, you need to use the correct annotation. Also, you need to name them appropriately, based on the corresponding form field names defined in
search.html.If the user enters “all” in the search box, or if they leave the box empty, call the
findAll()method fromJobData. Otherwise, send the search information tofindByColumnAndValue. In either case, store the results in ajobsArrayList.Pass
jobsinto thesearch.htmlview via themodelparameter.Pass
ListController.columnChoicesinto the view, as the existingsearchhandler does.
4) Display Search Results
Once you have your displaySearchResults handler passing information to the
view, you need to display the data.
In
search.html, create a loop to display each job passed in from the controller.Put the job results into a set of tables, similar to what you did for the
list-jobsview.
Tip
You can reuse the code you just wrote in list-jobs.html by defining a
new fragment in that file. Then you need to include that fragment in
search.html.
For the fragment to work properly in both files, the variables passed in by
model.addAttribute() must use the same names.
Sanity Check
At this point, all autograding tests should be passing. To be sure, right-click on the org.launchcode.techjobs.mvc package in src/test/java and select Run tests in… If any test fails, evaluate the failure/error message and go back to fix your code.
You might also want to check your app’s behavior against that of our demo app.
How to Submit
To turn in your assignment and get credit, follow the submission instructions.
Bonus Missions
Here are some additional challenges, for those willing to take them on:
When we select a given field to search within and then submit, our choice is forgotten and returns to “All” by default. Modify the view template to keep the previous search field selected when displaying the results.
In the tables displaying the full job data, find a way to manipulate the font, style, capitalization, etc. to further distinguish the labels from the data (e.g. Employer: LaunchCode). (Hint: We capitalize the title string in multiple templates, so have a look around).
In the tables of the job results, make each value (except
name) hyperlinked to a new listing of all jobs with that same value. For example, if we have a list of jobs with theJavaScriptskill, clicking on a location value likeSaint Louiswill generate a new list with all the jobs available in that city.
Super Bonus Mission
This is a big one! Prepare for a challenge!
Notice that we went to the trouble of passing in the actionChoices
HashMap to the view in the HomeController.index method. This puts the
responsibility of which actions should be presented on the controller, and not
the view. However, we didn’t go to such lengths for the navigation links
displayed on every page of the site.
In order to make the navigation links similarly detached, we’d need to pass
actionChoices in to every view, since the nav links are generated in
fragments.html. We’d have to do something like the line below in every
handler method, which would be a pain, not to mention error-prone and difficult
to update.
model.addAttribute("actions", actionChoices);
Let’s fix this.
Make a new controller,
TechJobsController. This new controller should have a static HashMap,actionChoices. The HashMap should be populated via a no-argument constructor, just likecolumnChoicesis populated inListController. You do NOT need to add the@Controllerannotation to this class.Write a static method
getActionChoicesinTechJobsControllerthat returns theactionsHashMap.Add the annotation
@ModelAttribute("actions")to this method. This annotation will cause the return value of the method to be set in the model with key"actions"for every controller that extendsTechJobsController.Modify every one of your other controllers to extend
TechJobsController.Modify
fragments.htmlto use the passed-in action choices to generate the navigation links.Finally, update your code so that
columnChoicesalso lives inTechJobsController.