18.1. Classes for C#
In a previous chapter, you were introduced to the ideas of classes, class memebers and how to instantiate objects. The examples in that chapter were already built for you in an IDE that was not Visual Studio. The goal for this chapter and the next is to provide you with confidence for using Visual Studio to creating classes of your own and populating them as you desire.
Before we start: There are three different code examples that you will encounter in this chapter.
- The first example is a program called
HelloWorldRunner. The book will walk through how to build and modify this program. We suggest you build along with the book.
- The first example is a program called
- The second example will walk through a
Studentclass. This example will be used later in the exercises. We suggest working with this code at the time of the exrcises, using the book as a reference point.
- The second example will walk through a
- The last code example is the
Temperatureapp you created in the Exceptions chapter. We will be updating it with concepts from this current chapter.
- The last code example is the
18.1.1. Creating A New Class In An Exisiting C# Project
In order to start coding along with the chapter, you need to create a new Visual Studio project named HelloWorldRunner.
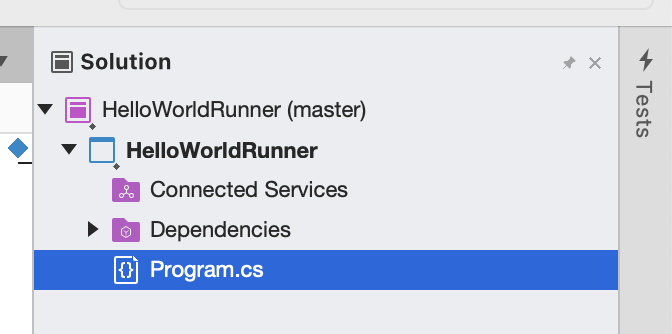
Next, we want to create a new class. You will use your Solution Explorer in order to do this. The Solution Explorer displays the files and folders contained with in your project. It looks like this:
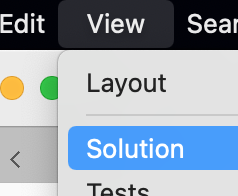
If you don’t see your Solution Explorer right away, look in the View menu.
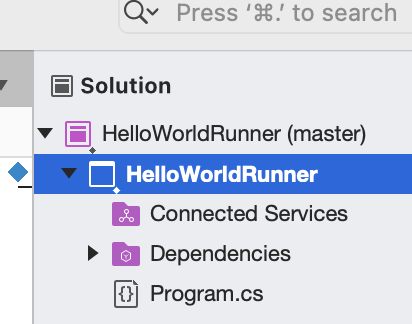
Now that you have your Solution Explorer, we can add a new class!
We want to add the class to our current project HelloWorldRunner, not the solution (which has the same name in this example).
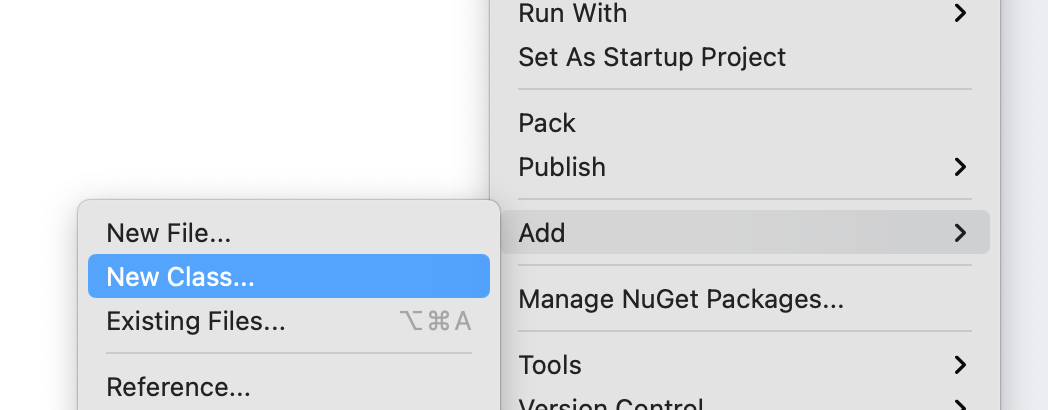
Click on your the project with your secondary button (the “wrong” click on a mouse or control + click on a touchpad).
This should bring up a large pop-up menu.
The project is contained within your solution. So far we have matched the names of our solution with our project, but they don’t have to match.
In the middle of the menu, you should see Add >. Go ahead and click that.
A new menu pops up where you can select what you want to add.
Select New Class....
After clicking New Class..., a new window will pop up asking what exactly you want to create and what you want to call it.
Select Empty Class (which should be the default option).
At the bottom of this window, you will see an option to name your new class.
Let’s name it HelloWorld.
If you look at your Solution Explorer, you should see that your new class has been added. They are listed in alphabetical order.

Now you are ready to code-a-long.
18.1.2. A Minimal Class and Object
Classes may contain fields and methods. Fields contain the data of a class and methods define actions a class can take. We say that fields and methods are members of a class.
Example
Let’s create a class called HelloWorld with one field, message, and one method, SayHello().
message will be a string and have a value of "Hello World".
SayHello() will not return a specific value and instead print out the value of message.
1 2 3 4 5 6 7 8 9 10 11 | public class HelloWorld
{
public string message = "Hello World";
public void SayHello()
{
Console.WriteLine(message);
}
}
|
The only field in the HelloWorld class is the string message, while the
only method is SayHello(), which prints the value of the message field
and doesn’t return anything.
Note
Remember, there is no Main method inside the HelloWorld class.
In order to use our SayHello method, we would create a way to invoke it inside the Main method.
To execute SayHello(), we’ll need to create an instance of the
class HelloWorld. We refer to an object created from a particular class as
an instance of that class.
Here’s how this might look with our HelloWorld class:
Example
1 2 3 4 5 6 7 8 9 | public class HelloWorldRunner
{
public static void main(string[] args)
{
HelloWorld hello = new HelloWorld();
hello.SayHello();
}
}
|
In order to call the SayHello method of HelloWorld, we must
first have an instance of HelloWorld, which we create using the
syntax new HelloWorld() from inside the Main method.
If you recall, just as with built-in classes, classes that we create define their own types.
So the object hello is a variable of type HelloWorld.
We introduced this HelloWorld class as a means of illustrating the simplest
representation of some basic concepts in C#. The goal of the next few
lessons is to build up the machinery to create a wide variety of
interesting classes that can be used to create complex programs and
elegantly solve difficult problems.
18.1.3. The this Keyword
In HelloWorld above, we could have written SayHello this way,
with the same net effect:
6 7 8 9 | public void SayHello()
{
Console.WriteLine(this.message);
}
|
In this context, inside of the class, we can refer to fields (and
methods) that belong to the class using the special object, this.
Whenever you use this, it always refers to the object that the
given code is currently within. In other words, this will always be
an instance of the given class. Since it is not legal to create code
outside of a class in C#, this nearly always makes sense to use
(there’s one exception, that we’ll encounter soon).
You are allowed to create local variables (variables declared
within a method) with the same name as a field of the given class. In
this case, in order to refer to the field, we must use this.
Example
Let’s look at how this works with our HelloWorld class:
1 2 3 4 5 6 7 8 9 10 11 12 13 14 15 16 17 | public class HelloWorld
{
public string message = "Hello World";
public void SayHello()
{
string message = "Goodbye World";
// The line below prints "Goodbye World"
Console.WriteLine(message);
// The line below prints "Hello World"
Console.WriteLine(this.message);
}
}
|
Warning
When a local variable has the same name as a field, we say that the local variable shadows the field. Errors caused by shadowing can be tricky to spot, so it’s best to avoid doing this in your code.
Note
If you want to learn more about this subject, check out the documentation on using the this keyword.
18.1.4. Check Your Understanding
Question
The following code block contains several bugs. Mark all of the lines that contain a bug in the code.
1 2 3 4 5 6 7 8 9 | public class Greeting
{
public String name = "Jess"
public void SayHello()
{
Console.WriteLine("Hello " + here.name + "!");
}
|
line 8
line 4
line 7
line 1