Terminal Commands Tutorial
As mentioned in the terminal chapter, the essence of the command line is text. Since this is quite different from how many may be used to using their computers, this tutorial is meant to help you picture how your machine is responding when you input common commands into the terminal.
Your computer is basically a file storage system. Sure, you may have many applications installed. But where do they all live? In folders. Aka, directories. The basics of terminal usage involve navigating these directories.
Let’s take a look at a given project’s file tree using a GUI window.
Note
This file tree is similar to the GUI on your own computer. The formatting will be a little different, but the overall visaul organization is the same.
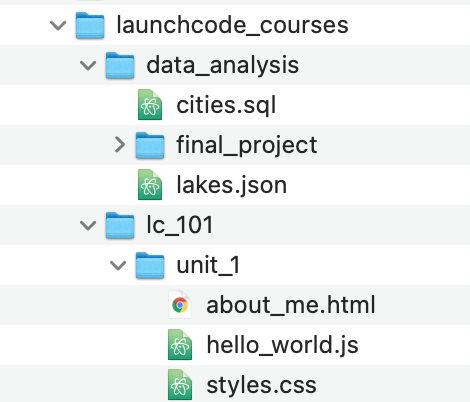
Sample file tree GUI
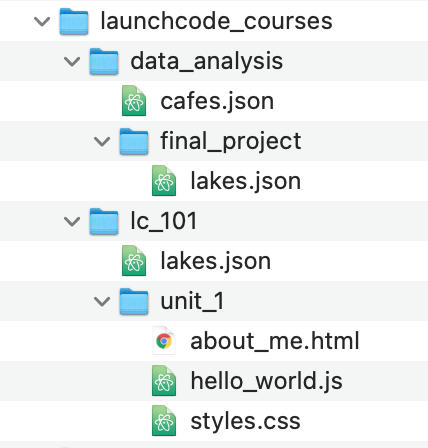
When working in the terminal, it can be helpful to think of yourself as physically inside of the project’s file system. File trees, like the one above, are common visualization tools. Here’s another map-like option for imagining your file system:

Sample file system map
We’ll navigate through and edit this sample project folder for the remainder of this tutorial.
Current Directory (.)
Imagining you are inside of this file system, . is a reference
to your location, or current directory.
Starting at the top directory, launchcode_courses, . represents
your current location.

Your current directory is launchcode_courses.
Here, your terminal will look something like this:
1 | computer:launchcode_courses user$
|
Most of what you see to the left of the command prompt symbol,
$ will be different on your machine. The basic structure here is
<machine_name>:<current_directory> <user_name>$.
Note
Some users choose to alter what they see before the command prompt.
For the purposes of this tutorial, we will simply use
<current_directory> $ as the prompt.
. itself is not a command. If you type only . into the terminal,
you’re not really telling the machine to do anything just yet.
If you’re curious, try it.
Note
Most commands require you to press Enter when you are ready to run.
You will probably see a somewhat cryptic message, like this:
1 2 3 4 | launchcode_courses $ .
bash: .: filename argument required
.: usage: . filename [arguments]
launchcode_courses $
|
That’s ok! Basically, we just entered an incomplete command. Our syntax
wasn’t quite right. Keep reading and we’ll see how to properly use ..
If you move into lc_101, . then refers to that directory. We’ll
cover how to move locations in detail down in cd Command.
1 2 | launchcode_courses $ cd ./lc_101/
lc_101 $
|
You may notice that the <current_directory> has updated but apart from
that, the computer doesn’t give us much response. This is quite common
and is a reason why our file system visuals come in handy to help remind
us what we’re doing.
Back in our map, we’ve done this:

We’re now in lc_101
Parent Directory (..)
.. is a reference to your parent directory, aka the directory
that CONTAINS your current location.
Remember the GUI file tree? That containment structure is represented through indentation:
launchcode_courses contains data_analysis and lc_101.
By the end of the Current Directory (.), we found ourselves inside
of lc_101.
We’re still in lc_101.
launchcode_courses is the parent directory of both the lc_101 and
data_analysis directories. While we’re in lc_101, .. refers to
launchcode_courses.
Moving further down into unit_1,
1 2 | lc_101 $ cd ./unit_1/
unit_1 $
|

We’re now in unit_1.
.. now refers to lc101.
../.. here refers to launchcode_courses.
Like . (Current Directory (.)), .. isn’t a command itself, but
rather a notation. We’re now ready to tackle our first command!
pwd Command
Entering the pwd command in your terminal returns your current
location, aka your working directory.
1 2 3 | unit_1 $ pwd
/launchcode_courses/lc_101/unit_1
unit_1 $
|
The working directory is another term for the current directory. Think of this command as like the ‘You are here’ star on our file maps.
We’re still in unit_1.
You’re basically just telling the computer to give you your current location.
This may seem basic, but this one is essential. You need to know your current
location when working in the terminal. A lot of beginner programmers simply
enter commands into the terminal without mind to where they are. pwd is
like a sanity check - a quick way to ensure that you know where you are and
what you’re doing. It’s the file system counterpart to Git’s git status.
ls Command
Entering the ls command in your terminal returns the contents of your
current directory. Recall, we’re in unit_1.
We’re still in unit_1.
1 2 3 4 | unit_1 $ pwd
/launchcode_courses/lc_101/unit_1
unit_1 $ ls
about_me.html hello_world.js styles.css
|
All of that looks to be in order. Let’s move back out into lc_101 and run
ls from there.
1 2 3 4 5 6 7 8 9 10 | unit_1 $ pwd
/launchcode_courses/lc_101/unit_1
unit_1 $ ls
about_me.html hello_world.js styles.css
unit_1 $ cd ..
lc_101 $ pwd
/launchcode_courses/lc_101
lc_101 $ ls
unit_1
lc_101 $
|
Notice that pwd Command after we moved. Also pay attention that ls
only gives us a view one level deep. Now let’s talk about how we move between
directories.
cd Command
cd <path_name> relocates you to the provided path. We’ve seen it before,
now let’s explore this command some more.
Remember, we’re inside lc_101,
We’re in lc_101.
To change directories to our Parent Directory (..), we run the following:
1 2 3 4 5 6 | lc_101 $ pwd
/launchcode_courses/lc_101
lc_101 $ cd ..
launchcode_courses $ pwd
/launchcode_courses
launchcode_courses $
|
It’s pretty self-explanatory, now we’re back in launchcode_courses.
We’re back to launchcode_courses.
Not surprisingly, to go down into data_analysis, we run
cd ./data_analysis/
1 2 3 4 5 6 | launchcode_courses $ pwd
/launchcode_courses
launchcode_courses $ cd ./data_analysis/
data_analysis $ pwd
/launchcode_courses/data_analysis
data_analysis $
|

We’ve made it to data_analysis.
Ok, so we know how to move one level above our current location (into our
parent directory) and how to move one level below our working directory. But
what if we wanted to get back to lc_101 from where we are now, in
data_analysis?
In order to move to a directory that is contained within the same parent as our working directory, we need to first go back up into the parent.
1 2 3 4 5 6 7 8 9 10 | data_analysis $ pwd
/launchcode_courses/data_analysis
data_analysis $ cd lc_101
bash: cd: lc_101: No such file or directory
data_analysis $ pwd
/launchcode_courses/data_analysis
data_analysis $ cd ../lc_101/
lc_101 $ pwd
/launchcode_courses/lc_101
lc_101 $
|
Do you see the faulty command? We tried running cd lc_101 from inside
data_analysis but the terminal did not recognize that path name from inside
the data_analysis directory.
We already know how to move to a parent directory, cd .., above we see how
we can move into a parent directory and down into one of its children all in
one command, cd ../lc_101/.
Here’s a visual of where we’ve just been

Path to move to a peer directory.
For practice, let’s go from our current spot in lc_101, down into
final_project.
1 2 3 4 5 6 7 8 9 10 11 12 13 14 | lc_101 $ pwd
/launchcode_courses/lc_101
lc_101 $ cd ..
launchcode_courses $ pwd
/launchcode_courses
launchcode_courses $ ls
data_analysis lc_101
launchcode_courses $ cd data_analysis/
data_analysis $ ls
cities.sql final_project lakes.json
data_analysis $ cd final_project/
final_project $ pwd
launchcode_courses/data_analysis/final_project
final_project $
|
Above, we check our location as we navigate to make sure we know where we’re
going. If we’re really confident though, we can accomplish moving from
lc_101 to final_project all in one go. Let’s say we moved back to
lc_101 already.
1 2 3 4 5 6 | lc_101 $ pwd
/launchcode_courses/lc_101
lc_101 $ cd ../data_analysis/final_project/
final_project $ pwd
launchcode_courses/data_analysis/final_project
final_project $
|
Are you starting to see how terminal navigation can get you places swiftly?
Let’s do one more quick move for fun. To go back to lc_101,
all we need to do is cd ../../lc_101/.
1 2 3 4 5 6 | final_project $ pwd
launchcode_courses/data_analysis/final_project
final_project $ cd ../../lc_101/
lc_101 $ pwd
launchcode_courses/lc_101
lc_101 $
|
Perhaps you noticed that the computer does not return anything to you after a
successful cd command. In the navigation samples above, we frequently rely
on the pwd Command and the ls Command to remind us where we
are and what paths are available to us.
mkdir Command
mkdir <new_directory_name> creates a new directory inside your current
location.
We’re in the lc_101 directory.
We’re back in lc_101.
Here, let’s create a directory for Unit 2 materials.
1 2 3 4 5 6 7 8 | lc_101 $ pwd
launchcode_courses/lc_101
lc_101 $ ls
unit_1
lc_101 $ mkdir unit_2
lc_101 $ ls
unit_1 unit_2
lc_101 $
|
Again, the computer does not return anything to you after this command and simply responds ready to accept another prompt. But we can see from our helpful ls Command that a new directory has been created.
And we can visualize our changes like this:

mkdir creates a new directory
Note
While mkdir creates a new directory, it does not place us into that directory.
Additionally, we don’t need to be in the parent of the newly created directory.
We can run mkdir from anywhere within the file system, as long as we use the
appropriate file path.
rm Command
rm <item_to_remove> removes a given item from the file tree.
Let’s say we decide we no longer need our cities.sql data. We can remove
it!
For fun - and practice! - let’s remove it while we’re still located in the
lc_101 directory.
1 2 3 4 5 6 7 8 | lc_101 $ pwd
launchcode_courses/lc_101
lc_101 $ rm ../data_analysis/cities.sql
lc_101 $ pwd
launchcode_courses/lc_101
lc_101 $ ls ../data_analysis/
final_project lakes.json
lc_101 $
|
See what we did there? Instead of moving into the parent directory of
cities.sql, we just used the longer file path relative to our location in
lc_101. And to check that our rm command did what we expected? Well we
also checked that right from our spot in lc_101 with ls and a longer
path.
Here’s the map of what we’ve done:

cities.sql is gone!
To remove a directory entry, rather than simply a file, requires an option
on the command. An option is an additional character, or set of characters,
added on the end of a text command to give the computer more instructions
related to your command. Options are usually indicated with a -. We’ll talk
more about the presence of options in man Command.
A common method to remove a directory is to use the -r option, although
there are other choices.
Let’s say we no longer want our unit_2 directory. We’re still in
lc_101.
1 2 3 4 5 6 7 8 9 10 | lc_101 $ ls
unit_1 unit_2
lc_101 $ rm unit_2
rm: unit_2: is a directory
lc_101 $ ls
unit_1 unit_2
lc_101 $ rm -r unit_2
lc_101 $ ls
unit_1
lc_101 $
|
Notice that simply using rm in line 3 returns a response telling us that
the item we’ve asked to remove is a directory. However, using rm -r in line
7 successfully removes the unit_2 directory.
Back in our map:

unit_2 is gone without a trace
cp Command
cp <source_path> <target_path> copies the item at the source and puts it in
the target path. The item can be a file or whole directory and is named within
its own source path.
Take our sample file tree above. We’re still in lc_101 and say we want to
copy our lakes.json file and place that copy inside the final_project
directory.
1 2 3 4 5 6 7 8 9 10 11 12 13 | lc_101 $ pwd
launchcode_courses/lc_101
lc_101 $ cd ../data_analysis/
data_analysis $ pwd
launchcode_courses/data_analysis
data_analysis $ ls
final_project lakes.json
data_analysis $ cp ./lakes.json ./final_project/
data_analysis $ ls
final_project lakes.json
data_analysis $ ls ./final_project/
lakes.json
data_analysis $
|
We didn’t need to cd into data_analysis but since we are dealing with a
file contained within it, it made sense to do so. Once we ran our cp
command, we checked the contents of both data_analysis and
data_analysis/final_project to verify the copy was made.
And of course, now there are two lakes.json.

lakes.json double take
We can think of cp as basically copy and paste, since the target path is
included in the command.
mv Command
mv <item_to_move> <target_path> moves an item to the provided target path.
The item being moved can be a single file or a whole directory. When referring
to the item being moved, its source path is required, just like the
cp Command.
Still in data_analysis, lets move data_analysis/lakes.json into
lc_101.
1 2 3 4 5 6 7 8 | data_analysis $ mv ./lakes.json ../lc_101/
data_analysis $ pwd
launchcode_courses/data_analysis
data_analysis $ ls
final_project
data_analysis $ ls ../lc_101/
lakes.json unit_1
data_analysis $
|
As usual, we use ls to verify our results. Now our map looks like the
following:

mv moves one of the lakes.json.
touch Command
touch <new_file_name> creates a new file.
Back in data_analysis, lets add a new cafes.json file to our directory.
1 2 3 4 5 6 7 8 | data_analysis $ pwd
launchcode_courses/data_analysis
data_analysis $ ls
final_project
data_analysis $ touch cafes.json
data_analysis $ ls
cafes.json final_project
data_analysis $
|
Here’s what that gives us:

touch adds a file
Here’s what that looks like in the GUI:
clear Command
clear wipes your terminal window of any previously run commands
and outputs in case you need a clean screen to think straight.
You probably won’t encounter a scenario where you need to clear your terminal, but it can be a nice command to know if you’re a minimalist.
There’s no change to our file map to show when this command is run. And in the terminal window, as soon as enter is hit, the command results in what looks like a new window.
1 | data_analysis $
|
man Command
man is your best friend in the terminal. Running man <command> gives you a manual
entry of what that command does, what options it takes, and more
documentation than you could ever need. It’s so thorough, it makes this
guide blush. Any command you think you may need, but you’re not sure how
to use it, or maybe you want to do something specific and are wondering if
there’s a specialized option for it, use man to get more info!
Practice looking up some of the commands you know; maybe you’ll learn a new option or two!
Some other terminal stuff you should know when using the manual:
Scrolling: Some entries are very long! They will probably need to be scrolled through. You’ll know there’s more to read if you see
:at the bottom of your terminal window. You can use your keyboard’s arrow keys to navigate the entry. If you reach the bottom of the entry, you’ll see a line that readsEND.Exiting: Once you’re finished reading, you’ll need to exit the manual page using the q command.
Tip
Git bash does NOT support man. Instead, <command> --help will provide a scaled down altenative.
Exiting Programs
ctrl + c Details
ctrl + c can be used to exit a running program.
Some programs take different commands to exit. ctrl + c is sometimes the command to quit a running program and other times used to prompt the running program for an different exit command.
q
q is another command for exiting a running program. Notably, it is needed
to exit the man Command pages.
Histroy of the Terminal
If you want to learn more about the history of the terminal and CLI, check out the following: