29.3. Angular File Structure
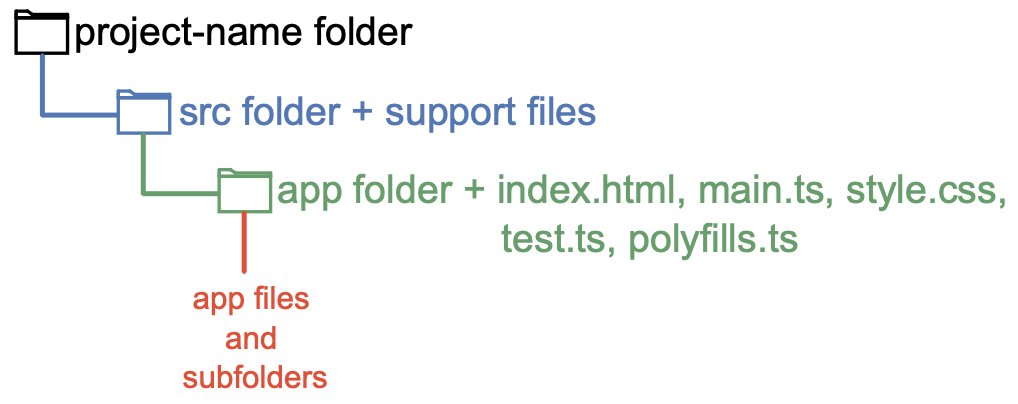
Each Angular project contains a standard file structure, which is shown in the figure below.

All of the project files (and there will be LOTS) are stored in the single,
top-level folder, project-name, which contains a src folder and a set
of support files.
Note
When you start a new Angular project, do not worry about the support files. These will be generated automatically, and they take care of the routine technical details for making your project run smoothly.
src contains the app folder and five important files: index.html,
main.ts, style.css, tests.ts and polyfills.ts. We will explore
these files in more detail on the next page. For now, recognize that they
control how the Angular project operates.
The app folder contains the files and subfolders needed to control the
nitty-gritty details of displaying a webpage. For your projects, most of your
time and effort will be spent modifying the contents within app.
29.3.1. Installing Angular
Angular uses its own set of command line instructions to create, update, and launch projects. Before you dive too deeply into the Angular lessons, you need to install the Angular command line interface (CLI) on your computer. Fortunately, the process is relatively painless.
Open up the terminal (or the terminal panel in VSCode) and enter the following command:
npm install -g @angular/cli@12
Note
There are more recent versions of this package but we're using version 12 for generating new code.
When you pull down starter code from Github, you will have to run npm install which will set up that project to use Angular 8.
While you may notice differences between the two versions, the core functionality of Angular will remain the same.
Note
If the installer prompts you to make choices, just accept all of the default options.
This command installs the CLI globally on your computer, which means that Angular commands will work regardless of the folder you have open.
Angular commands begin with the keyword ng (for A-ng-ular), and the most
commonly used include:
ng new: Creates a new Angular project in the current directory. The shortcut syntax isng n.ng generate: Creates new files within an existing project. The shortcut syntax isng g.ng serve: Compiles a project and launches it in a form that can be displayed in a browser. The shortcut syntax isng s.
For a complete list of commands, refer to the Angular documentation.
29.3.1.1. Check Your GitHub Account
For the "HTML Me Something" assignment, you created an account on GitHub . Since you will modify Angular projects over several lessons, you need access to GitHub to download starter code and store your progress.
Follow the link and make sure you remember your login information, or enroll if you have not yet created an account.
29.3.1.2. What's in a Name?
If you Google "Angular tutorial", you will receive plenty of hits. Some of the resources will be exceptional, others not. However, you will probably notice that many of the results refer to AngularJS. This is a previous version of the software, and it is NOT the same as modern Angular.
AngularJS is NOT the same as Angular. Even the websites are different (angularjs.org vs. angular.io). We recommend that you avoid AngularJS resources for now. You can always learn how to use the old version later if your job requires it.
29.3.2. Ready To Go
As with any new coding skill or tool, the best way to learn is to actively practice. Let's begin building your first Angular project.
