Setting Up A New Module Site
Prerequisites
Python
Working with our Sphinx setup requires Python 3.5+.
Check your Python version:
$ python -V
Python 3.6.1 :: Continuum Analytics, Inc.
On some systems, Python 3 will be installed as python3:
$ python3 -V
Python 3.6.5
Note
If you are using python3, you’ll need to use pip3 wherever pip is used in the sections below.
If you don’t have a sufficient Python install, we recommend installing Miniconda.
Sphinx Setup
Install Sphinx:
$ pip install sphinx
Install Recommonmark to allow for writing of Markdown files in Sphinx:
$ pip install recommonmark
Install the LaunchCode fork of the sphinx-bootstrap-theme Sphinx
theme.
$ pip install git+https://github.com/LaunchCodeEducation/sphinx-bootstrap-theme.git@master
Install pypandoc because if you don’t, you will see an error after running build
$ pip install pypandoc
Installing the theme for development
Note
Only complete this step if you want to edit the theme for all sites. Otherwise, skip to the next section.
If you want to make changes to the theme, clone its GitHub
repo.
From the repository directory sphinx-bootstrap-theme/, run:
$ pip install -e .
This installs the Python package from the source contained in the cloned repo.
Site Setup
Clone the site template into a new directory:
$ git clone [email protected]:LaunchCodeEducation/curriculum-book-template.git SITE_NAME
Alternatively, if you don’t have an SSH key configured for your GitHub account, use HTTP:
$ git clone http://github.com/LaunchCodeEducation/curriculum-book-template SITE_NAME
Move into the new project directory. Make the module template repository
the new site’s upstream remote, for ease of updating the site when
the curriculum-book-template repository is updated:
$ git remote rm origin
$ git remote add upstream [email protected]:LaunchCodeEducation/curriculum-book-template.git
Or, with HTTP:
$ git remote rm origin
$ git remote add upstream http://github.com/LaunchCodeEducation/curriculum-book-template
Create a new empty repository on GitHub, under [@LaunchCodeEducation](https://github.com/LaunchCodeEducation) or [@LaunchCoderGirl](https://github.com/LaunchCoderGirlSTL), as appropriate. Add the new repo as a remote to your local repository, and push:
$ git remote add origin NEW_REPO_URL
$ git push origin master
Building the site
Now build the site and push, so we can configure GitHub Pages:
$ ./build.sh
Running Sphinx v1.7.2
loading pickled environment... not yet created
building [mo]: all of 0 po files
building [html]: all source files
updating environment: 1 added, 0 changed, 0 removed
reading sources... [100%] index
looking for now-outdated files... none found
pickling environment... done
checking consistency... done
preparing documents... done
writing output... [100%] index
generating indices... genindex
writing additional pages... search
copying static files... done
copying extra files... done
dumping search index in English (code: en) ... done
dumping object inventory... done
build succeeded.

The HTML pages are in docs.
If the build script fails due to a permissions error, enable its executable bit:
$ chmod +x build.sh
Note
At this point, if you wish to view the site locally then follow the instructions to set up a local HTTP preview server.
Before you can commit, remove the following line from .gitignore:
docs/*
Warning
At this point, it is very important to make sure you followed the directions above to point your origin remote at the right location.
After the build successfully completes, add and commit the built site.
You’ll have several new files and directories in this commit, since it
will be the first (and only) time many of the site’s static files are
moved into the /docs, from which they’ll be served.
$ git add .
$ git commit -m "Initial build"
$ git push origin master
Publishing via GitHub Pages
From the repository’s Settings page, enable GitHub Pages via the
/docs directory.
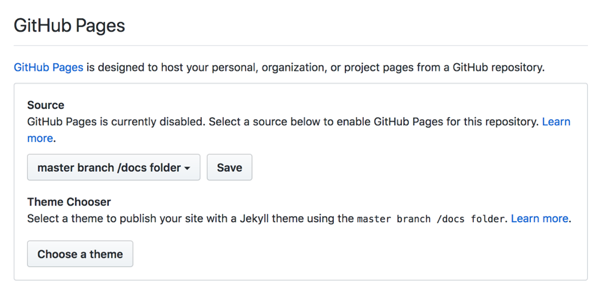
Enable GitHub Pages
After a couple of minutes, you should be able to access the live site via its GitHub Pages URL.
Site-specific settings
At the top of src/conf.py, add your site-specific settings. Be sure
to at least configure:
Variables in
site_theme_options:navbar_title: The site name that will appear in the navbar.navbar_site_name: The title of the dropdown in the navbar that lists top-level site pages.bootswatch_theme: Eitherlaunchcodeorcodergirl, depending on the intended program for the module being published.
project: The name of the curriculum module (e.g. “LaunchCode’s Liftoff”)If creating a site for CoderGirl, set
html_logo = '_static/images/logos/codergirl-white.png'
Updating the Theme or Styles
Occasionally the site’s theme or styles will be updated. We discuss how to get and deploy such changes.
Updating the site template
To update the site template (get changes to _static files,
build.sh, and other files from curriculum-book-template),
fetch the upstream changes and merge them into the master branch.
$ git fetch upstream
$ git merge upstream/master
Then build the site, commit, and push.
When merging, be very mindful of merge conflicts. In particular,
conflicts in index.rst and conf.py are common. Additionally, you
may have conflicts in docs/ (the build directory). To deal with
these, merge all other conflicts and rebuild the site. Also be watchful
for any new files added by this merge. The merge may bring in images or
.rst files that are not used by your project.
Updating the site theme
To update the site’s template, update your local install of
sphinx-bootstrap-template (--upprade forces the package to be
downloaded again):
$ pip install --upgrade git+https://github.com/LaunchCodeEducation/sphinx-bootstrap-theme.git@master
Then build the site, commit, and push.