Terminal Commands Tutorial
As mentioned in the Terminal chapter, a command line interface (CLI) just uses text. This is quite different from how we usually use our computers and phones. This tutorial is meant to help you picture how your machine responds when you enter some common commands.
Note
For the purposes of this tutorial, we will use current_directory$ as the
terminal prompt.
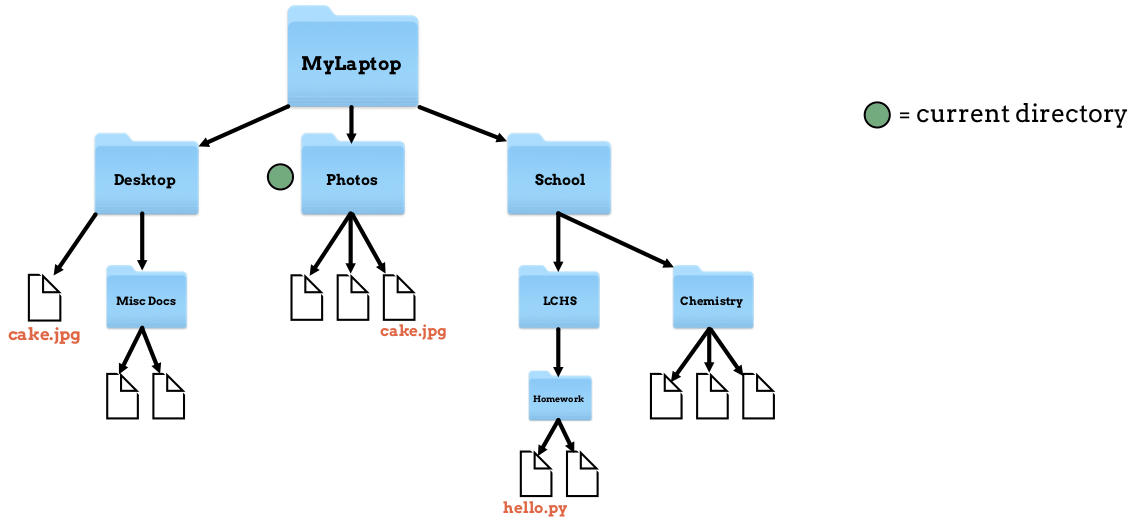
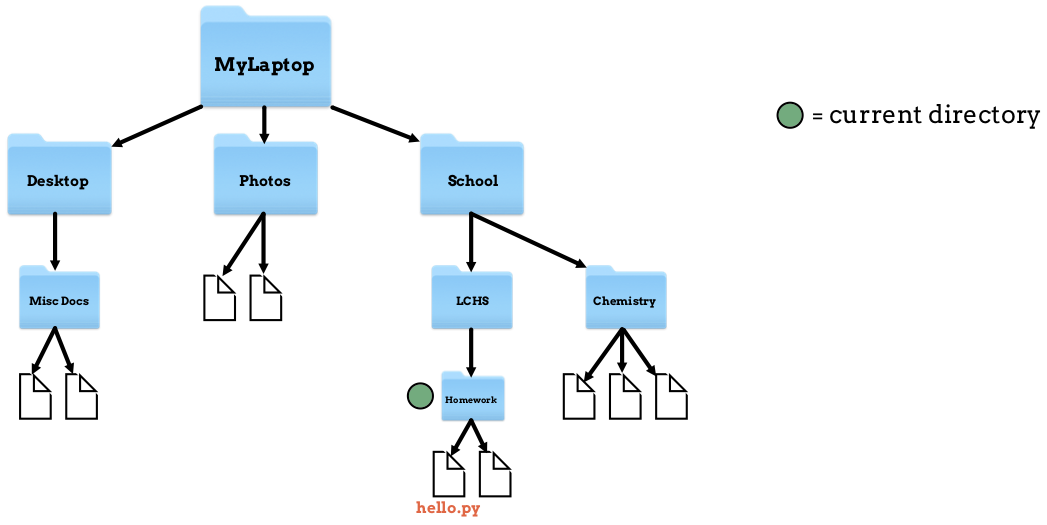
We will also use this file tree for the examples:

cd Command
cd directory_path moves us to the location described by directory_path.
Let’s start inside the LCHS directory.
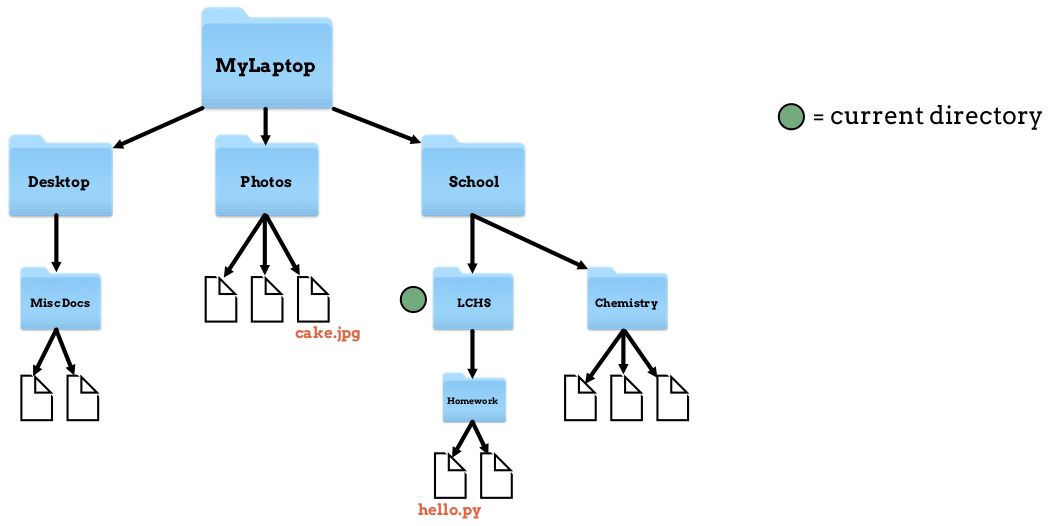
Our current position is in the LCHS folder.
To move up one level into the parent directory, run the following commands in the terminal:
1 2 3 4 5 | LCHS$ pwd
/MyLaptop/School/LCHS
LCHS$ cd ..
School$ pwd
/MyLaptop/School
|
Great! Now we’re inside the School folder.
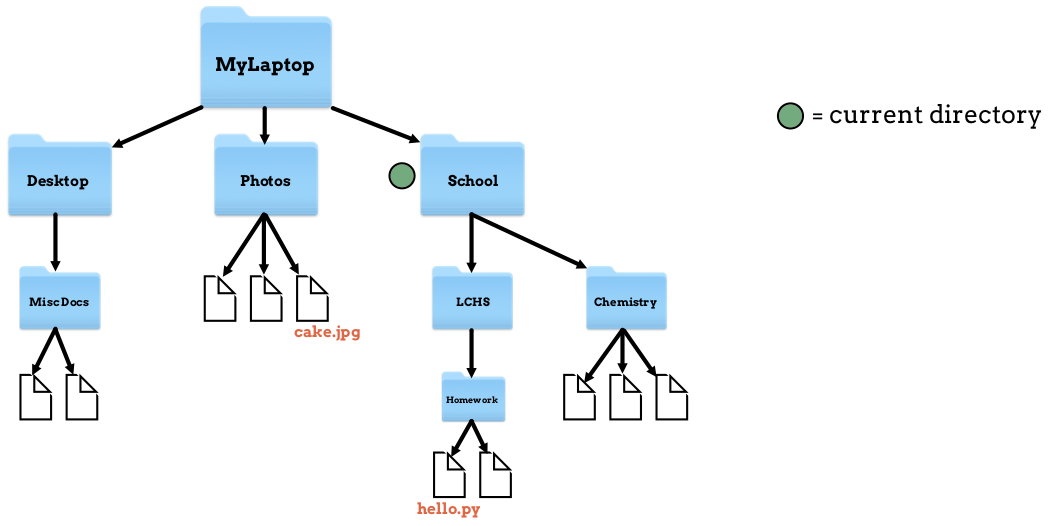
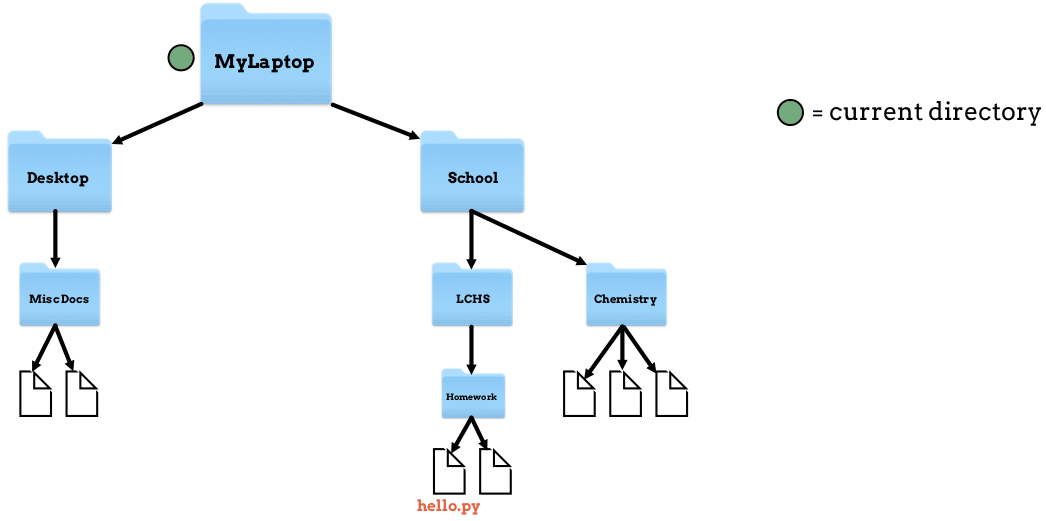
Our current position is now in the School folder.
Note
The terminal does not display anything after a successful cd command. In
the example above, we used the pwd command in lines 1
and 4 to check our location.
To make the actual move, only the cd command on line 3 is necessary.
To go back down into LCHS, we run cd ./LCHS:
1 2 3 4 5 | School$ pwd
/MyLaptop/School
School$ cd ./LCHS
LCHS$ pwd
/MyLaptop/School/LCHS
|
OK, we’ve returned to where we started.
What if we want move to Chemistry from where we are now, in LCHS?
Looking at the file tree again, we can trace the path we need to follow.
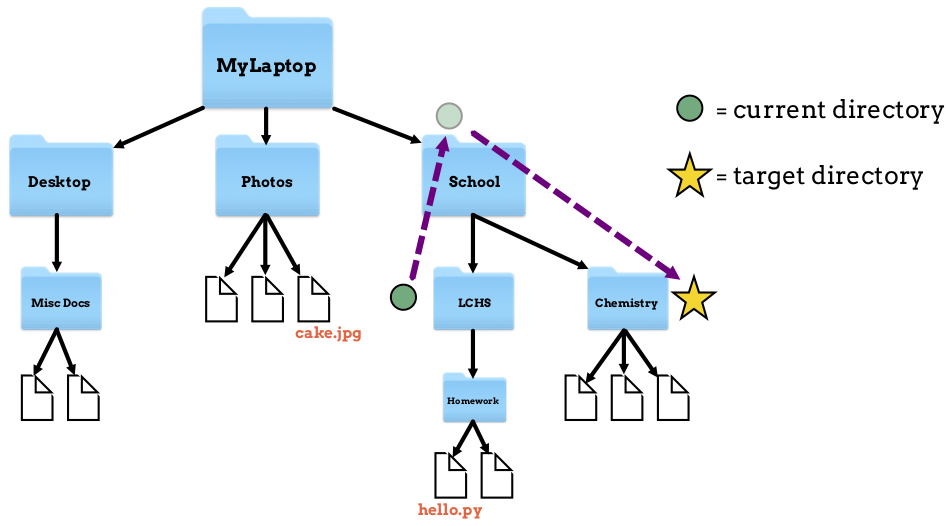
Path to move from LCHS into the Chemistry directory.
To make this move, first we need to go up one level into the parent directory,
School. Next, we must move down into the Chemistry folder.
One way to do this is with two separate commands:
1 2 3 4 5 6 | LCHS$ pwd
/MyLaptop/School/LCHS
LCHS$ cd ..
School$ cd ./Chemistry
Chemistry$ pwd
/MyLaptop/School/Chemistry
|
Line 3 moves us up one level into the School folder. Line 4 moves us from
there down one level into Chemistry.
Tip
We can combine more than one navigation step into a single command. In the
code above, we could replace lines 3 and 4 with cd ../Chemistry.
For more practice, let’s go from our current spot in Chemistry into the
Homework folder. Looking back at the file tree, we need to move up one
level (into School) and then down two levels into Homework.
Let’s start with a 3 step process:
1 2 3 4 5 6 7 | Chemistry$ pwd
/MyLaptop/School/Chemistry
Chemistry$ cd ..
School$ cd LCHS
LCHS$ cd Homework
Homework$ pwd
/MyLaptop/School/LCHS/Homework
|
Notice that we used pwd again in lines 1 and 6 to check our location. We
made the actual move in lines 3 - 5.
If we’re really confident, we can complete the move in a single command:
1 2 3 4 5 | Chemistry$ pwd
/MyLaptop/School/Chemistry
Chemistry $ cd ../LCHS/Homework
Homework$ pwd
/MyLaptop/School/LCHS/Homework
|
Are you starting to see how terminal navigation can get you places quickly?
Let’s do one more quick move for fun. To go back to Chemistry, all we need
to do is:
1 2 3 4 5 | Homework$ pwd
/MyLaptop/School/LCHS/Homework
Homework$ cd ../../Chemistry
Chemistry$ pwd
/MyLaptop/School/Chemistry
|
cd ../../Chemistry tells the terminal, Move up one level, then move up
another level, then move down into the Chemistry directory.
(Click here to return to the Terminal chapter).
clear Command
clear wipes the terminal window of all text. It gives us a clean screen
whenever we need a fresh start.
clear doesn’t change our location in the file tree.
We usually don’t need to clear our terminal, but it’s a nice command to know for those who like to avoid clutter. As soon as we hit Enter after the command, the window looks as good as new!
1 | LCHS$
|
(Return to the Terminal chapter).
cp Command
cp source_path target_path copies the item at the source and places a new
version at the target path. The item can be a file or whole directory.
Our location is inside the Photos directory.
Let’s say we want to copy our cake.jpg file and place that copy inside the
Desktop directory.
1 2 3 4 5 6 7 | Photos$ ls
cake.jpg puppy.jpg bff.jpg
Photos$ cp /MyLaptop/Photos/cake.jpg /MyLaptop/Desktop
Photos$ ls
cake.jpg puppy.jpg bff.jpg
Photos$ ls ../Desktop
cake.jpg
|
Line 1 checks the contents of our current directory.
Line 3 makes a copy of the
cake.jpgfile (found atMyLaptop/Photos/cake.jpg) and places it into the/MyLaptop/Desktoplocation.Lines 4 and 6 use the ls command to verify that
cake.jpgnow exists in two places on our device.
cake.jpg double take
We don’t actually need to be in the Photos directory to copy the
cake.jpg file. We can run the cp command from any location. However,
starting at the source_path helps us think through the process.
We can think of cp as basically copy and paste, since the target path is
included in the command.
(Return to the Terminal chapter).
ls Command
Entering the ls command in the terminal returns the contents of the current
directory.
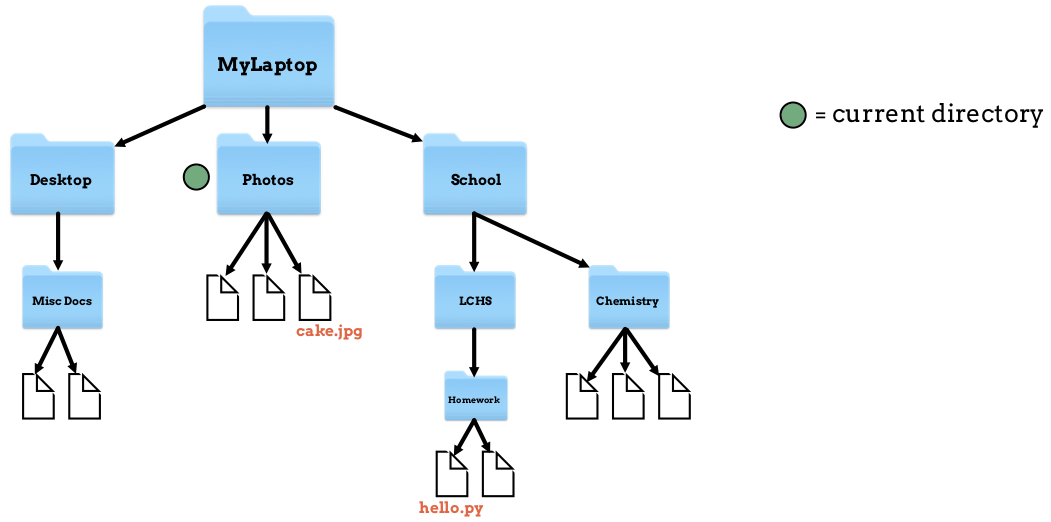
For example, let’s assume we are in the Photos directory.
Our location is inside the Photos directory.
Now let’s display a list of the contents of the folder:
1 2 | Photos$ ls
cake.jpg puppy.jpg bff.jpg
|
Line 1 is the command, and line 2 displays the returned message. All of that
looks to be in order. Let’s move up one level into MyLaptop and run ls
from there.
1 2 3 4 5 6 7 | Photos$ pwd
/MyLaptop/Photos
Photos$ cd ..
MyLaptop $ pwd
/MyLaptop
MyLaptop $ ls
Desktop Photos School
|
Notice that ls only gives us a view one level deep. The command shows us
that MyLaptop holds 3 other directories, but we do not see the contents of
those folders.
(Return to the Terminal chapter).
man Command
man is a very good friend. Running man command gives you a summary of
what that command does, what options it takes, and more documentation than we
could ever need. It’s so thorough, it makes this short tutorial blush.
Anytime we have questions about how to use a command, we can access the manual to get more info!
Try It!
Look up some of the commands you know. Maybe you’ll learn a new option or two!
Some other terminal stuff we should know when using the manual:
Scrolling: Some entries are very long! You’ll know there’s more to read if you see
:at the bottom of the terminal window. You can use your keyboard’s arrow keys to scroll through the text. Once you reach the bottom of the entry, you’ll see a line that readsEND.Exiting: Once you’re finished reading, exit the manual page by typing the letter
q.
(Return to the Terminal chapter).
mkdir Command
mkdir folder_name creates a new directory inside your current location.
We will use the Photos directory for this example.
Our location is inside the Photos directory.
Let’s create a directory for pet photos:
1 2 3 4 5 6 7 | Photos$ pwd
/MyLaptop/Photos
Photos$ ls
cake.jpg    puppy.jpg   bff.jpg
Photos$ mkdir fur_babies
Photos$ ls
cake.jpg fur_babies puppy.jpg bff.jpg
|
Again, the computer does not return anything after the mkdir command on
line 5. It just responds with another prompt. However, by using the helpful
ls command, we see that a new directory was created.
Our file tree now looks like this:
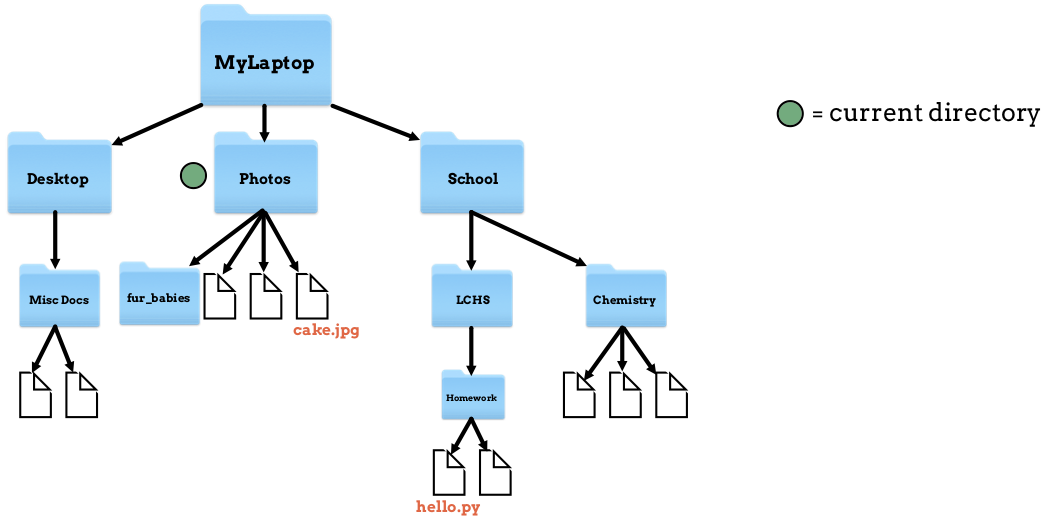
mkdir creates a new directory.
Note
While mkdir creates a new directory, it does not move us into that
location. Also, we don’t need to be in the parent of the newly created
folder.
We can run mkdir from anywhere within the file system, as long as we use
the correct file path.
(Return to the Terminal chapter).
mv Command
mv source_path target_path moves a file or directory from its old location
in the file tree to a new one.
Our location is inside the Photos directory.
Let’s start in the Photos directory like we did with the
cp command example. This time, instead of copying the
cake.jpg file, we will move it into the Desktop folder.
1 2 3 4 5 6 7 8 | Photos$ ls
cake.jpg puppy.jpg bff.jpg
Photos$ mv ./cake.jpg ../Desktop
Photos$ ls
puppy.jpg bff.jpg
Photos$ cd ../Desktop
Desktop$ ls
cake.jpg MiscDocs
|
Note the following:
In line 3, we used relative paths instead of absolute paths.
./cake.jpgmeans, Look in the current directory for the file called cake.jpg. The path../Desktopmeans, Move up into the parent directory, then down into the Desktop folder.On lines 1, 4, and 7, we use
lsto verify our results.
Now our file tree looks like this:
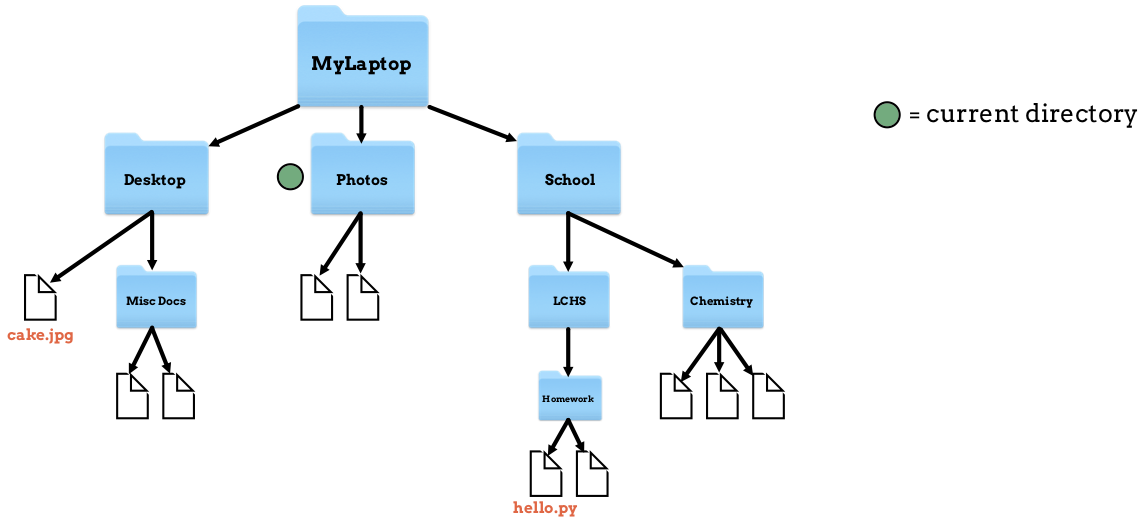
mv moves cake.jpg from Photos into Desktop.
(Return to the Terminal chapter).
pwd Command
Entering the pwd command in the terminal returns our current location in
the file tree. This is called our working directory.
1 2 | LCHS $ pwd
/MyLaptop/School/LCHS
|
The working directory is another term for the current directory. Think of this command like the You Are Here dot on our file tree.
Our working directory is LCHS.
We are basically just asking the computer to give us our current location. This may seem basic, but the information is critical.
You need to know your current location when working in the terminal.
A lot of beginners enter commands into the terminal without paying attention to
where they are. This often leads to mistakes and confusion. pwd is like a
sanity check - a quick way to know where we are and what we are doing.
(Return to the Terminal chapter).
rm Command
rm file_name removes a given item from the file tree. This item can be a
single file or an entire directory.
Removing a Single File
Let’s say we no longer want our cake.jpg photo. We can remove it!
Like many of the other terminal commands, we do NOT need to be in the same
directory as the file we want to delete. For fun - and practice! - let’s remove
cake.jpg while we’re located in the Homework directory.
Our current directory is Homework.
1 2 3 4 5 6 | Homework$ pwd
/MyLaptop/School/LCHS/Homework
Homework$ rm /MyLaptop/Photos/cake.jpg
Homework$ cd /MyLaptop/Photos
Photos$ ls
puppy.jpg bff.jpg
|
See what we did in line 3? Instead of moving into the parent directory of
cake.jpg before removing it, we stayed in the Homework folder and used
the full path to the file.
To check that our rm command did what we expected, we used the
cd command in line 4. This moved us to the Photos
directory. Then, a simple ls command returned the contents
of that folder.
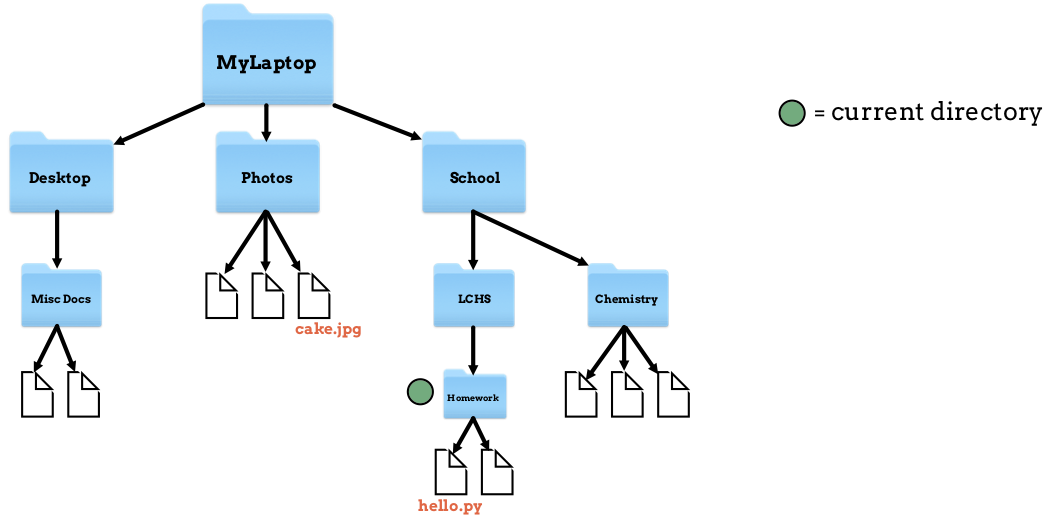
Here’s the map of what we’ve done:
cake.jpg is gone!
Removing a Directory
Warning
Removing a directory also deletes all of its contents.
To remove a directory, we need to include an option on the command. An
option is an additional character, or set of characters, added on the end of a
command. These characters give the computer more instructions about what you
want it to do. Options are usually indicated with a -.
A common method to remove a directory is to use the -r option, although
there are other choices. (Feel free to use the man rm
command to read about these).
Let’s say we no longer want our Photos directory. Assume we are in the
MyLaptop directory. Let’s see what happens when we try to use rm by
itself:
1 2 3 4 5 6 | MyLaptop$ ls
Desktop Photos School
MyLaptop$ rm Photos
rm: Photos: is a directory
MyLaptop $ ls
Desktop Photos School
|
Notice that simply using rm in line 3 returns a message telling us that
Photos is a directory. The command does NOT delete the folder. This feature
of rm helps prevent us from accidentally deleting a directory and all of
its contents. Imagine what would happen if we entered rm /MyLaptop without
this safety net!
Let’s try again, but this time we will add the -r option:
1 2 3 4 5 | MyLaptop$ ls
Desktop Photos School
MyLaptop$ rm -r Photos
MyLaptop $ ls
Desktop School
|
The rm command does not tell us when it successfully runs. The ls check
on line 4 shows us that we’ve removed the Photos folder and everything
inside of it.
Back in our map:
Photos is gone without a trace!
(Return to the Terminal chapter).
touch Command
touch new_filename creates a new file.
Our current directory is Homework.
In the Homework directory, lets add a new file called loop_practice.py.
1 2 3 4 5 | Homework$ ls
hello.py user_input.py
Homework$ touch loop_practice.py
Homework$ ls
hello.py loop_practice.py user_input.py
|
Here’s what the command on line 3 gives us:

touch adds a file.
(Return to the Terminal chapter).