Coding together allows you to work as a team so you can build bigger projects faster.
In this studio, we will practice the common Git commands used when multiple people work on the same code base.
You and a partner will begin by coding in tag-team shifts. By the end of the task you should have a good idea about how to have two people work on the same code at the same time. You will learn how to:
This lesson reinforces:
The instructor will discuss why GitHub is worth learning. You already know how to use a local Git repository with one branch, giving you the ability to move your code forward and backward in time. Working with branches on GitHub extends this ability by allowing multiple people to build different features at the same time, then combine their work. Pull requests act as checkpoints when code flows from branch to branch.
Students must pair off for this exercise. If you have trouble finding a partner, ask your TA for help.
We are going to simulate a radio conversation between the shuttle pilot and mission control.
First, find a new friend to share the activity.
You and your partner will alternate tasks, so designate one of you as Pilot and the other as Control. Even when it is not your turn to complete a task, read and observe what your partner is doing to complete theirs. The steps here mimic how a real-world collaborative Git workflow can be used within a project.
Warning
As you go through these steps, you'll be working with branches. It's very
likely you will make changes to the code only to realize that you did so in the
wrong branch. When this happens (and it happens to all of us) you can use
Git stash to cleanly move your changes to another branch. Read about how
to do so in our Git Stash tutorial.
Note
Be careful if you try to use copy/paste with the git commands! The
$ symbols in the screenshots represent to the prompts in the terminal.
They are NOT part of the commands.
Control: Navigate to your development folder. Enter the following 3 commands to create a new project.
$ mkdir communication-log
$ cd communication-log
$ git init
In that directory, open a new file index.html in the editor of your choice.
Paste in this code:
1<html>
2   <body>
3      <p>Radio check. Pilot, please confirm.</p>
4   </body>
5</html>
Let's check that our html looks okay by opening it in a browser. Do this by
selecting File > Open File in your web browser, and navigating to the
location of your new HTML file. The URL will look something like this:
file:///Users/username/Development/communication-log/index.html.
Once you've checked this file in the browser, let's stage and commit it.
First, check the status.
$ git status
On branch main

Initial commit

Untracked files:
(use "Git add <file>..." to include in what will be committed)

   index.html

nothing added to commit but untracked files present (use "git add" to track)
The output shows is that index.html is not staged. Let's add
everything in this directory, then check the status again.
$ git add .
$ git status
On branch main

Initial commit

Changes to be committed:
(use "git rm --cached <file>..." to unstage)

   new file:   index.html
The output tells us that the file is staged. Now let's commit. After
that, we can see a record of our progress by using git log.
$ git commit -m 'Started communication log.'
[main (root-commit) e1c1719] Started communication log.
1 file changed, 5 insertions(+)
create mode 100644 index.html

$ git log
commit 679de772612099c77891d2a3fab12af8db08b651
Author: Cheryl <[email protected]>
Date:   Wed Apr 5 10:55:56 2017 -0500

   Started communication log.
Great! We've got our project going locally, but we're going to need to make it accessible for Pilot also. Let's push this project up to GitHub.
Control: Go to your GitHub profile in a web browser. Click on the "+" button to add a new repository (called a repo for short).
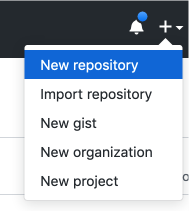
The New Repository link is in the dropdown menu at top right on GitHub.
To create a new repository:
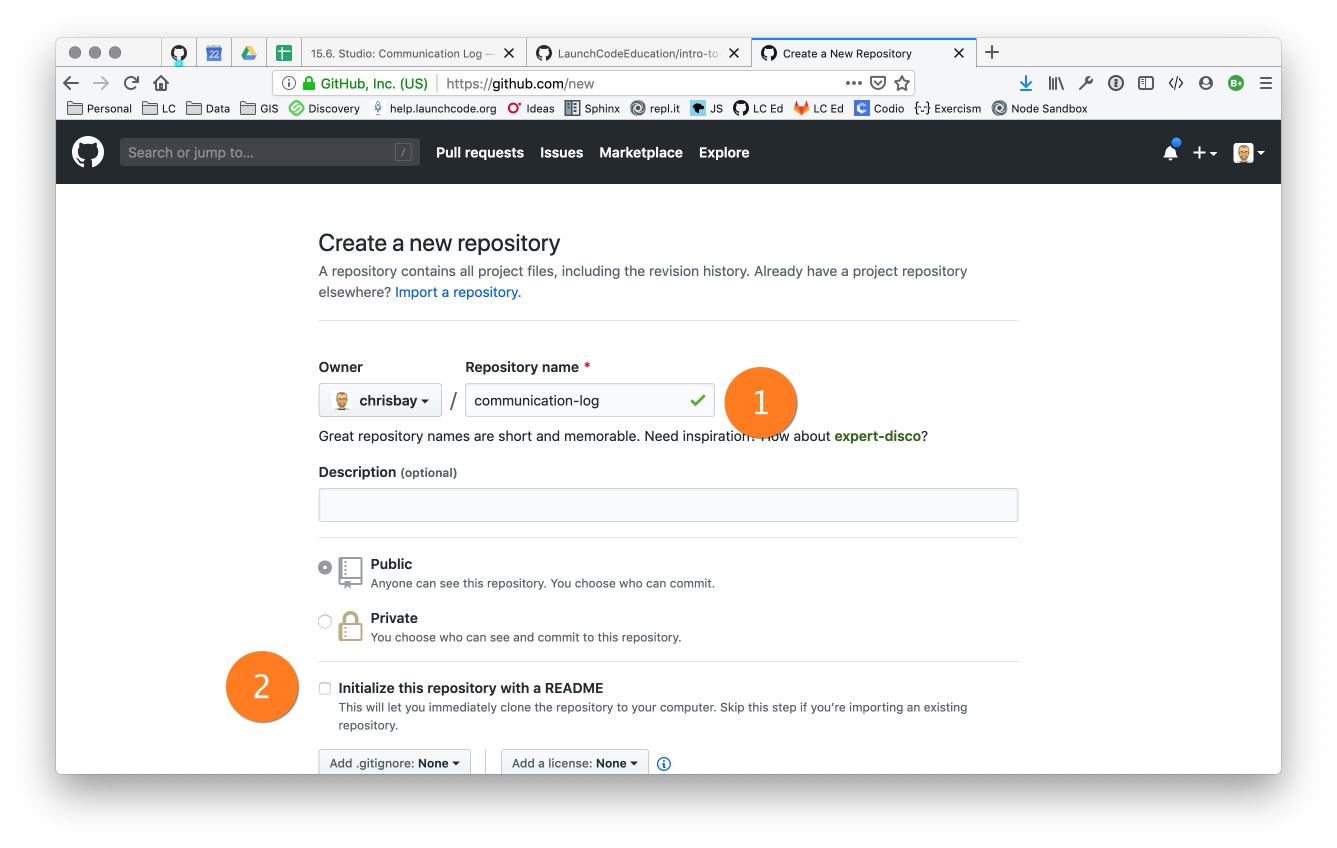
Create a new repository in GitHub
Note
If you initialize with a README, in the next step Git will refuse to merge this repo with the local repo. There are ways around that, but it's faster and easier to just create an empty repo here.
After clicking, you should see something similar to:
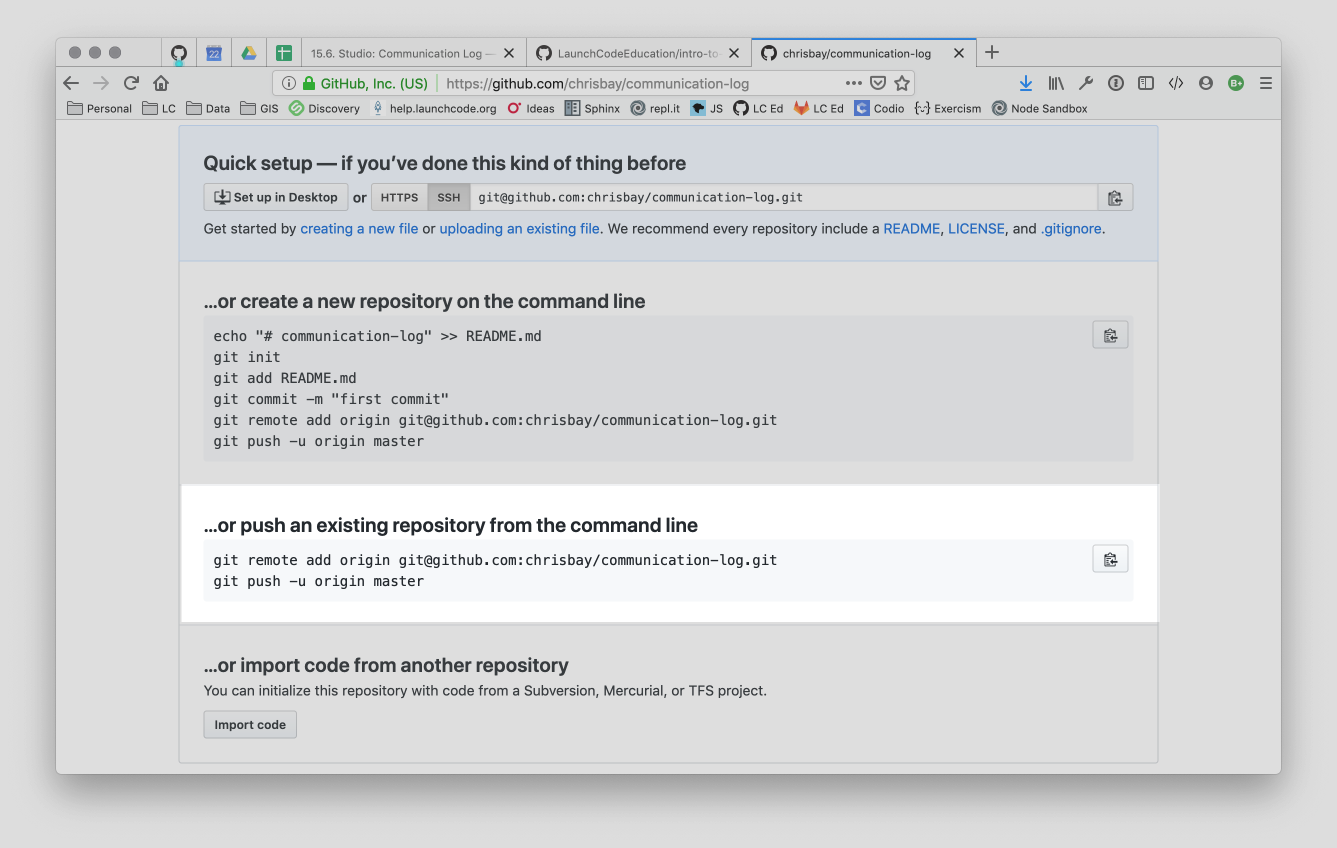
Connecting to a repository in GitHub
Now go back to your terminal and copy/paste the commands shown in the GitHub instructions. These should be very similar to:
$ git remote add origin https://github.com:chrisbay/communication-log.git
$ git push origin main
Note
The first time you push up to GitHub, you will be prompted in the terminal to enter your account username and password. Do this.
You will then see a large amount of output that you can safely ignore. The final few lines will confirm a successful push. They will look something like this:
To github.com:chrisbay/communication-log.git
   c7f97814..54993de3  main -> main
Warning
Unless you've set up an SSH key with GitHub, make sure you've selected the HTTPS clone URL. If you're not sure whether you have an SSH key, you probably don't.
Now you should be able to confirm that GitHub has the same version as your local project. (File contents in browser match those in terminal). Click around and see what is there. You can read all your code through GitHub's web interface.
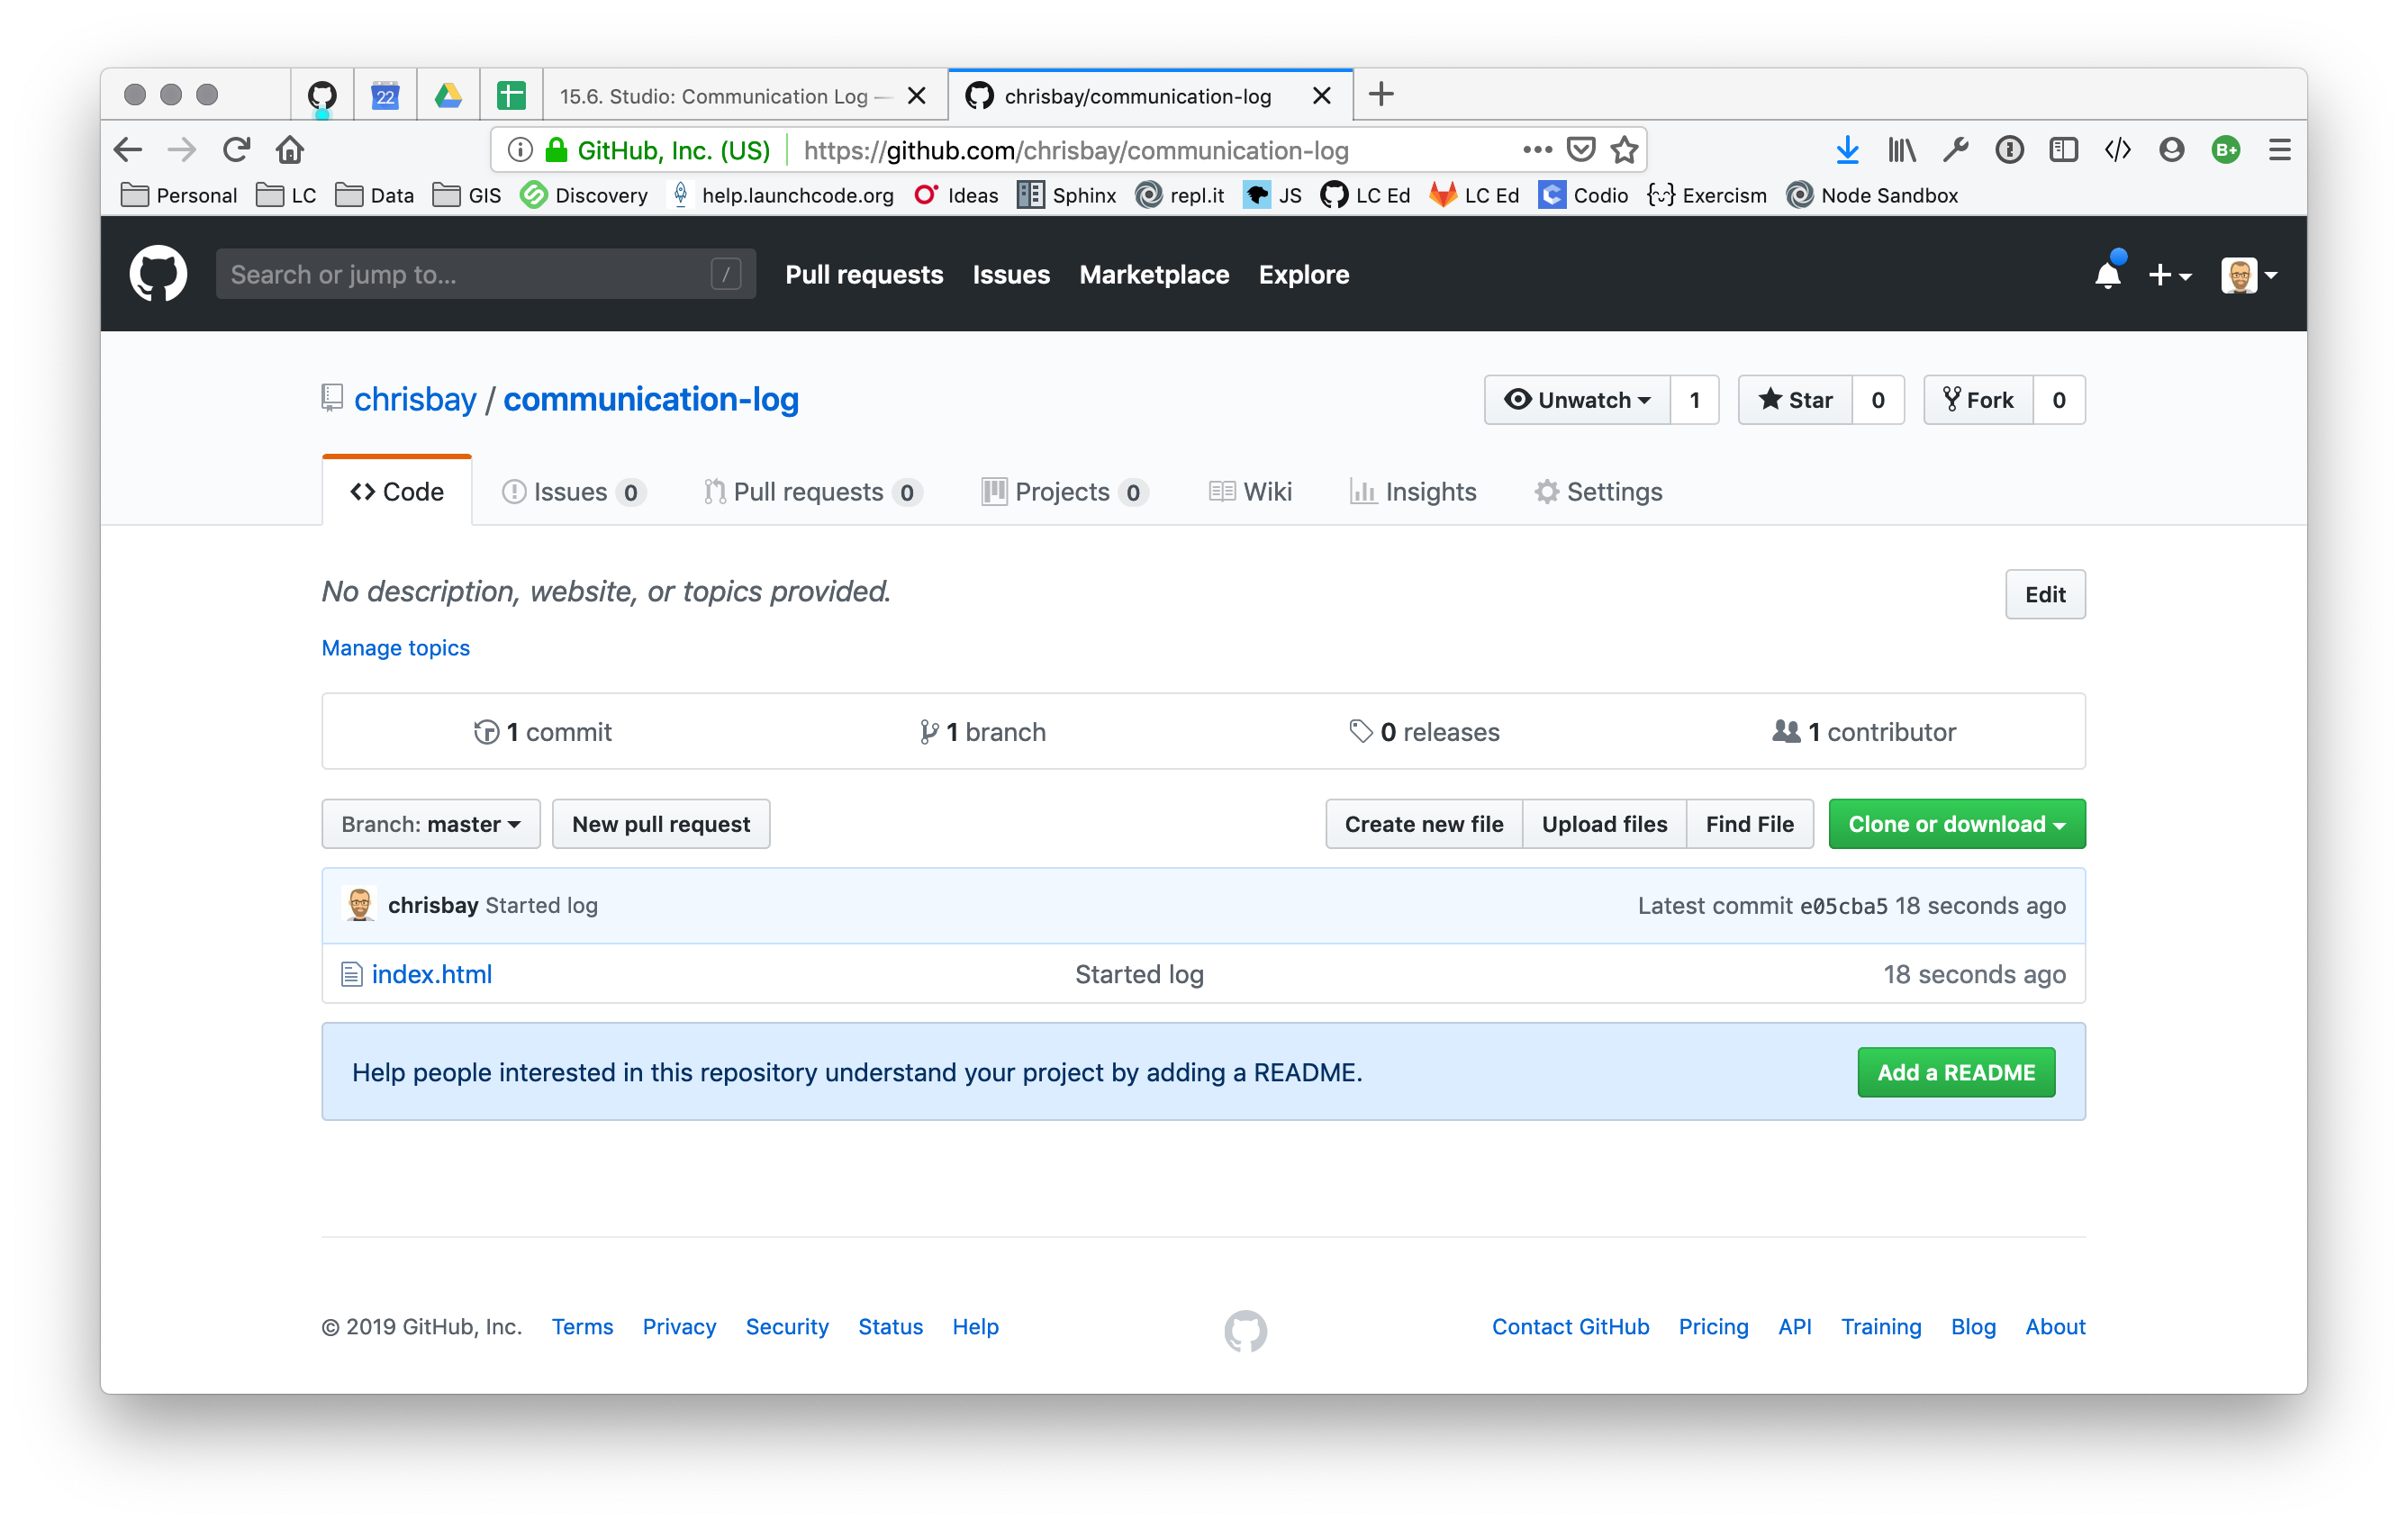
A repository with one commit in GitHub
Pilot: Go to Control's GitHub profile and find the communication-log repo. Click on the green Clone or download button. Use HTTPS (not SSH). Copy the url to your clipboard.
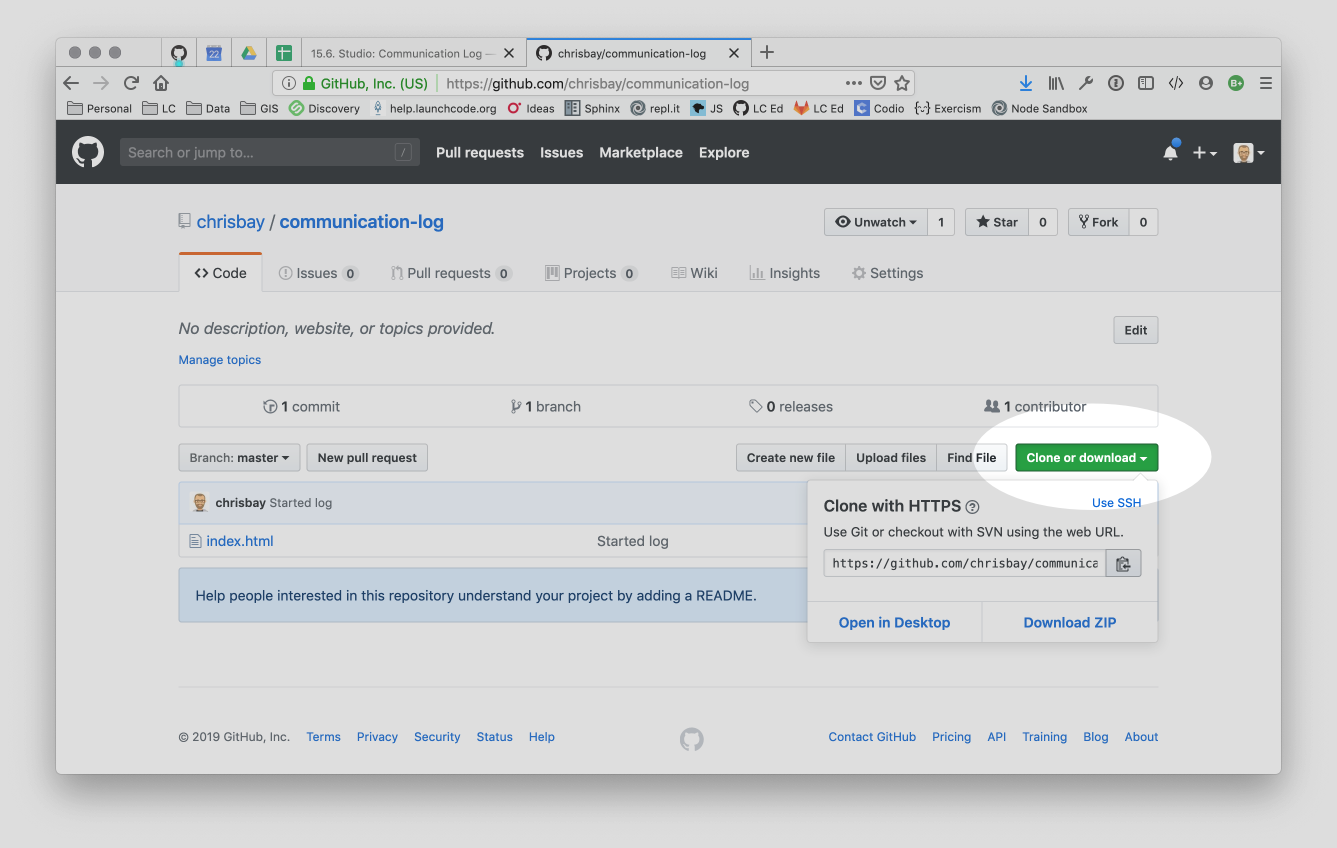
Cloning a repository in GitHub
In your terminal, navigate to your development folder and clone down the repo. The command should look something like this.
$ git clone https://github.com/chrisbay/communication-log.git
Now you can respond to Control! Open the index.html file in your editor and
add your response to mission control. Be creative, the communication can go
anywhere! Just don't ask your partner what you should write. After you finish,
commit your change.
$ git status
On branch main
Your branch is up-to-date with 'origin/main'.
nothing to commit, working directory clean
$ git add index.html
$ git commit -m 'Added second line to log.'
Now we need to push up your changes so Control can use them as well.
$ git push origin main
ERROR: Permission to chrisbay/communication-log.git denied to pilot.
fatal: Could not read from remote repository.

Please make sure you have the correct access rights
and the repository exists.
Great error message! It let us know exactly what went wrong: Pilot does not have security permissions to write to Control's repo. Let's fix that.
Control: In your web browser, go to your communication-log repo. Click
the Settings button then click on Collaborators. Enter in Pilot's GitHub
username and click Add Collaborator.
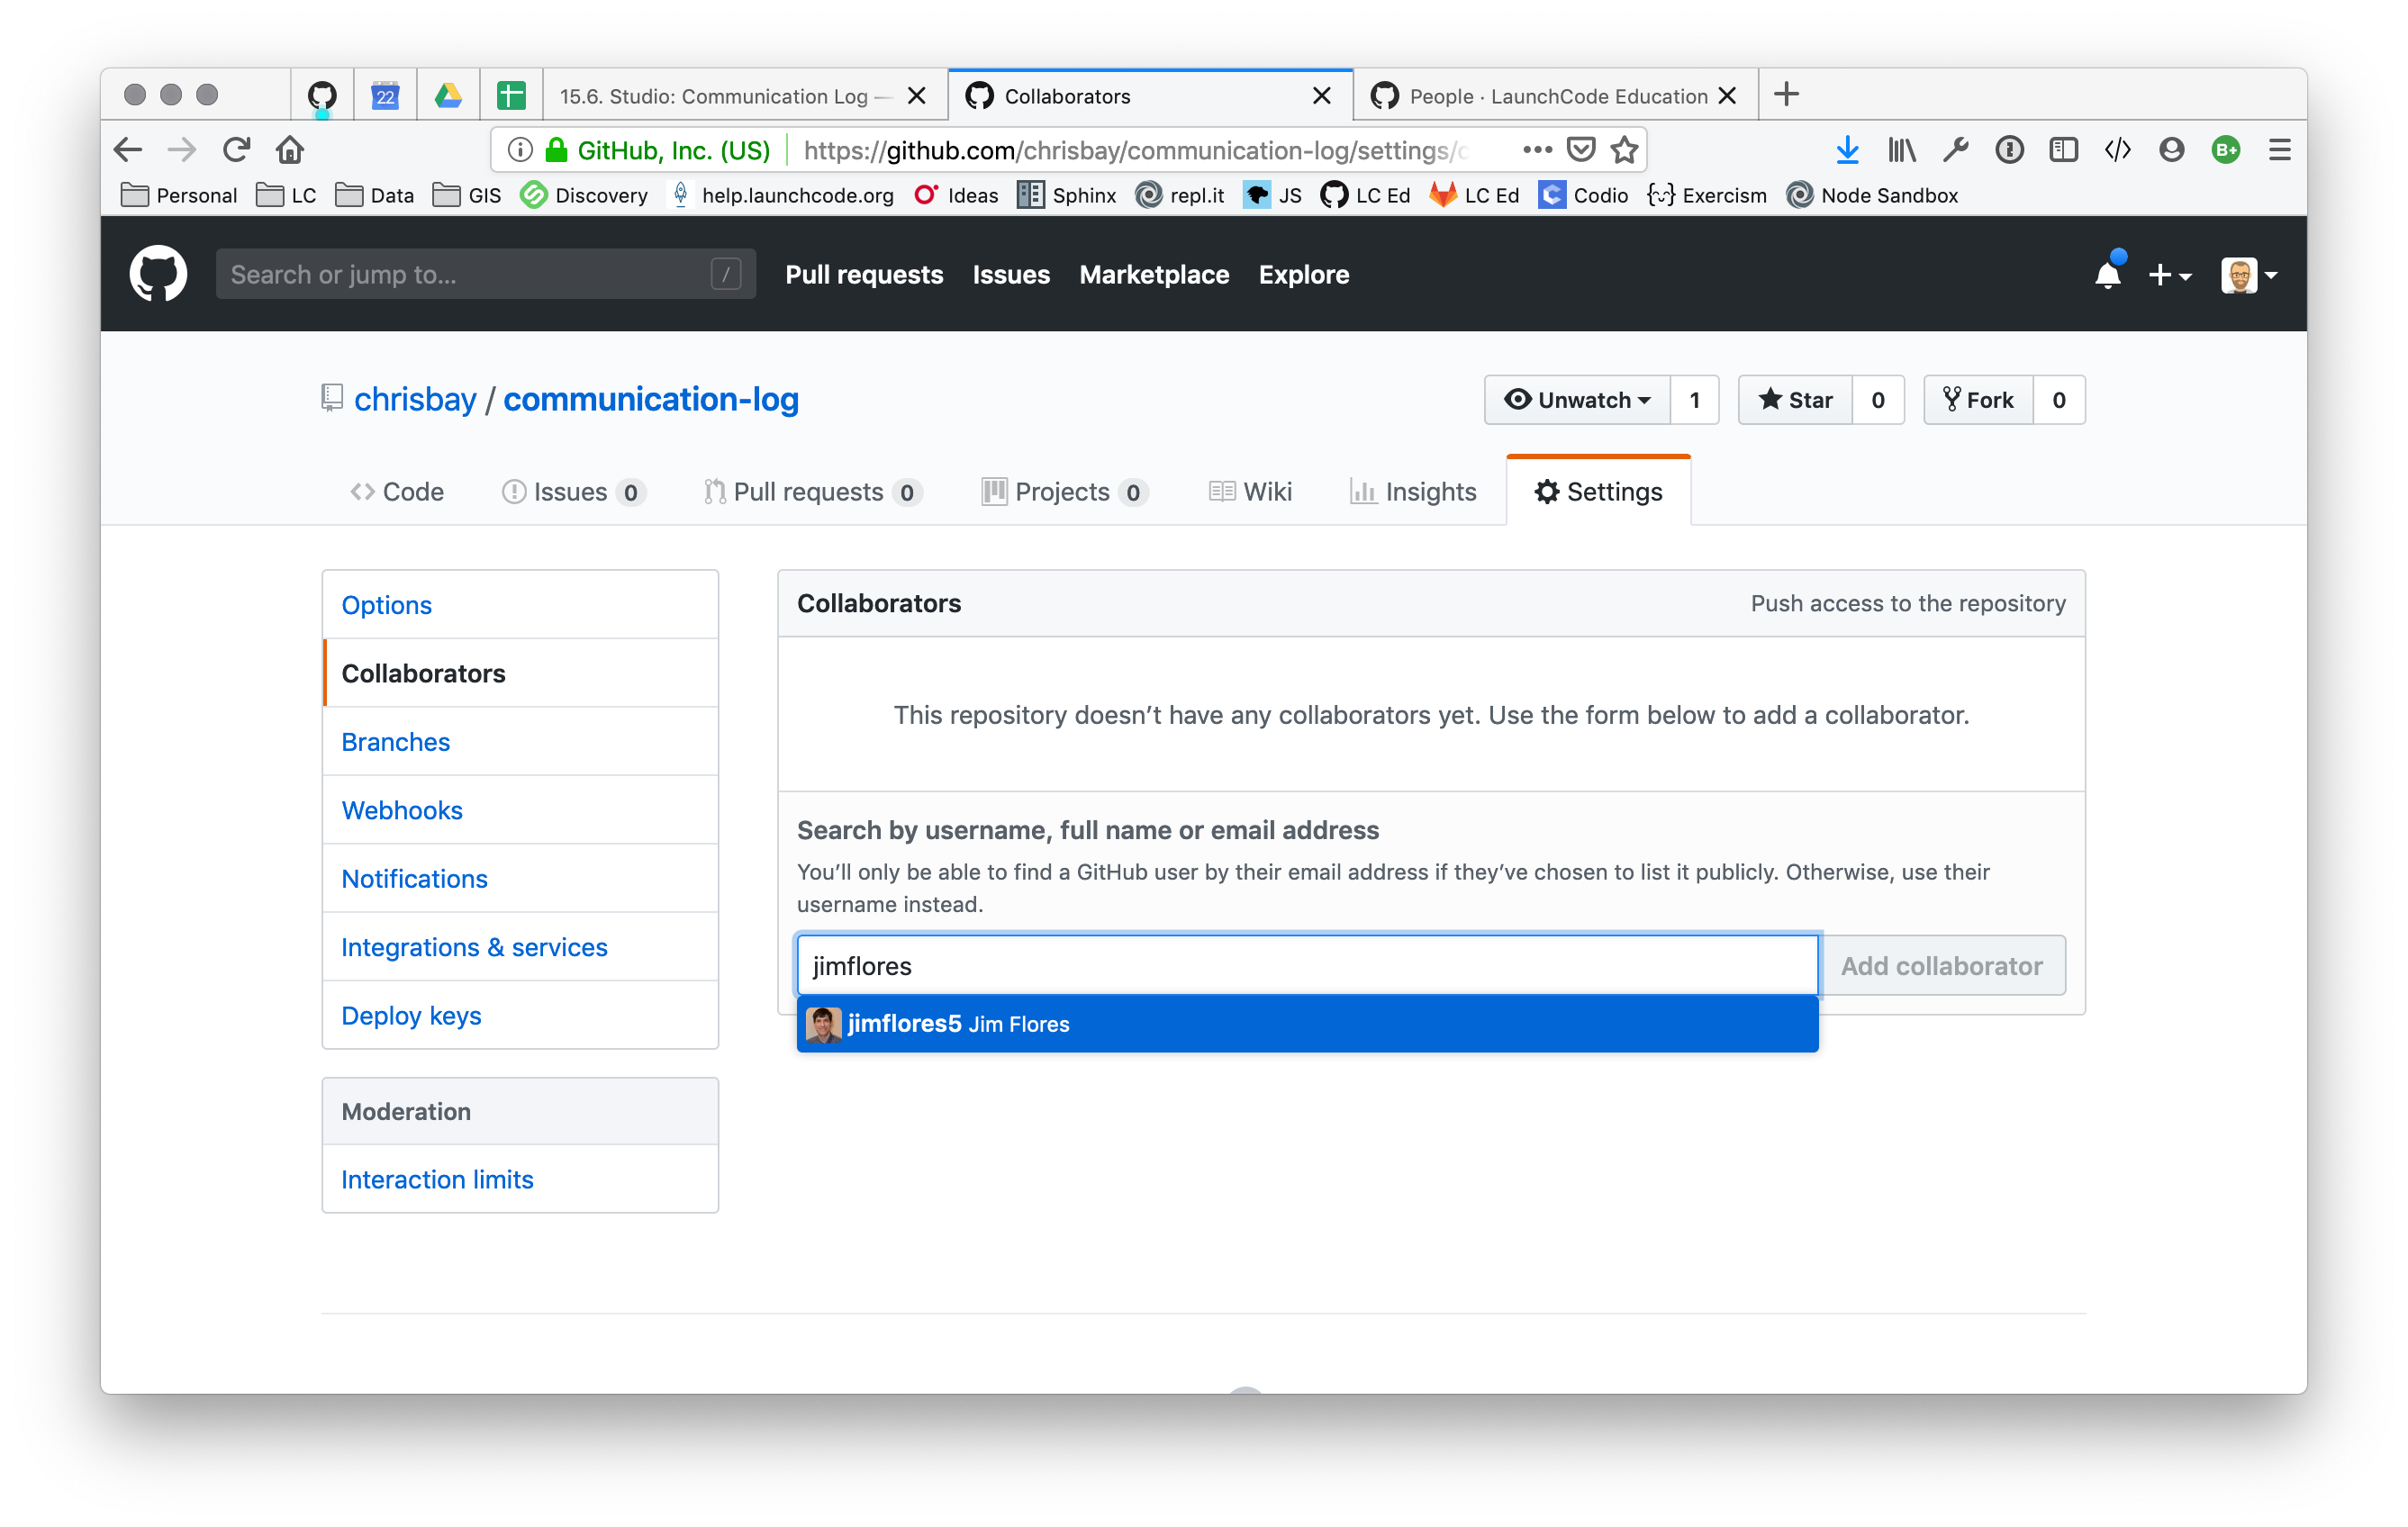
Add a collaborator to your repo in GitHub
Pilot: You should receive an email invitation to join this repository. View and accept the invitation.
Note
If you don't see an email (it may take a few minutes to arrive in your inbox), check your Spam folder. If you still don't have an email, visit the repository page for the repo that Control created (ask them for the link), and you'll see a notification at the top of the page.
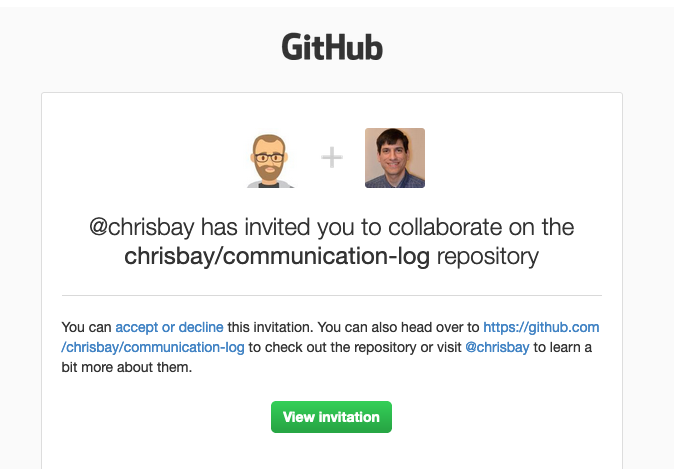
Invited to collaborate email in GitHub
Now let's go enter that command again to push up our code.
$ git push origin main
Counting objects: 9, done.
Delta compression using up to 4 threads.
Compressing objects: 100% (9/9), done.
Writing objects: 100% (9/9), 1.01 KiB | 0 bytes/s, done.
Total 9 (delta 8), reused 0 (delta 0)
remote: Resolving deltas: 100% (8/8), completed with 8 local objects.
To [email protected]:chrisbay/communication-log.git
   511239a..679de77  main -> main
Anyone reading the HTML through GitHub's browser interface should now see the new second line.
Control: You might notice you don't have the second line of code in your copy of the project on your computer. Let's fix that. Go to the terminal and enter this command to pull down the updated code into your local git repository.
$ git pull origin main
remote: Counting objects: 3, done.
remote: Compressing objects: 100% (2/2), done.
remote: Total 3 (delta 1), reused 3 (delta 1), pack-reused 0
Unpacking objects: 100% (3/3), done.
From github.com:chrisbay/communication-log
   e0de62d..e851b7e  main     -> origin/main
Updating e0de62d..e851b7e
Fast-forward
index.html | 1 +
1 file changed, 1 insertion(+)
Now, in your editor, add a third line to the communication. Then add, commit, and push it up.
You can have your story go anywhere! Try to tie it in with what the pilot wrote, without discussing with them any plans on where the story will go.
Pilot: You might notice now you don't have the third line on your computer. Go to the terminal and enter this command to pull in the changes that Control just made.
$ git pull origin main
remote: Counting objects: 3, done.
remote: Compressing objects: 100% (2/2), done.
remote: Total 3 (delta 1), reused 3 (delta 1), pack-reused 0
Unpacking objects: 100% (3/3), done.
From github.com:chrisbay/communication-log
   e851b7e..167684c  main     -> origin/main
Updating e851b7e..167684c
Fast-forward
index.html | 1 +
1 file changed, 1 insertion(+)
Now add a fourth line to the log. Again, be creative, but no planning!
Then add, commit, and push your change.
You can both play like this for a while! Feel free to repeat this cycle a few times to add to the story.
This workflow is a common one in team development situations. You might wonder, however, if professional developers sit around waiting for their teammates to commit and push a change before embarking on additional work on their own. That would be a drag, and thankfully, there is a nice addition to this workflow that will allow for simultaneous work to be carried out in a reasonable way.
Pilot: While Control is working on an addition to the story, let's make
another change simultaneously. In order to do that, we'll create a new branch.
Recall that a branch is a separate "copy" of the codebase that you can commit
to without affecting code in the main branch.
$ git checkout -b open-mic
Switched to a new branch 'open-mic'
This command creates a new branch named open-mic, and switches your local
repository to use that branch.
Create a new file named style.css and add the following rules:
1body {
2   color: white;
3   background-color: black;
4}
Then link it in index.html. It should look something like this:
1<html>
2   <head>
3      <link rel="stylesheet" type="text/css" href="style.css">
4   </head>
5   <body>
6      <p>Radio check. Pilot, please confirm.</p>
7      ... your content here
8   </body>
9</html>
Now stage and commit these changes.
$ git add .
$ git commit -m 'Added style.css'
$ git push origin open-mic
Note that the last command is a bit different than what we've used before
(git push origin main). The final piece of this command is the name of
the branch that we want to push to GitHub.
You and your partner should both now see a second branch present on the GitHub project page. To view branches on GitHub, select Branches from the navigation section just below the repository title.
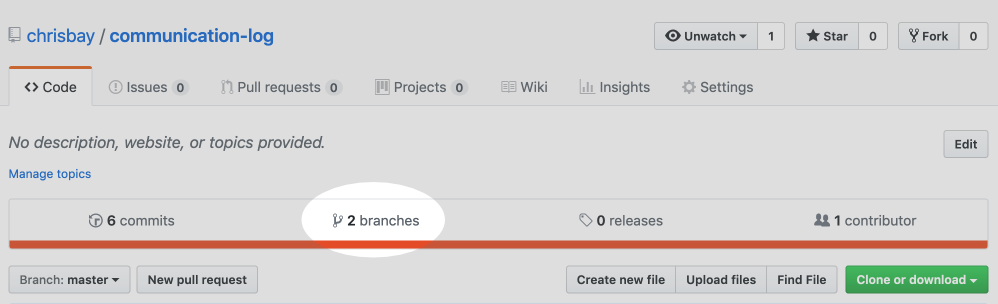
Branches Button in GitHub
In your terminal, you can type this command to see a list of the available branches:
$ git branch
* open-mic
main
Note that creating and being able to see a branch in your local repository via this command does NOT mean that the branch is on GitHub. You'll need to push the branch for it to appear on GitHub.
Note
The * to the left of open-mic indicates that this is the active branch.
Great! Now let's show the other player your work in GitHub and ask them to merge it in to the main branch.
Pilot: If you haven't already, in your browser, go to the GitHub project and click on Branches and make sure you see the new branch name, open-mic.
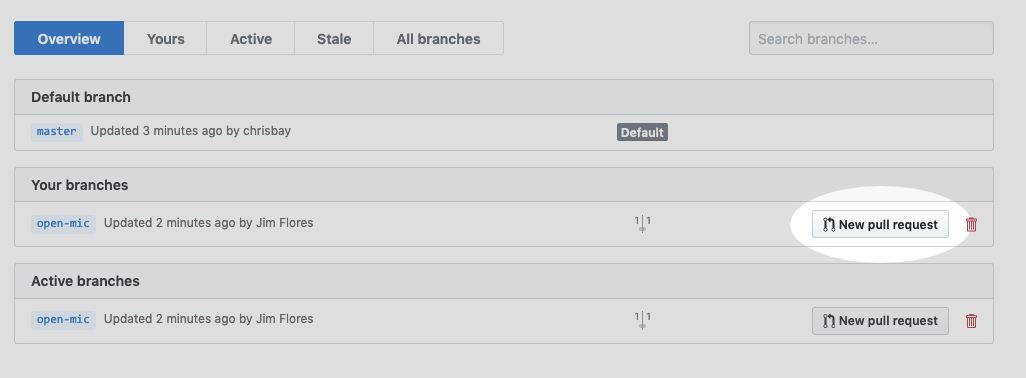
Branches Page in GitHub
Click New Pull Request to begin the process of requesting that your changes
in the open-mic branch be incorporated into the main branch. Add some
text in the description box to let Control know what you did and why.
Note that the branch selected in the base dropdown is the one you want to merge into, while the selected branch in the compare dropdown is the one you want to merge from.
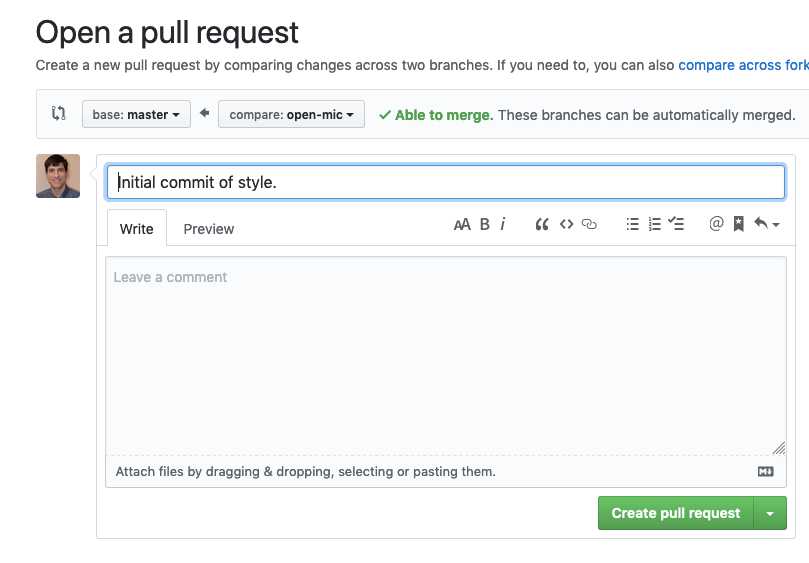
Open a PR in GitHub
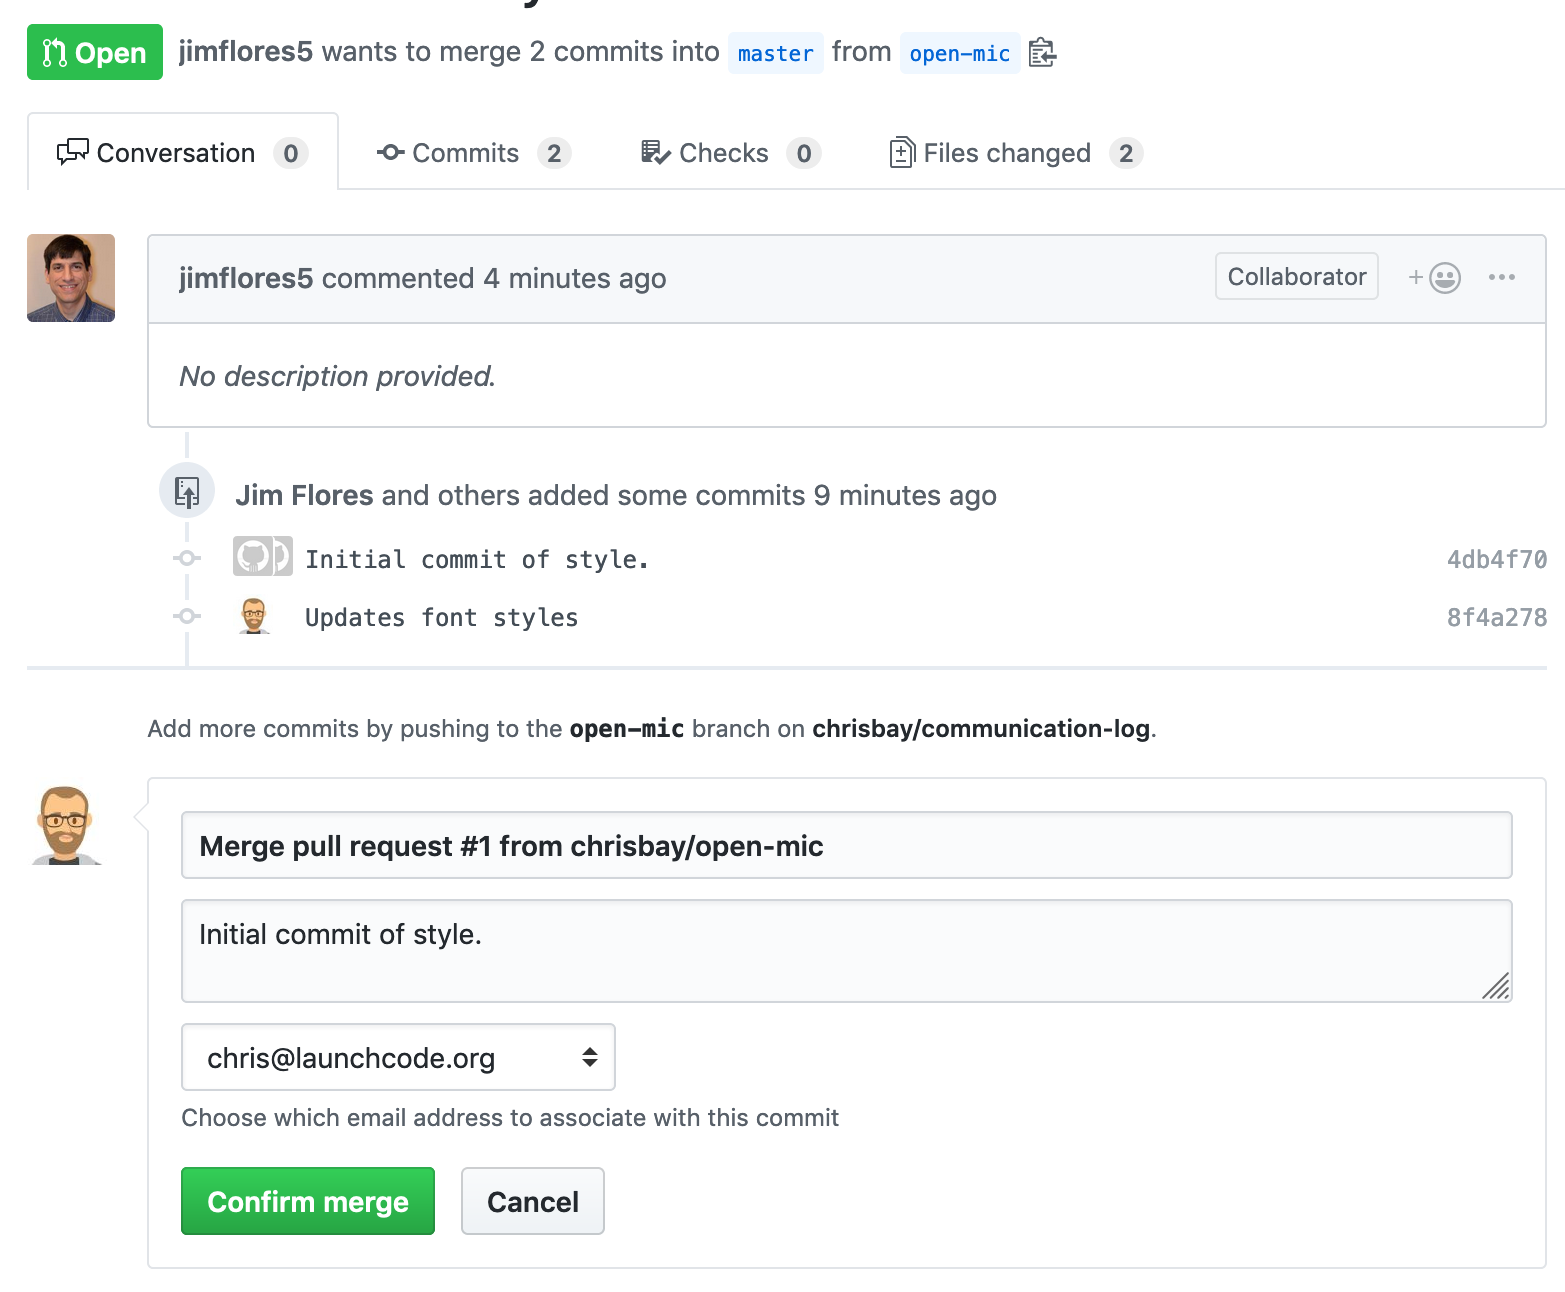
This is what an opened pull request looks like:
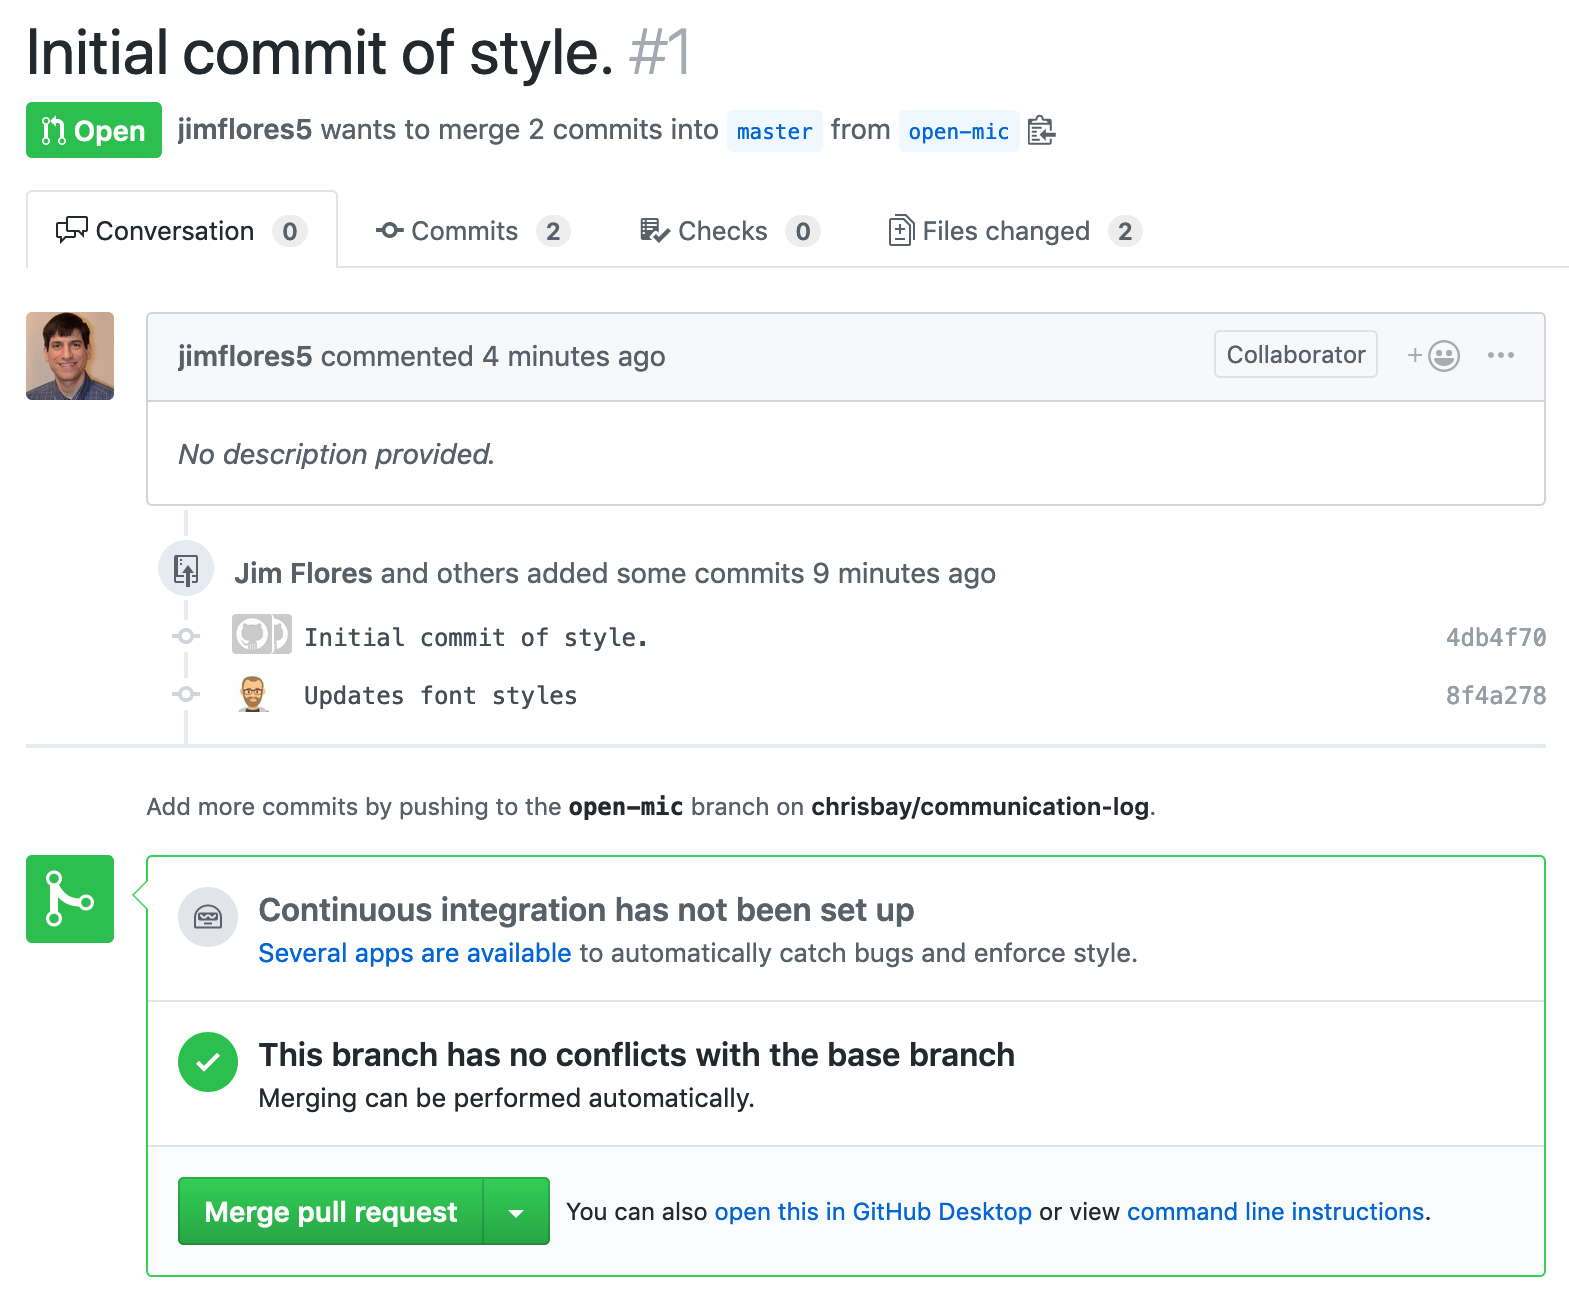
An open PR in GitHub
Control: You will notice that you do not see the new style.css file
locally. Type this command to see what branches are on your local computer:
$ git branch
* main
If you want to work with the branch before merging it in, you can do so by typing these commands:
$ git fetch origin open-mic
...
$ git branch
open-mic
* main
$ git checkout open-mic
Switched to branch 'open-mic'
Your branch is up-to-date with 'origin/open-mic'.
Make a change, commit, and push this branch--you will see that the pull request in GitHub is updated to reflect the changes you added. The context in the description box is NOT updated, however, so be sure to add comments to the pull request to explain what you did and why.
Now switch back to the main branch:
$ git checkout main
Switched to branch 'main'
Your branch is up-to-date with 'origin/main'.
You will see your files no longer have the changes made in the open-mic
branch. Let's go merge those changes in, so that the main branch adopts
all the changes in the open-mic branch.
Control: Go to the repo in GitHub. Click on Pull Requests.
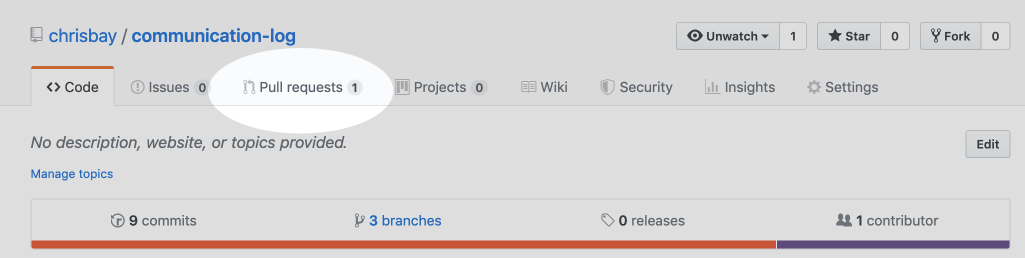
PR Open in GitHub
Explore this page to see all the information GitHub shows you about the pull request.
Merge a Pull Request in GitHub
When you're happy with the changes, merge them in. Click Merge Pull Request then Confirm Merge.
Confirm PR Merge in GitHub
Upon a successful merge, you should see a screen similar to the following:
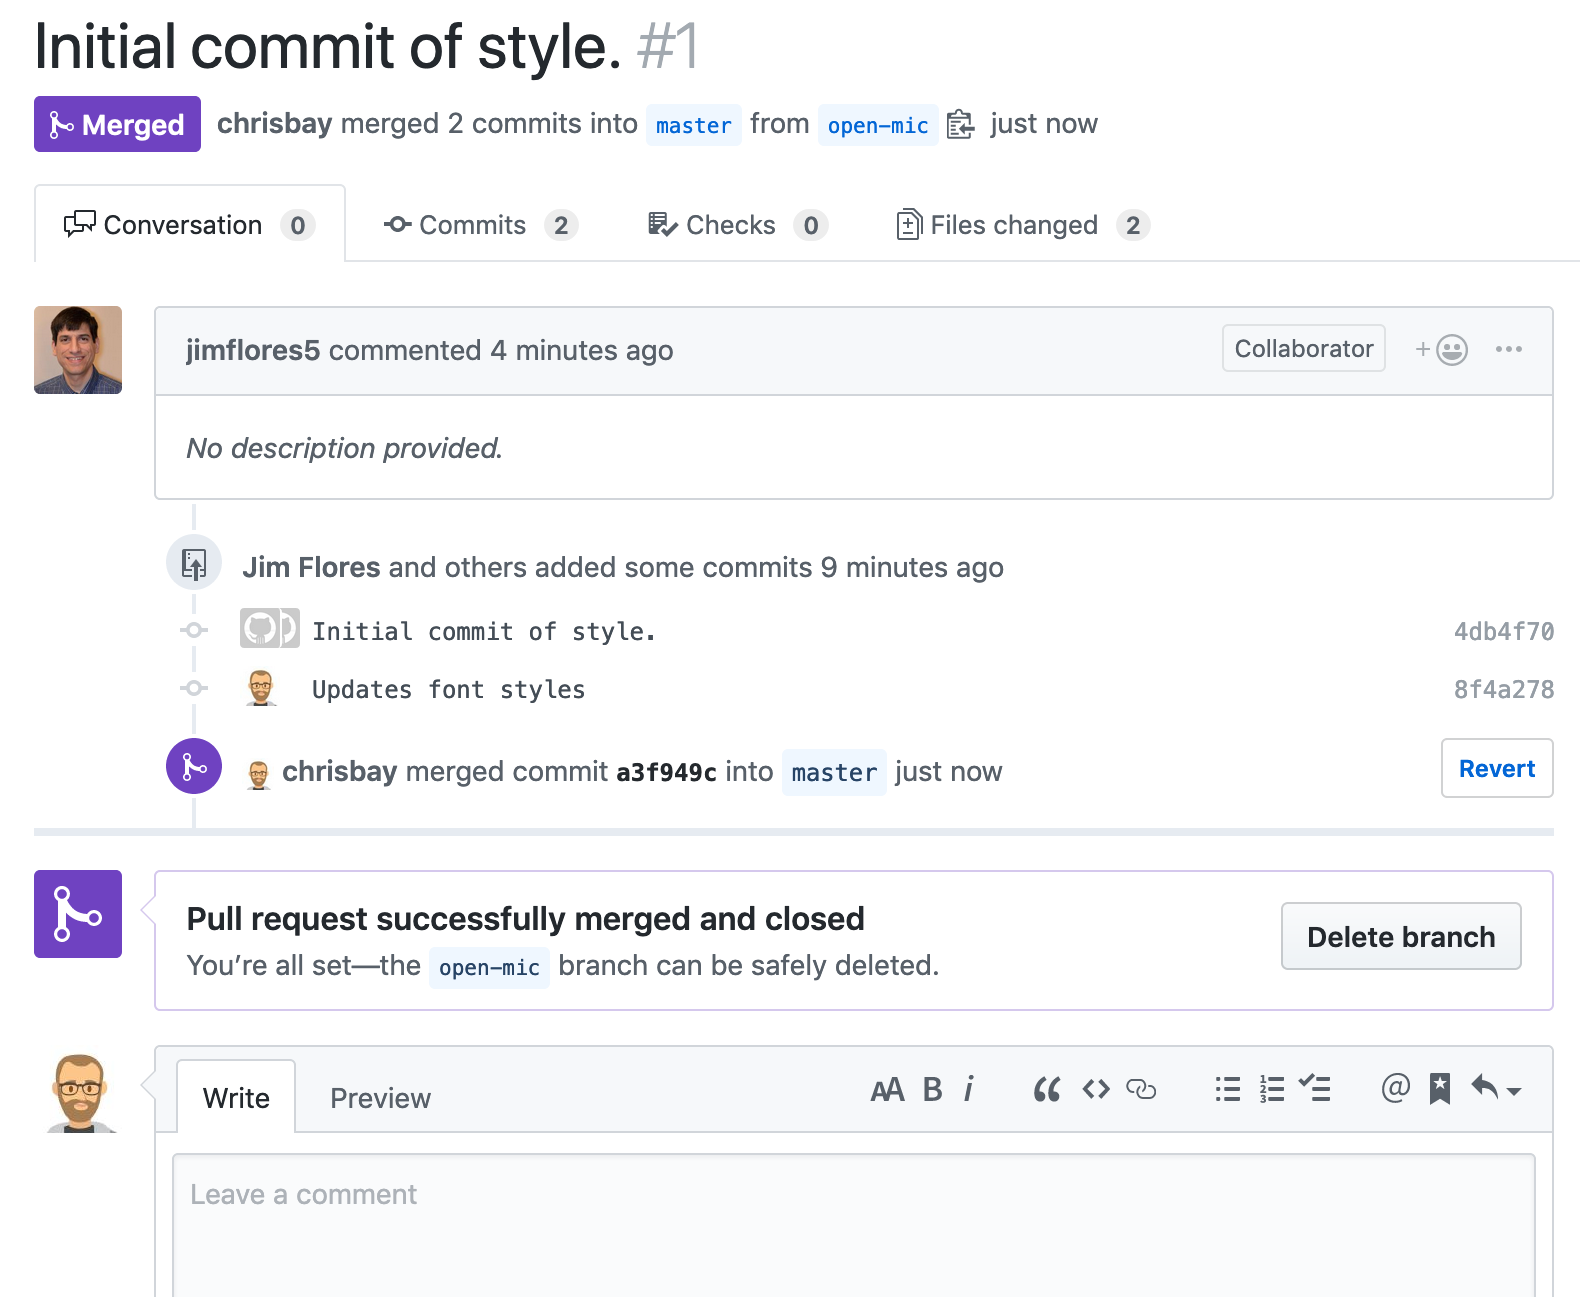
PR Merged in GitHub
The changes from open-mic are now in the main branch, but only in
the remote repository on GitHub. You will need to pull the updates to your
main for them to be present locally.
$ git checkout main
$ git pull origin main
Git is able to merge these files on its own.
When collaborating on a project, things won't always go smoothly. It's common for two people to make changes to the same line(s) of code, at roughly the same time, which will prevent Git from being able to merge the changes together.

Git Merge Conflicts
This isn't such a big deal. In fact, it's very common. To see how we can handle such a situation, we'll intentionally create a merge conflict and then resolve it.
Pilot: Let's change something about the style file. Our HTML is looking pretty plain, so let's pick a nice font and add some margins.
First, switch back to the main branch.
$ git checkout main
Let's change our font. To do so, add this link to your index.html file,
right after the first stylesheet link:
<link href="https://fonts.googleapis.com/css?family=Satisfy" rel="stylesheet">
And spice up your style.css file to look like this:
1body {
2   color: white;
3   background-color: #333;
4   font-size: 150%;
5   font-family: 'Satisfy', cursive;
6   margin: 5em 25%;
7}
The result:
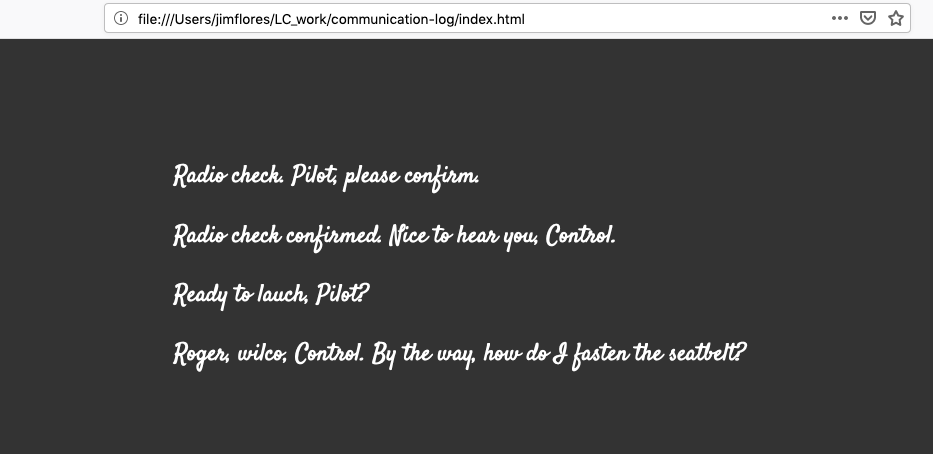
Satisfying!
Stage and commit your changes and push them up to GitHub. If you don't remember
how to do this, follow the instructions above. Make sure you're back in the
main branch! If you're still in open-mic, then your changes will be
isolated, and you won't get the merge conflict you need to learn about.
Meanwhile...
Control: Let's change something about the style file that Pilot just edited. Change it to look like this:
1body {
2   color: white;
3   background-color: black;
4   font-family: 'Sacramento', cursive;
5   font-size: 32px;
6   margin-top: 5%;
7   margin-left: 20%;
8   margin-right: 20%;
9}
Don't forget to link the new font in your index.html file, after the other
link:
<link href="https://fonts.googleapis.com/css?family=Sacramento" rel="stylesheet">
Commit your changes to branch main.
Control: Try to push your changes up to GitHub. You should get an error message. How exciting!
$ git push origin main

To [email protected]:chrisbay/communication-log.git
! [rejected]        main -> main (fetch first)
error: failed to push some refs to '[email protected]:chrisbay/communication-log.git'
hint: Updates were rejected because the remote contains work that you do
hint: not have locally. This is usually caused by another repository pushing
hint: to the same ref. You may want to first integrate the remote changes
hint: (e.g., 'git pull ...') before pushing again.
hint: See the 'Note about fast-forwards' in 'git push --help' for details.
There's a lot of jargon in that message, including some terminology we haven't encountered. However, the core of the message is indeed understandable to us: "Updates were rejected because the remote contains work that you do not have locally." In other words, somebody (Pilot, in this case), pushed changes to the same branch, and you don't have those changes on your computer. Git will not let you push to a branch in another repository unless you have incorporated all of the work present in that branch.
Let's pull these outstanding changes into our branch and resolve the errors.
$ git pull
remote: Counting objects: 4, done.
remote: Compressing objects: 100% (3/3), done.
remote: Total 4 (delta 1), reused 4 (delta 1), pack-reused 0
Unpacking objects: 100% (4/4), done.
From github.com:chrisbay/communication-log
   7d7e42e..0c21659  main     -> origin/main
Auto-merging style.css
CONFLICT (content): Merge conflict in style.css
Auto-merging index.html
CONFLICT (content): Merge conflict in index.html
Automatic merge failed; fix conflicts and then commit the result.
Since Pilot made changes to some of the same lines you did, Git was unable to automatically merge the changes.
The specific locations where Git could not automatically merge files are
indicated by the lines that begin with CONFLICT. You will have to edit
these files yourself to incorporate Pilot's changes. Let's start with
style.css.
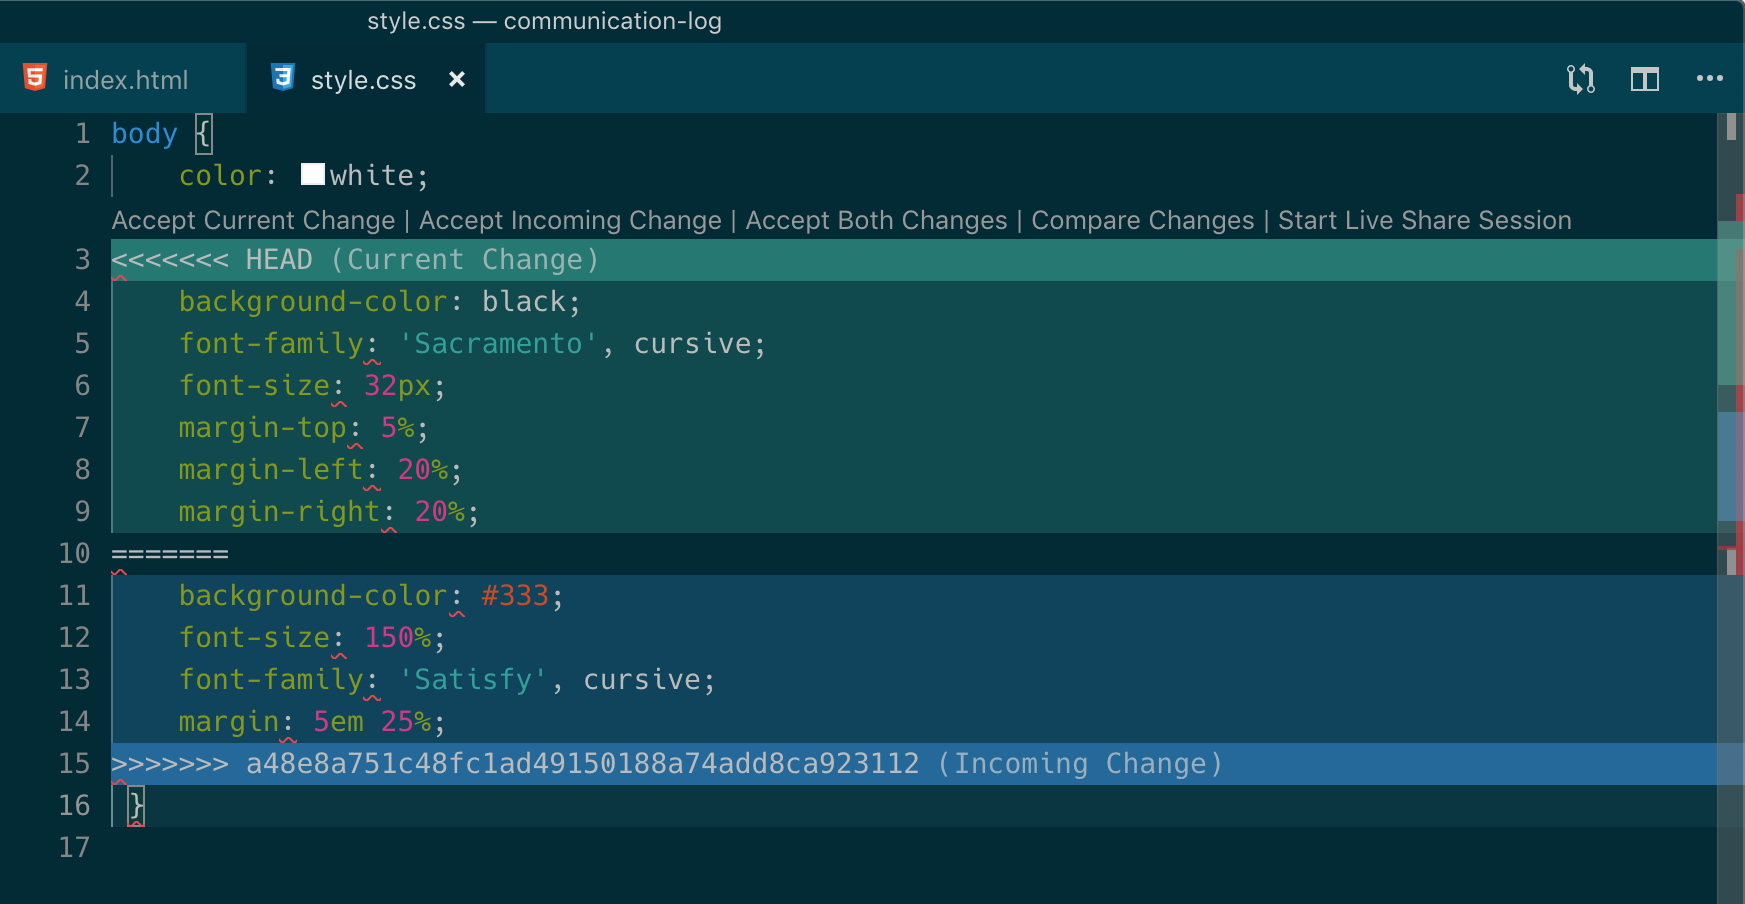
Merge conflicts in style.css, viewed in VS Code
At the top and bottom, there is some code that could be merged without issue.
Between the <<<<<<< HEAD and ======= symbols is the version of the code
that exists locally. These are your changes.
Between ======= and >>>>>>> a48e8a75...
are the changes that Pilot made (the hash a48e8a75... will be unique to
the commit, so you'll see something slightly different on your screen).
Let's unify our code. Change the CSS to look like this, making sure to remove the Git markers so that only valid CSS remains in the file.
1body {
2   color: white;
3   background-color: black;
4   font-family: 'Sacramento', cursive;
5   font-size: 150%;
6   margin: 5em 25%;
7}
Tip
Like many other editors, VS Code provides fancy buttons to allow you to resolve individual merge conflicts with a single click. There's nothing magic about these buttons; they do the same thing that you can do by directly editing the file.
You will need to do the same thing for the index.html file. You only need
the link for the Sacramento font, not the Satisfy font. Then stage, commit, and
push your changes; you should not see an error message this time.
Pilot: Meanwhile, Pilot is sitting at home, minding their own business. A
random git status seems reassuring:
$ git status
On branch main
Your branch is up-to-date with 'origin/main'.
nothing to commit, working directory clean
Your local Git thinks the status is quo. Little does it know that up at GitHub,
the status is not quo. We'd find this out by doing either a git fetch, or
if we just want the latest version of this branch, git pull:
$ git pull
remote: Counting objects: 13, done.
remote: Compressing objects: 100% (8/8), done.
remote: Total 13 (delta 4), reused 13 (delta 4), pack-reused 0
Unpacking objects: 100% (13/13), done.
From Github.com:chrisbay/communication-log
   0c21659..e0de62d  main     -> origin/main
Updating 0c21659..e0de62d
Fast-forward
index.html | 3 ++-
style.css  | 4 ++--
2 files changed, 4 insertions(+), 3 deletions(-)
Great Scott! Looks like Control changed both index.html and style.css.
Note that Pilot didn't have to deal with the hassle of resolving merge
conflicts. Since Control intervened, Git assumes that the team is okay with the
way they resolved it, and fast forwards our local repo to be in sync with the
remote one. Let's look at style.css to make sure:
1body {
2   color: white;
3   background-color: black;
4   font-family: 'Sacramento', cursive;
5   font-size: 150%;
6   margin: 5em 25%;
7}
Let's turn the tables on the steps we just carried out, so Pilot can practice resolving merge conflicts.
Merge conflicts are a part of the process of team development. Resolve them carefully in order to avoid bugs in your code.