6.2. JUnit
JUnit is a library that provides the classes, methods, and assertions for writing and executing unit tests in Java. In this course, we use JUnit4. Although there are newer versions now available, JUnit4 is still popular and widely used.
6.2.1. Java Annotations
On the topic of unit testing, the annotation @Test is used to
indicate that a public void method should be treated as a test case.
In Java, annotations are formalized bits of information about a program. They operate
somewhere between actual code syntax and a comment on the code. Annotations do not
directly affect the code they annotate, but they do supply information to the compiler.
Annotations are indicated with an @ symbol. We will provide an example in the
walkthrough below.
6.2.2. .jar and Testing Setup
In your java-web-dev-exercises repo, we’ve included two .jar files for the JUnit
library. These are located in the lib folder. JAR stands for Java ARchive and is a
common Java file format used for bundling many classes and files together. The JUnit library
code is bundled and packaged in both the junit-4.13-beta-3.jar and
hamcrest-core-1.3.jar .jar files.
Note
The versions of these packages may change before this text.
In this project, we call these external libraries dependencies. A dependency is a
separately developed program or piece of code that another program or piece of code
uses to carry it out its function. Our Java tests will depend on JUnit code. In
the future, as you build your own Java projects, you will likely include these
dependencies in a different fashion other than .jar files. Many Java projects
use a build automation tool to help manage dependencies. We’ll begin using this kind
of tool later in this course. Since we’re not quite there yet, we’ve included the
.jar files.
Right-click on each of the .jar files and select the Add as Library
option. In the dialog box that opens up, make sure the
java-web-dev-exercises project is selected, then click OK.
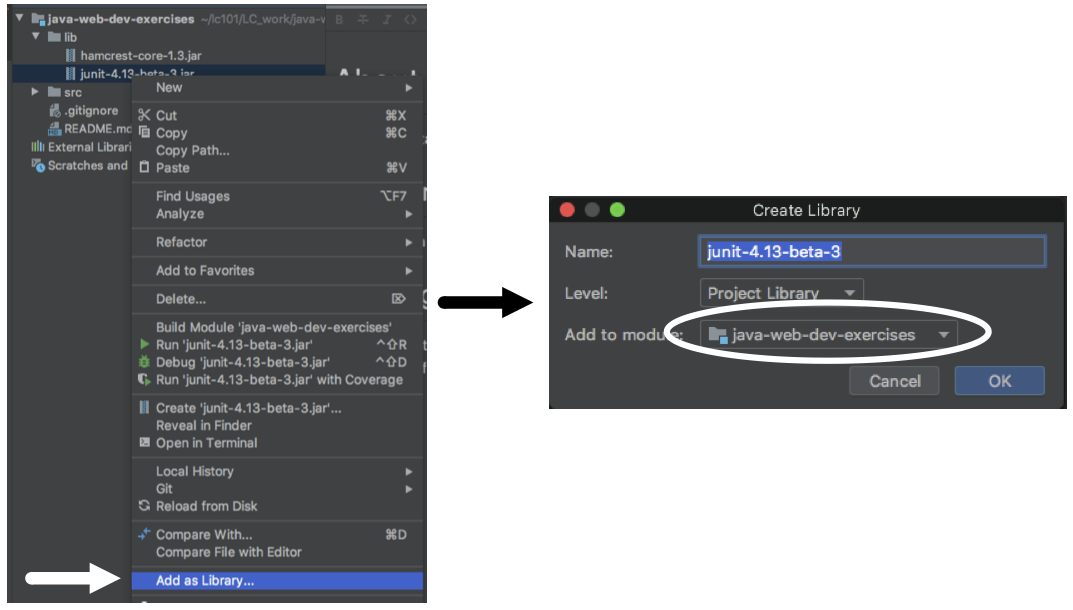
Right-click on the .jar filename to add it as a library.
6.2.2.1. main/Car and test/CarTest
Within org.launchcode.java.demos, open the lsn5unittesting directory.
Inside lsn5unittesting, you’ll see a main directory and test
directory. Open the Car class within main and look around. Here, we
provide a class Car with basic information about a make, model, gas level,
and mileage as well as getters, setters, and a few other methods.
In the same directory, you’ll find a Main class with a main method that prints the
make and model of a given Car object. Run this class to verify it works.
Now, open test/CarTest. It’s empty, save for a few TODOs. Let’s tackle the
first TODO to make a new empty test. Starting with an empty test lets us
validate that we can use JUnit in our current environment.
6.2.3. @Test
Create the following empty test underneath the first TODO. As usual, be sure write this code rather than copy/paste it:
1 2 3 4 5 | //TODO: add emptyTest so we can configure our runtime environment
@Test
public void emptyTest() {
assertEquals(10,10,.001);
}
|
Once written, you likely need to add these import statements at the top of your file:
1 2 | import org.junit.Test;
import static org.junit.Assert.assertEquals;
|
Note
In some cases, IntelliJ may sense which testing library and method you want to use and add the import statements as you type. If this is the case, just make sure they are the correct paths. Aren’t IDEs wonderful?
As we mention above, @Test annotates the method to signal it as a test case. We need
to add the appropriate import statement in order to take advantage of this annotation.
Our empty test is aptly named emptyTest(), a description of its role. This test does
not follow the AAA rule from our Testing Best Practices, as it jumps straight to
asserting. Nor is it relevant, for that matter.
Again, the IDE comes in handy, inserting the names of each of our parameters,
“expected:”, “actual:”, and “delta:”. This empty test is simply asserting an
expected value of 10 to equal an actual value of 10,
with an accepted .001 variance.
Note
The third argument, called delta, is the amount of allowed difference between the
expected and actual values. If the difference between the two values is within
that range, then the test still passes.
This argument is optional for some comparisons and required for others. One
scenario in which it is required is when comparing doubles.
Why is it required? Well, that’s kind of a long story. Some number types are
floating-point numbers.
Due to the nature of their storage, these types carry with them a certain
degree of
inaccuracy.
In brief, the delta argument ensures we can still reasonably compare two doubles.
Of course, 10 equals 10. But let’s run it so
we know our test runner works. Click the green arrow to the left of
public class CarTest to run the test. Once run, you’ll see a new output panel with a
green check mark indicating the test passed and a message stating the test passed. We
know now how the test runner behaves when a test passes and begin the real work of unit
testing the Car class.
Under your second TODO, write a test to verify that the constructor sets the
gasTankLevel property.
1 2 3 4 5 6 | //TODO: constructor sets gasTankLevel properly
@Test
public void testInitialGasTank() {
Car test_car = new Car("Toyota", "Prius", 10, 50);
assertEquals(10, test_car.getGasTankLevel(), .001);
}
|
Here, we give the test a descriptive name, testInitialGasTank(), initialized a new
Car object, and test that the constructor correctly handles the gasTankLevel property.
By now, you’ve probably already imported the Car class.
import org.launchcode.java.demos.lsn5unittesting.main.Car;
Run CarTest to see that both tests pass.
Tip
If you want to run only one test, click the green arrow next to the test method’s name.
6.2.4. @Before
@Before is another annotation we can use to help in test cases. The @Before
annotation can be used to set up some data or a condition that you want to have for
every test in a given class. In the case of CarTest, it would be nice to not need to
create a new Car instance for each test we write.
In your testInitialGasTank() method, remove the line initiating test_car.
Above your first test, add the following @Before method:
1 2 3 4 5 6 | Car test_car;
@Before
public void createCarObject() {
test_car = new Car("Toyota", "Prius", 10, 50);
}
|
Did IntelliJ prompt you to import @Before? Did it import the annotation as you were
writing the method? If not, add it:
import org.junit.Before;
Now, run the test file and ensure your test still passes.
6.2.5. @After
@After, conversely, defines a set of conditions to be met after each test in a
suite is run.
Note
A good or frequent use case for @After would be if you needed to test
some code that requires access to a database. Here, you could open the database
connection with a @Before method and close the connection in an @After method.
6.2.6. Common Assertion Methods
In addition to the very commonly used assertEquals() method
you see above, here are a few other methods you should have in
your unit testing playbook.
Assertion |
Description |
|---|---|
|
Asserts that two values, expected and actual, are equal to each other (optionally, within a given range of difference) |
|
Asserts that a given condition is false |
|
Asserts that a given condition is true |
|
Asserts that a given object is not null |
6.2.7. Check Your Understanding
Question
Write another version of testInitialGasTank() using assertFalse(), comparing the value to 0.
Question
Write another version of testInitialGasTank() using assertTrue().