Studio: Consuming the Coding Events API With Postman
The UI of a browser is designed to make simple GET requests for URLs entered into its address bar. This design works great for browsing sites, but falls short when working with APIs. Anything beyond a GET request is difficult to send via a browser address bar alone. Think about what is needed to create a new Event. This type of request contains a body. Our MVC application included a view to allow us to test inputs. Our API, however, is headless. It does not contain the client-side form. In order to test how it handles requests then, we need a way to interact with the API server without the browser. In this studio, we work with Postman to explore how APIs can be consumed.
Setup
Install Postman
If you haven’t done so already, install Postman .
Fork and Clone the API Source Code
With Postman installed, we’re ready to fork and clone the API located here . Although it is implemented differently from CodingEvents MVC, you will find that most of the features from the MVC application have been supported through endpoints in the API.
Our focus in this studio is on operations and as such we will not be going into the development of the API. However, feel free to explore the source code if you are curious about the similarities and differences between the .NET MVC and API implementations.
Start the API Server
Open the project within IntelliJ and start the application.
Swagger Documentation
This application also implements Swagger for an api documentation page. Once your application is running you can view the swagger docs here at the following location: http://localhost:8080/swagger-ui/index.html.
You’ll see a page that looks nothing like any view we created in our other MVC applications. What you see running in the browser is not at all a client-side application, but rather, some documentation resources for the API itself.
You’ll see a list of those endpoints we asked you to describe for this lesson’s exercises:
Two endpoints at the API entry-point path, /events, to interact with the collection as a whole:
- list Events:
GET /events -> Event[] - create a Event:
POST /events (NewEvent) -> 200, Event
And three that require a sub-path variable, /events/{id}, to interact with a single entity:
- find single Event:
GET /events/{id} -> Event - delete a Event:
DELETE /events/{id} -> 204, Event - update an Event
PATCH /events/{id} -> 200, Event
And below this list are two Schemas, or shapes, of resources the API handles.
Swagger is a popular tool API developers use to include fast documentation for their API codebase. The page we’re looking at is generated by this tool and gives us a nice summary of the endpoints made available by the API we currently have running. But remember, we’ll test the API in Postman.
Making Requests to the Coding Events API
List the Coding Events
To create our first request using Postman, select the Create New button located within the “Start with something new” section.

Select the Create New button to create a new request
The above screenshot is from the Home page on Postman. If you are on the Workshop page choose the New button on the top right of the My Workspace pane located on the left side.
Creating a New Request
With the Create New view open, select the HTTP Request option.
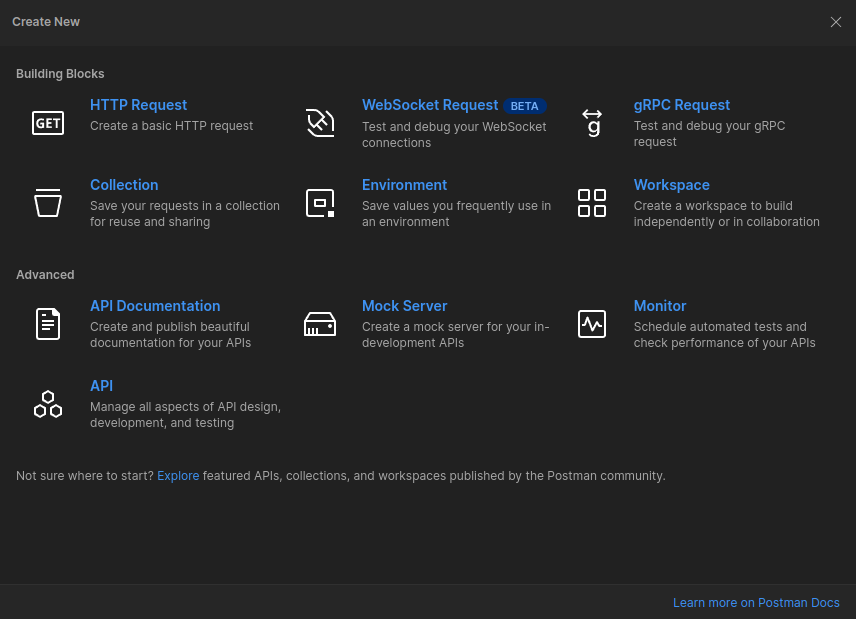
This will open the view to create a HTTP Request.
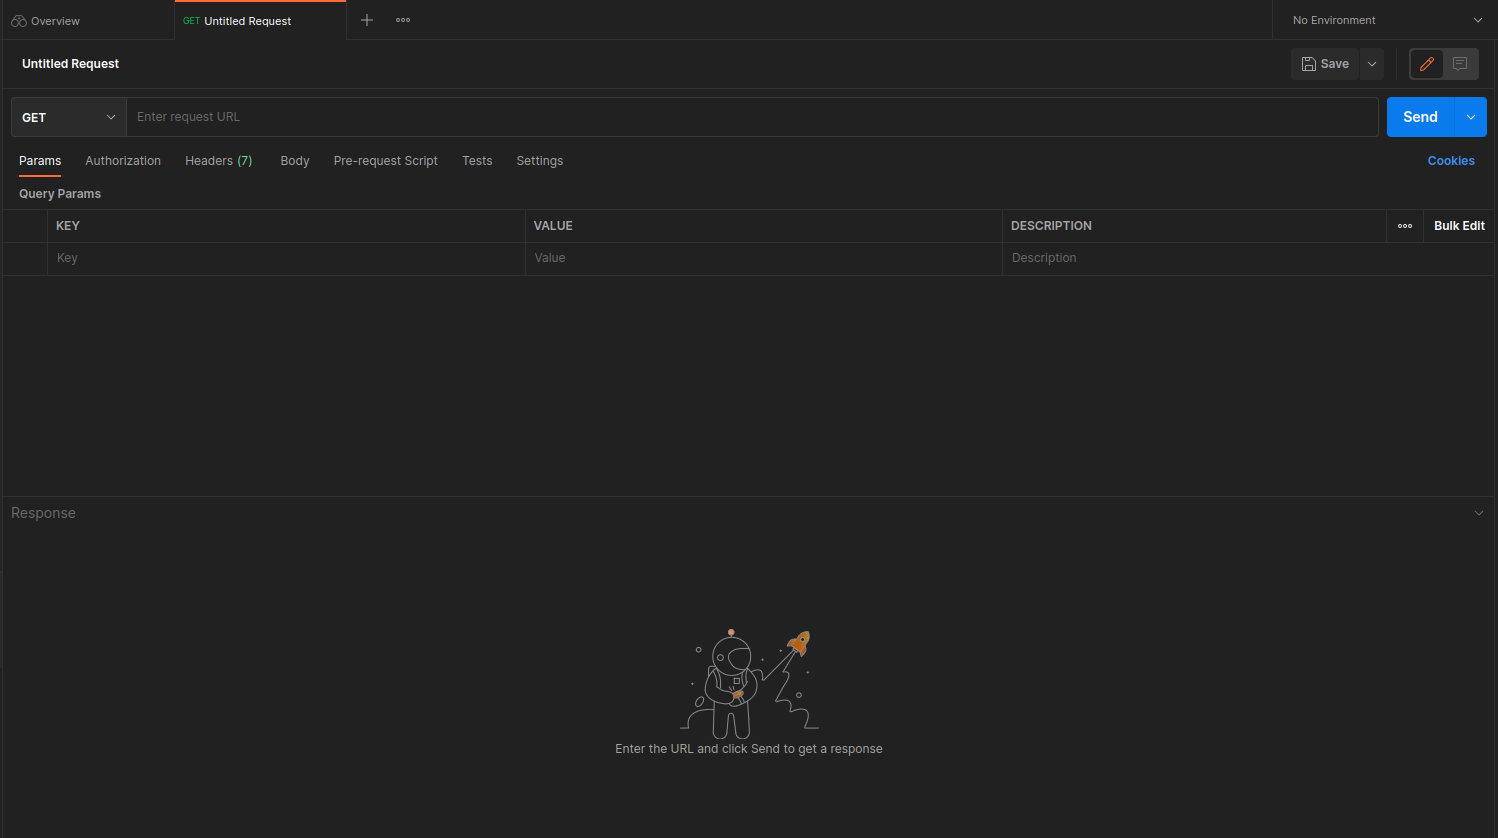
Configuring the Request
Postman exposes an exhaustive set of tools for configuring every aspect of a request. Fortunately, this request is relatively simple.
We want to request the state of the CodingEvents collection, in shorthand:
GET /events -> CodingEvent[]
In Postman, we can make this request by configuring the following settings:
- the URL of the endpoint:
http://localhost:8080/events - the HTTP method of the endpoint:
GET - the request header: (
Accept: application/json)
To the left of the URL bar is a dropdown selector for HTTP methods. It will default to GET. In the following requests, you will need to select the appropriate method from this list.
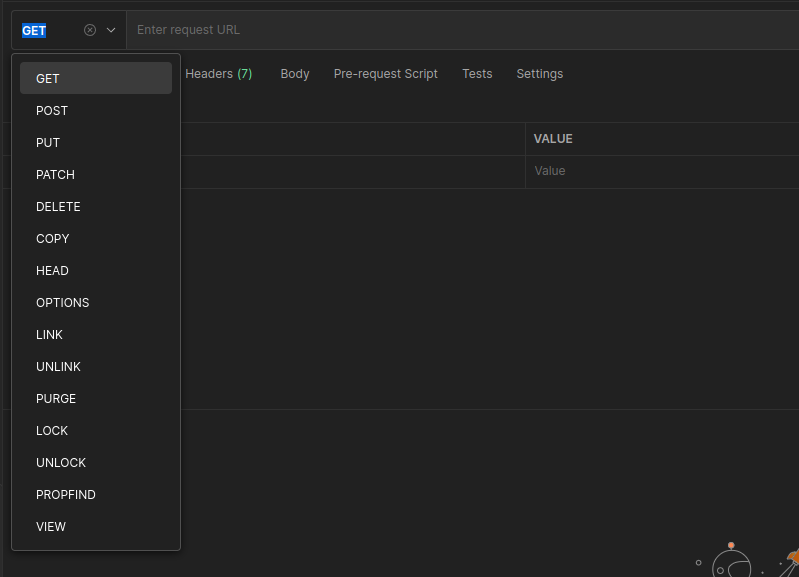
The dropdown menu contains all of the HTTP request types available to send
Next to the request method type, enter the request URL where the API request should be sent: http://localhost:8080/events.
Underneath the URL bar are tabs for other aspects of the request. Select the Headers tab to configure our header. The Accept header lets the API know that we accept responses that are formatted as JSON.
In our context, the API only responds with JSON. However, some APIs offer multiple MIME types for their responses. It is a best practice to set this header explicitly to the content type the consuming application expects.
You can set multiple headers in this section. As you begin to type the name and value of headers, Postman will autocomplete them for you. After configuration, your request should look like this:

The request Accept header is given a value of “application/json”
To issue the request, you can select the blue Send button on the right of the window, or use the ctrl + enter keyboard shortcut.
Viewing the Response
Below the request configuration, you will see the response section has been populated. From here, you see the response body along with the status code (on the right) and a tab for headers:
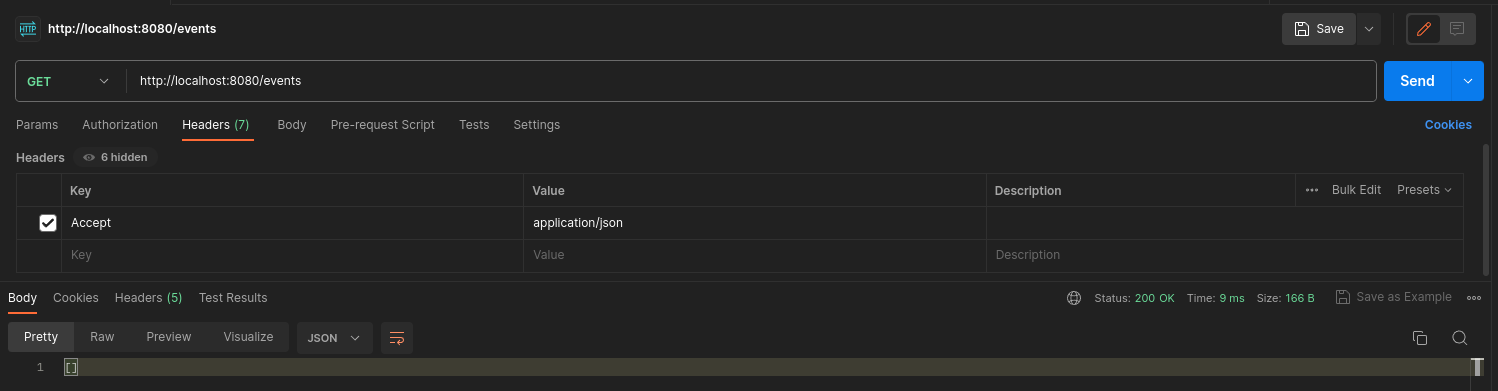
The initial CodingEvents collection state is empty
Since this is our first time running the application, the database is empty. We expectedly received an empty JSON list [] which corresponds to the empty representation of the Coding Events collection.
If you select the Headers tab in the response pane, you see the API satisfied our Accept request header and provided the response in application/json format.
The response is returned as application/json
If you get a connection refused error, it means you likely forgot to start the API server or mistyped the URL. Check both of these before attempting the request again.
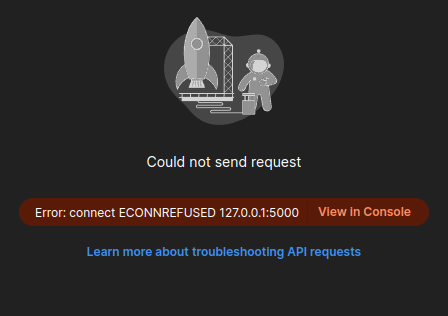
If sending the request results in a connection error, check your setup and request settings.
Create an Event
For our next request, we will create an Event. Repeat the steps you performed in the previous request:
- Click on the New button in the top left corner of the Postman window to create a new request.
- Select the HTTP Request option.
This request will change the state of the Events collection by adding a new entity to it. Recall that the shorthand for this request is:
POST /events (NewCodingEvent) -> 200, Event
We will need to set the following request settings:
- The URL of the endpoint:
http://localhost:8080/events - The HTTP method of the endpoint:
POST - The request header: (
Content-Typeapplication/json) - The request body: a JSON
NewEventobject
As a best practice, we explicitly define the Content-Type header. This header indicates that our request contains application/json data so that the API knows how to parse the incoming request body.
Configure the Request Body
In addition to the configurations you are now familiar with setting, we will need to define the request body. For this task, select the Body tab that is next to Headers.
The body of the request must be in a raw JSON format. In the Body tab, you will need to select the data format. Select raw from the available options. Once this format is selected, enter the following JSON body:
{
   "name": "Halloween Hackathon!",
   "description": "A gathering of nerdy ghouls to work on GitHub Hacktoberfest contributions"
}
Before sending the request, check that your configuration matches the above settings.
Hit Send and we’ll take a look at the result.
Analyzing the Response
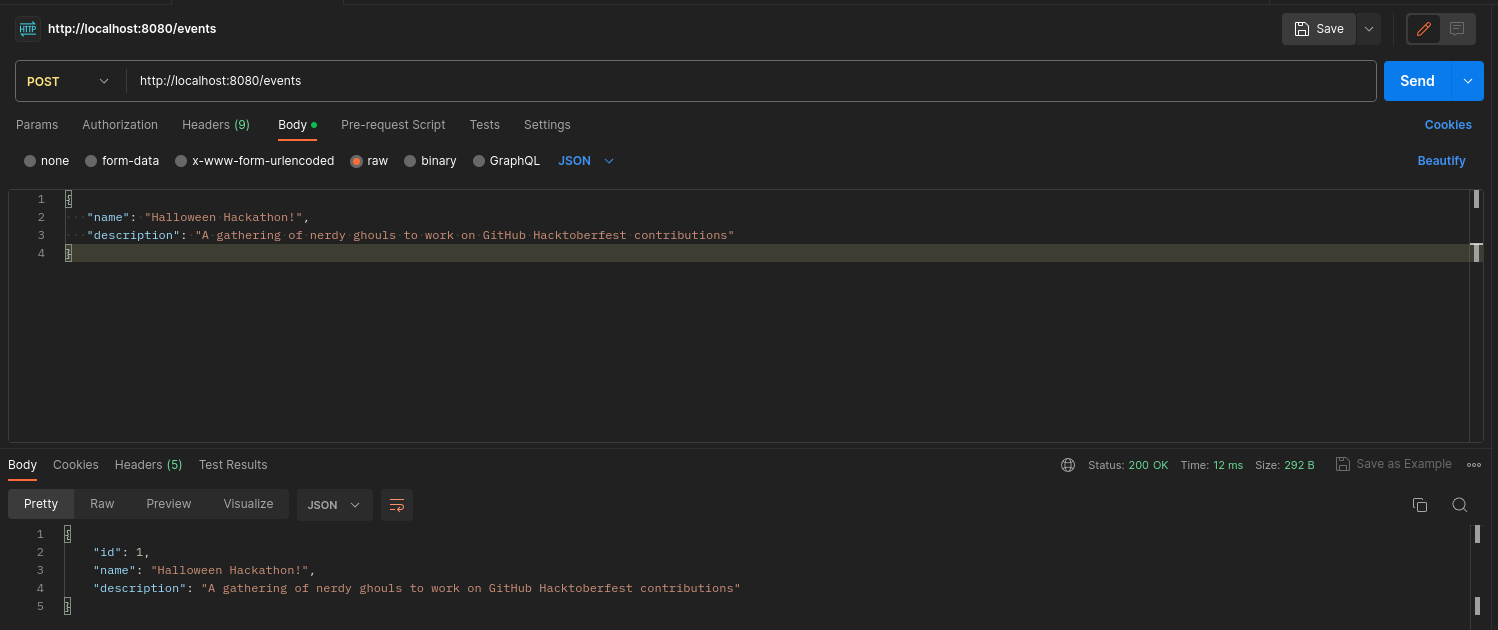
You can see in the response that the API reflected back the representation of the new Event entity. Notice that a unique id has been assigned to it by the API. Looking at the status code (200) and headers of the response, we can see the API conformed to the REST convention. The URL value of the newly created resource is: http://localhost:8080/events/1.
This location can be can now be used to view the individual Event entity that was created by our request.
Sending a Bad Request
To test the rejection of bad requests, let’s send one that violates the NewEvent validation constraints. Send another request with the following JSON body:
{
   "name":
   "Description": "A gathering of nerdy ghouls to work on GitHub Hacktoberfest contributions"
}
You can see from the response that the API rejected the request. The response returns a bad request status of 400 which indicates a client-side error. The response body includes information about what went wrong with the request.
Get a Single Event
For this step, we will make a request for the state of a single entity. You can use the URL from the Location header of the previous request to complete this task. Remember to follow the steps you performed before, keeping in mind the shorthand for this request:
GET /events/{id} -> Event
- Create a new
HTTPrequest - Configure the URL of the endpoint:
http://localhost:8080/events/1 - Configure the HTTP method of the endpoint:
GET - Configure the request header: (
Accept: application/json)
You should get back the following JSON response body:
{
    "id": 1,
    "name": "Halloween Hackathon!",
    "description": "A gathering of nerdy ghouls to work on GitHub Hacktoberfest contributions"
}
Updating an Event
This step will include updating an already existing resource. We will use the Location header from the previous step to update the name and description of the event.
Create a new
HTTPrequestConfigure the URL of the endpoint:
http://localhost:8080/events/1Configure the HTTP method of the endpoint:
PATCHConfigure the request header
Configure the request body:
{
   "name": "Linux Fundamentals",
   "description": "An event for Linux enthusiasts!"
}
After sending the request verify that the changes were made by crafting another GET request to the resource located at http://localhost:8080/events/1.
Delete an Event
In this final step, we will issue a DELETE request. Before we make the request, let’s re-issue the request to list the collection of CodingEvents. Now that we have added an entity, we expect the state of the CodingEvents resource collection to have changed. Switch back to the GET request tab and re-issue the request for the endpoint http://localhost:8080/events. You should get a response of the collection’s list representation containing the single entity we have created.
[
   {
      "name": "Linux Fundamentals",
      "description": "An event for Linux enthusiasts!"
   }
]
To delete this entity, and therefore change the state of our resources, we will need to issue the following shorthand request:
DELETE /events/{id} -> 204
Once again, go through the methodical process of setting up the request:
- Create a new
HTTP request - Configure the URL of the endpoint:
http://localhost:8080/events/1 - Configure the HTTP method of the endpoint:
DELETE
Notice that for this request, we do not need to set any request headers. A DELETE request should send back an empty (no-content) response body with its 204 status code.
Deleting an Event returns no body in the response
As a final confirmation, check the state of the CodingEvents collection by submitting a GET request to http://localhost:8080/events and notice that it has returned to its initial state. The representation of this state is shown in the empty list [] response body.
Bonus Missions
If you complete this studio early and want some additional practice, consider the following bonus missions:
- Explore the API source code using your IDE debugger to step through the request and response process
- Try consuming the API from the command-line using the Bash curl program or the PowerShell Invoke-RestMethod cmdlet.