Login and Registration Forms
With a User class in place, we can now create controllers and views for creating a user and verifying their credentials.
The code for this section begins with the user-model branch
and ends with the login-reg-forms branch
of the CodingEventsJava repository.
Creating AuthenticationController
In the controllers package, create a new class named AuthenticationController. Since this controller will deal with User objects, it needs a UserRepository instance.
| |
Session-Handling Utilities
Before creating handler methods for rendering and processing our login and registration forms, we need some utility methods for working with sessions. Below the definition of userRepository, let’s add the following class members:
| |
This code allows us to store and retrieve the login status of a user in a session. More specifically, a logged-in user’s user ID will be stored in their session.
Sample session data for a logged-in user:
| session_id | 81LfWG9 |
|---|---|
| user | 42 |
The static field userSessionKey is the key used to store user IDs. setUserInSession uses an HttpSession object (part of the standard javax.servlet.http package) to store key/value pair. getUserFromSession looks for data with the key user in the user’s session. If it finds one, it attempts to retrieve the corresponding User object from the database. If no user ID is in the session, or if there is no user with the given ID, null is returned.
The HttpSession class handles the details of session creation and lookup for us, including generating unique session IDs and session cookies.
These utility methods will allow our handlers to manage authentication.
Form DTOs
Our login and registration forms will use DTOs to help with form rendering and processing. Furthermore, since these forms will be similar—both require a username and password—we’ll use inheritance in creating our DTOs.
The DTO for the login form needs only username and password fields.
Create a new package called dto within the models package.
| |
LoginFormDTO should live in the models.dto package.
To better understand this approach, think of a DTO associated with a form as an object that represents each of the form fields. Using a DTO to represent the data associated with a form makes form rendering and processing much easier when the form does not line up with a specific model class.
In the class above, we have a password field that will store a plain-text password. However, this does not contradict our early imperative about NOT storing passwords, since LoginFormDTO is not a persistent class.
Our registration form will ask for a username/password pair, and then ask the user to confirm the password by typing it in again. So the associated DTO can extend LoginFormDTO and add an additional field for password verification.
| |
RegisterFormDTO should also live in the models.dto package.
The Registration Form
We are now ready to build our form handlers. Before we can authenticate a user, we must have users in the application, so we’ll build the registration form first.
To render the form within AuthenticationController is simple:
| |
When passing an object into the view with model.addAttribute, specifying a label for the object is optional. If a label is not specified the class name is used, with the first letter converted to lowercase.
In the method above, model.addAttribute(new RegisterFormDTO()) will pass a RegisterFormDTO object in with the label registerFormDTO.
Create a new register.html file inside of the templates directory that uses the three DTO fields to render the form fields:
| |
The form processing handler is more complicated. Add the following code to your AuthenticationController class so that we can look at it, and then break it down in detail.
| |
- Lines 1-3: Define the handler method at the route
/registerthat takes a validRegisterFormDTOobject, associated errors, and aModel. In addition, the method needs anHttpServletRequestobject. This object represents the incoming request, and will be provided by Spring. - Lines 7-10: Return the user to the form if an validation errors occur.
- Line 12: Retrieve the user with the given username from the database.
- Lines 14-19: If a user with the given username already exists, register a custom error with the
errorsobject and return the user to the form. See the note on usingerrors.rejectValuebelow. - Lines 21-28: Compare the two passwords submitted. If they do not match, register a custom error and return the user to the form.
- Lines 29-32: At this point, we know that a user with the given username does NOT already exist, and the rest of the form data is valid. So we create a new user object, store it in the database, and then create a new session for the user.
- Finally, redirect the user to the home page.
The Errors class we have been using in conjunction with model binding will always contain information about errors related to validation annotations on the given model. However, it can also be used to manually generate additional errors. In the method above, we call:
errors.rejectValue("username", "username.alreadyexists",
                    "A user with that username already exists");
errors.rejectValue takes three parameters:
- The field containing the error.
- A label representing the error. This allows error messages to be imported from another file. While we don’t have such a file, this parameter is required.
- A default message to use if no external error message file is available (as is the case here).
This is a good time to test your application. Start it up, navigate to /register and try to create a user. If everything goes well, you will see a new row in the user table of the database.

The Login Form
Rendering the login form is similar to rendering the registration form:
@GetMapping("/login")
public String displayLoginForm(Model model) {
    model.addAttribute(new LoginFormDTO());
    model.addAttribute("title", "Log In");
    return "login";
}
The form template itself should be placed in templates/login.html, and is
also similar to the registration template:
| |
As usual, processing the form is more complicated. Again, we’ll break it down in detail.
| |
- Lines 1-9: The method definition, parameters, and initial error checking are nearly identical to the registration
POSThandler above. - Line 11: Retrieves the
Userobject with the given password from the database. - Lines 13-17: If no such user exists, register a custom error and return to the form.
- Line 19: Retrieves the submitted password from the form DTO.
- Lines 22-26: If the password is incorrect, register a custom error and return to the form. Password verification uses the
User.isMatchingPassword()method, which handles the details associated with checking hashed passwords. - Line 28: At this point, we know the given user exists and that the submitted password is correct. So we create a new session for the user.
- Line 30: Finally, redirect the user to the home page.
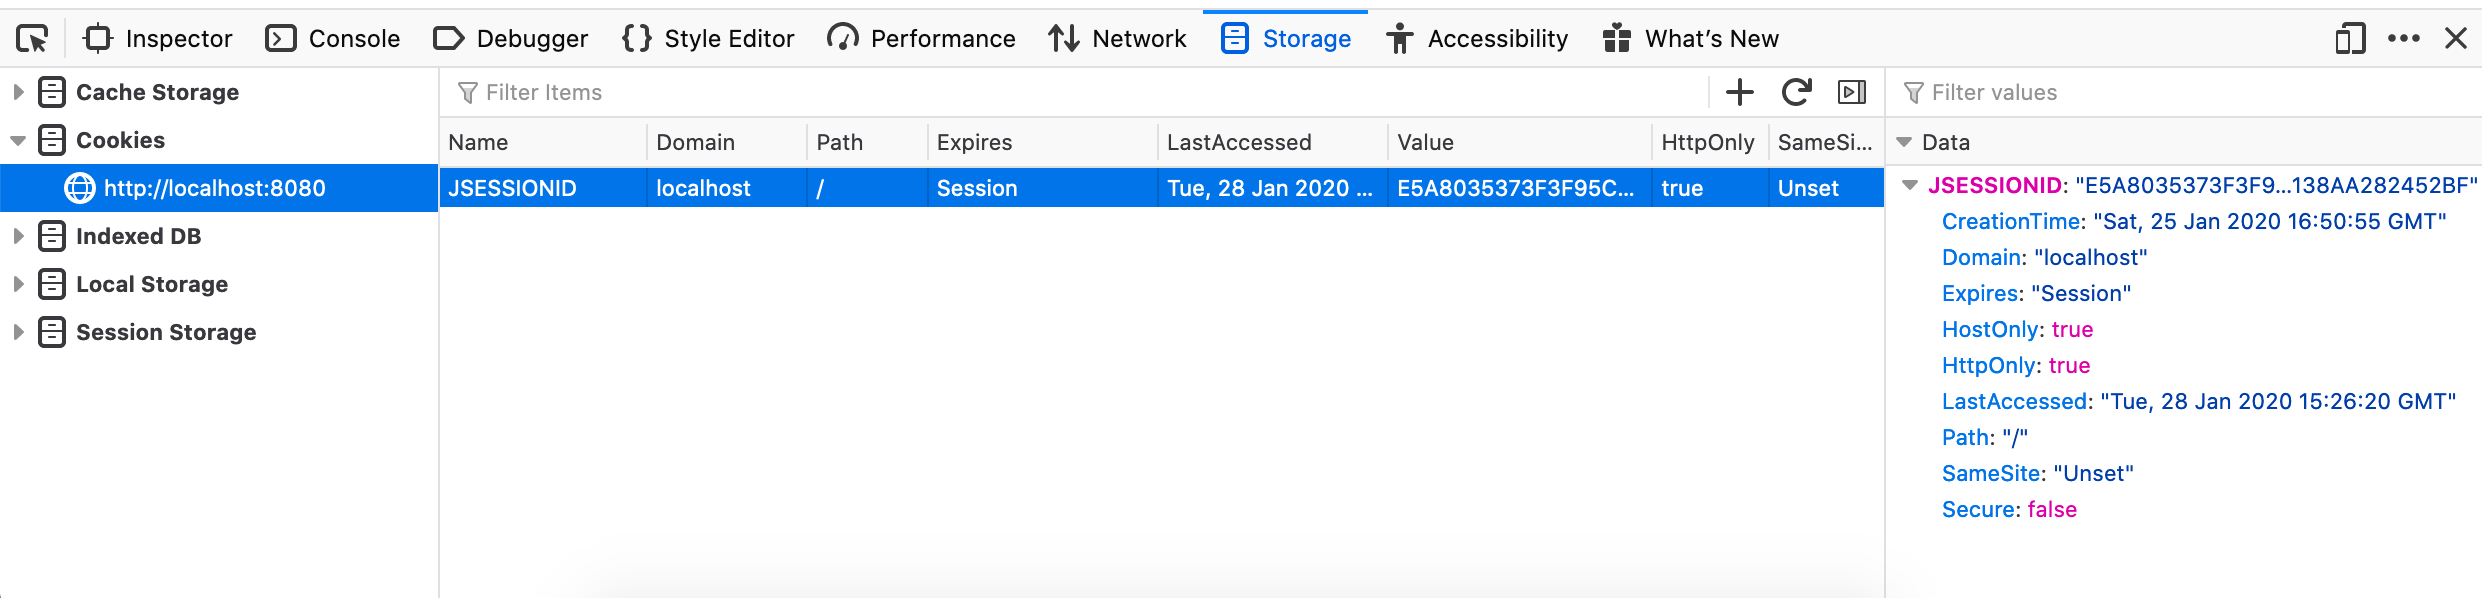
Now you can test your login form. Upon successful form submission, you should be redirected to the home page. To verify that a session was created, open Firefox’s developer tools and navigate to the Storage pane. Select Cookies > http://localhost:8080 in the left-hand pane and you should see a cookie with the key JSESSIONID. This is the session cookie created by the application. (You may see other cookies as well, which is okay.)
Logging Out
After the complicated processes of user registration and login, logging a user out is refreshingly simple.
@GetMapping("/logout")
public String logout(HttpServletRequest request){
    request.getSession().invalidate();
    return "redirect:/login";
}
To log out, we simply invalidate the session associated with the given user. This removes all data from the session, so that when the user makes a subsequent request, they will be forced to log in again.
Check Your Understanding
What is the name of the new method we have introduced on the Errors object?
Errors.hasErrors()Errors.errors()Errors.isNotEmpty()Errors.rejectValue()
Which developer tool panel can we use to verify that a user session has been started?
- Console
- Network
- Storage
- Performance