Task 1: Getting to Know the Starter Code
Getting Started
Set up a local copy of the project:
- The starter code for this project is in this github repository . Fork, clone, and then set up the project in IntelliJ. Refer back to the instructions from Assignment 0 for details.
- Launch the application (via the Gradle pane, Tasks > Application > bootRun) to make sure it starts up. Then shut it down.
- Run the autograding tests. The tests for this assignment are set up the same way as for Assignment 2 . There are four tasks for this assignment, but the first doesn’t require any coding on your part. Therefore, there are 3 test files (for tasks 2-4). As with Assignment 2, we recommend that you only run the tests for the task you are currently working on.
Review the Code
One essential programming skill that you will develop is the ability to read and understand someone else’s code. This assignment begins with you practicing exactly that. Make sure you carefully examine the provided code BEFORE you start changing things.
Trying to “fix” a code sample before understanding how it works leads to confusion, frustration, and a broken program. DO NOT SKIP the code review!
Carly created a Spring Boot application and filled in some features. She
refactored JobData to generate an ArrayList of Job objects based on
your TechJobs-OO work, and she added controllers and views for a “Home”,
“List”, and “Search” page. JobData now also builds ArrayLists for the
Employer, Location, PositionType, and CoreCompetency objects.
The Model
When referring to Java class locations, we’ll usually omit the leading
path: src/main/java/org/launchcode/.
The “model” is contained in the JobData class, which is in the models
package. We put “model” in quotes, since this class isn’t a model in the
typical, MVC/object-oriented sense (maybe a better name for this assignment
would be TechJobs VC).
The JobData class serves the same purpose as before—it reads data from
the job_data.csv file and stores it in a format we can use. In this case,
that format is an ArrayList of Job objects. Note that Carly changed the
path to the job_data.csv file to store it in the src/main/resources
directory.
You’ll use some of the static methods provided by JobData in your
controller code. Since you’re already familiar with these, we’ll leave it to
you to review their functionality as you go.
The Controllers
Expand the controllers package, and you’ll see that you have three
controllers already in place. Let’s look at these one at a time.
The HomeController
This class has only one handler method, index, which displays the home page
for the app. The controller renders the index.html template (in
src/main/resources/templates) and provides a fairly simple view.
The ListController
This controller provides functionality for users to see either a table showing
all the options for the different Job fields (employer, location,
coreCompetency, and positionType) or a list of details for a selected
set of jobs.
If you look at the corresponding page at /list, you’ll see an “All” column
in the table. However, this option doesn’t work yet, and you will fully
implement that view as you work on the assignment.
At the top of ListController is a constructor that populates
columnChoices and tableChoices with values. These HashMaps play the
same role as in the console app, which is to provide a centralized collection
of the different List and Search options presented throughout the user
interface.
ListController also has list and listJobsByColumnAndValue handler
methods, with routes as annotated above their definitions. The first method
renders a view that displays a table of clickable links for the different job
categories. The second method renders a different view that displays
information for the jobs that relate to a selected category. Both of the
handlers obtain data by implementing the JobData class methods.
In the listJobsByColumnAndValue method, the controller uses two query
parameters passed in as column and value to determine what to fetch
from JobData. In the case of "all" it will fetch all job data,
otherwise, it will retrieve a smaller set of information. The controller then
renders the list-jobs.html view. We’ll explore the list.html and
list-jobs.html templates in a moment.
listJobsByColumnAndValue works similarly to the search functionality, in
that we are “searching” for a particular value within a particular field and
then displaying jobs that match. However, this is slightly different from the
other way of searching in that the user will arrive at this handler method as a
result of clicking on a link within the list view, rather than via
submitting a form. We’ll see where these links originate when we look at the
views. Also note that the listJobsByColumnAndValue method deals with an
“all” scenario differently than if a user clicks one of the category links.
The SearchController
Currently, the search controller contains only a single method, search.
It simply renders the form defined in the search.html template.
Later in this assignment, you will receive instructions for adding a second handler to deal with user input and display the search results.
The Views
Let’s turn our attention to the views.
The fragments File
If the application is not running, launch it and navigate to the site’s home
page in your browser. Also open up the
src/main/resources/templates/index.html file in IntelliJ. You’ll notice
that there is a fair amount of content visible on the page that isn’t contained
in index.html. This is because we’re using two fragments from
fragments.html (head and page-header). These allow for some basic
page structure and navigation to be shared across all of our views.
Have a look at the structure of fragments.html, but you will NOT need to do
any work within this file for this assignment.
We use Twitter’s Bootstrap
CSS, HTML, and
JS framework to provide some styling and functionality to our views. The
appropriate files are included at the top of fragments.html and thus
are included on every page of our app.
You won’t have to explicitly use Bootstrap at all in this assignment, but it’s a great way to make your sites look good with minimal work. Consider using it in your own projects!
The List Views
Turn your attention to list.html. This page displays a table of links
broken down into several categories. Data from columnChoices is used to
fill in the header row, and information stored in tableChoices generates
the link text.
The most interesting part of this template is how we generate the links:
| |
tableChoicesis a HashMap fromJobData, and it contains the names of theJobfields as keys (employer, etc.). The value for each key is an ArrayList ofEmployer,Location,CoreCompetency, orPositionTypeobjects.- In line 1,
categoryrepresents one key/value pair fromtableChoices, and in line 3,itemrepresents one entry from the stored ArrayList. - We’ve seen the syntax
@{/list/jobs}to generate a link within a Thymeleaf template, but we haven’t seen the other portion of the link:(column=${category.key},value=${position}). This syntax causes Thymeleaf to dynamically generate query parameters for our URL.
In line 4, we set these parameters by using column= and value=. The
values of these parameters are determined dynamically based on
${category.key} and ${item}. Since these values come from
tableChoices, the keys will be employer, location, etc. The
values will be the individual elements from the related ArrayList. When the
user clicks on these links, they will be routed to the
listJobsByColumnAndValue handler in ListController, which looks for
these parameters.
Clicking on one of the links will display a list of jobs that relate to the
choice, via the listJobsByColumnAndValue handler method. However, that
view, list-jobs.html isn’t working yet. While the handler method is fully
implemented, the view template needs some work.
For now, click one of the Location links. This sends a request as we outlined above, but doing so only displays a page with a title and no job list.
The page you see at /list/values?column=location&value=... is generated by
the list-jobs.html template. It has a similar structure as list.html,
but the table consists of only one column.
Select “Kansas City” from the list of locations, and then check the address bar of your browser:
/list/jobs?column=location&value=Kansas%20City
Thymeleaf inserts %20 for us, to represent a space, but this may
actually be hidden in your browser’s address bar.
The Search View
Finally, click on Search from the home page, or the navigation bar, and open
up search.html in IntelliJ. You’ll see a search form (in both the browser
and template file) that gives the user the option of searching by a given
Job field, or across all fields. This is an exact visual analog of our
console application.
This template will be used to display search results, in addition to rendering the form. This will give the nice user experience of easily searching multiple times in a row.
Wrap Up the Code Review
Once you understand the controllers and views that are already in place, you’re ready to begin your work.
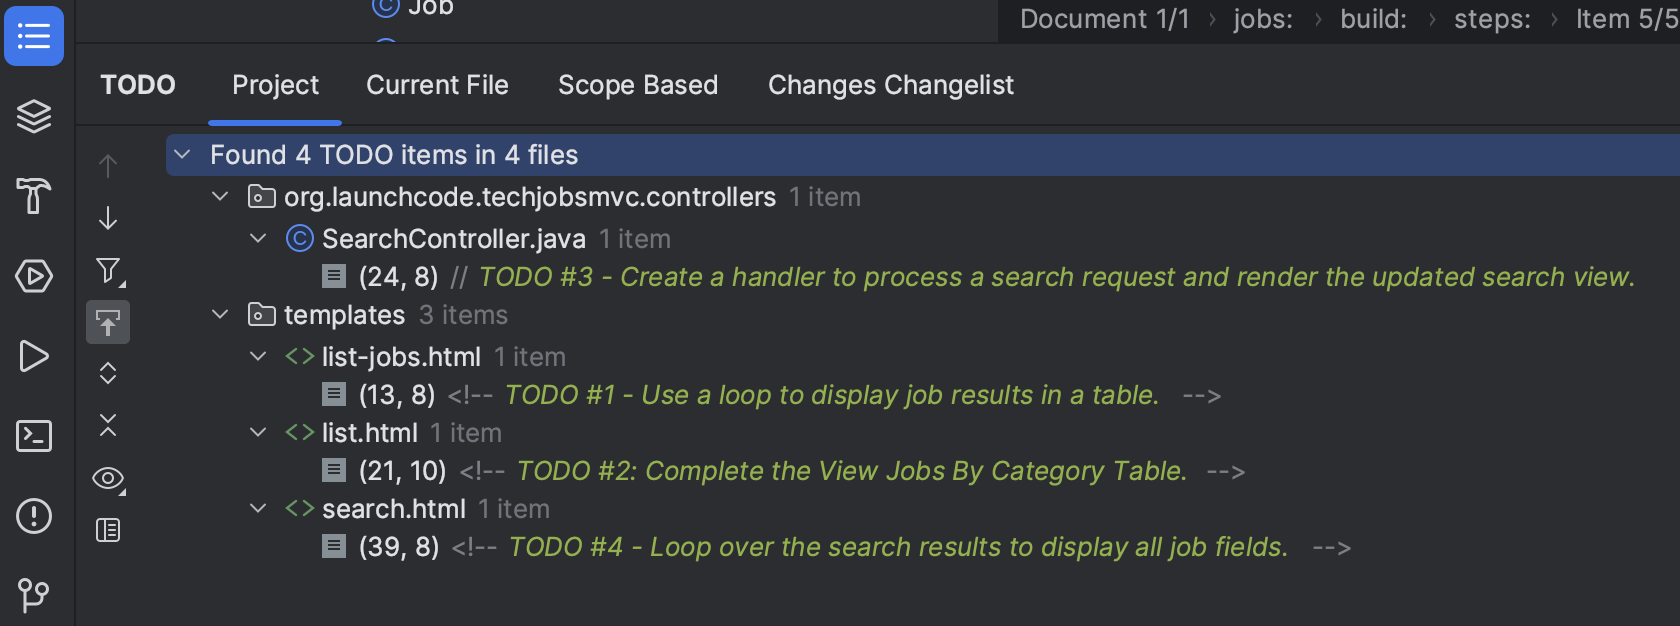
In IntelliJ, select View > Tool Windows > TODO to pop open a small pane at
the bottom of the window. This list is populated by any code comments that
start with TODO. You’ll see your tasks listed, and clicking on any one will
open the relevant file.
As you work on your tasks, remember to refer to the demo app .