Fetching Data
Now that we know what an API is, let’s use one to update a web page. Let’s use a weather API to add weather data to a web page. The URL for this special LaunchCode weather API is https://handlers.education.launchcode.org/static/weather.json .
Example JSON returned from our weather API.
{
    "temp": 67,
    "windSpeed": 5,
    "tempMin": 50,
    "tempMax": 71,
    "status": "Sunny",
    "chanceOfPrecipitation": 20,
    "zipcode": 63108
}
We can see that this API returns useful information like temp and
windSpeed. Our goal is to add that data to a Launch Status web page. Note,
this API is for instruction purposes and does not contain real time data.
Launch Status web page, which we will add weather data to.
<!DOCTYPE html>
<html>
    <head>
    <title>Launch Status</title>
    </head>
    <body>
    <h1>Launch Status</h1>
    <h3>Weather Conditions</h3>
    <div id="weather-conditions">
        <!-- TODO: dynamically add html about weather using data from API -->
    </div>
    </body>
</html>
fetch Function
To request the weather data, we will use the fetch function. fetch is a
global function that requests, or fetches, resources such as data from an API.
Take note of two necessary aspects of the fetch function:
- The URL of where the data is located.
- For this example, it will be
"https://handlers.education.launchcode.org/static/weather.json"
- A response handler function to utilize the data that is being fetched.
- For this example, it will be
function(response){...};
Notice a string URL is passed to fetch. Also notice the anonymous request handler function that has a response parameter. The .then method will be explained soon.
fetch("https://handlers.education.launchcode.org/static/weather.json").then(function(response) {
    console.log(response);
} );
In this example, we are requesting data from https://handlers.education.launchcode.org/static/weather.json and our response handler (the anonymous function) simply logs the response to the console.
fetch Example
Now let’s add fetch in the Launch Status web page. the following code can be located within the javascript-projects/fetch/chapter-examples directory. The file is called fetch-weather-part-1.html
A <script> tag has been added that includes:
- A load event handler on line 6.
- A
fetchand response handler function on line 7. - A
console.log(response);on line 8 that prints out theresponseobject.
<!DOCTYPE html>
<html>
    <head>
    <title>Launch Status</title>
    <script>
        window.addEventListener("load", function() {
            fetch("https://handlers.education.launchcode.org/static/weather.json").then(function(response) {
                console.log(response);
            } );
        });
    </script>
    </head>
    <body>
    <h1>Launch Status</h1>
    <h3>Weather Conditions</h3>
    <div id="weather-conditions">
        <!-- TODO: dynamically add html about weather using data from API -->
    </div>
    </body>
</html>
Let’s break down how fetch works:
- A URL is passed to
fetchas a parameter. - This causes an HTTP GET request to be sent from the browser to the API.
- The API processes the request and sends back a response, which contains data.
- Once the browser receives the response, the
.then()statement executes. - The anonymous response handler function called by
.then(function(response)runs, and this function deals with the data sent back from the API. - Based on the code in the handler function, the web page gets updated using DOM methods.
In this section, fetch is used to make GET requests. fetch can also
be used to make other types of HTTP requests such as POST and PUT.
View the GET Request
We can see evidence of the GET request by following these steps:
- Open the
javascript-projects/fetch/chapter-examples/fetching-data/fetch-weather-part-1in a browser window. - Open developer tools.
- Open the Network tab in developer tools.
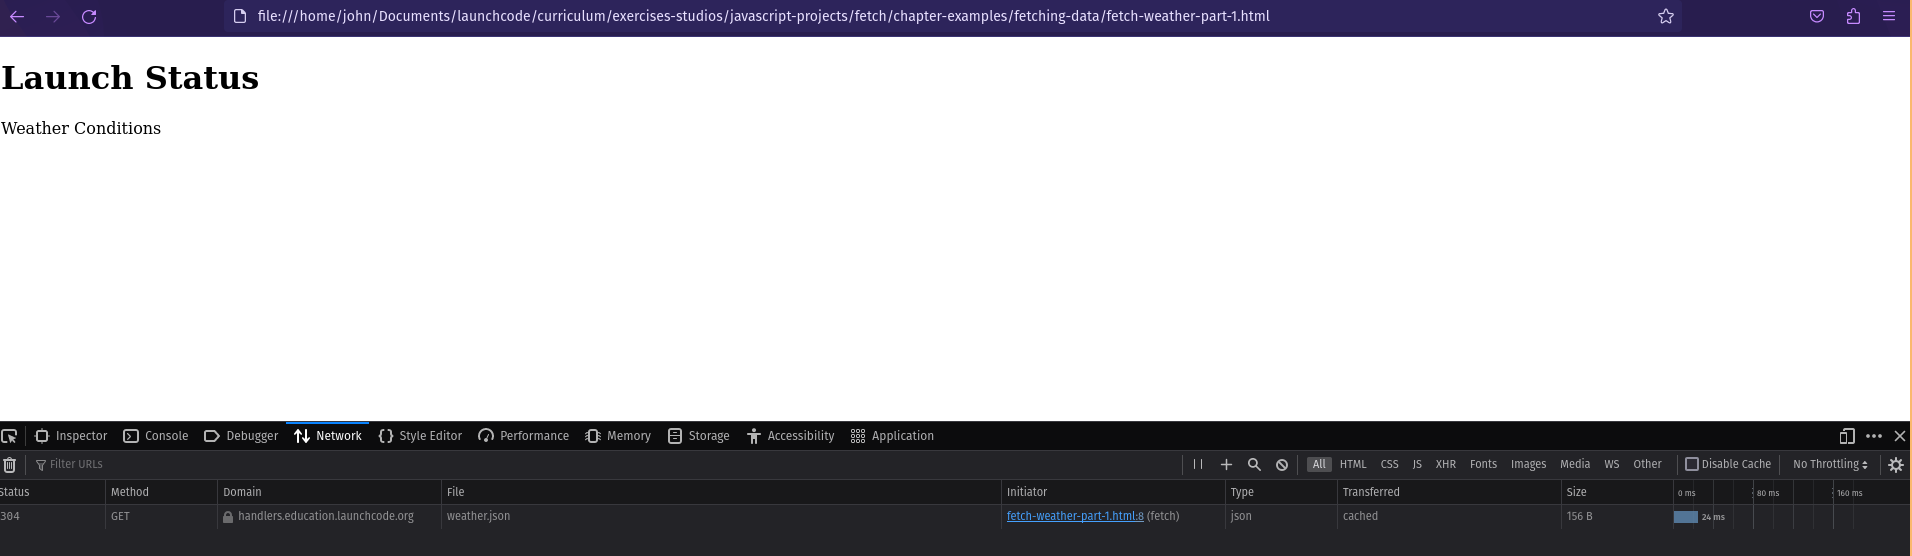
In the image above, you can see the web page has been rendered on the left. In
the developer tools, the GET request to the Weather API has been highlighted
along with the response from that request. The response shows the JSON data
that was received. In the console output, you can see the Response object
has been logged. We will use that object next.
Response Object
The response to the GET request is contained in a Response object, which is an instance of the Response class
.
The class contains methods that allow us to access the status of an API request and the data returned in the response.
On line 8, the json() method is used to gain access to the JSON data
contained in the response object.
Line 9 logs the JSON to the console. We’ll discuss .then() later.
<html>
    <head>
    <title>Launch Status</title>
    <script>
        window.addEventListener("load", function() {
            fetch("https://handlers.education.launchcode.org/static/weather.json").then( function(response) {
                // Access the JSON in the response
                response.json().then( function(json) {
                console.log(json);
                });
            });
        });
    </script>
    </head>
    <body>
    <h1>Launch Status</h1>
    <h3>Weather Conditions</h3>
    <div id="weather-conditions">
        <!-- TODO: dynamically add html about weather using data from API -->
    </div>
    </body>
</html>
Console Output
Object {
    temp: 67,
    windSpeed: 5,
    tempMin: 50,
    tempMax: 71,
    status: "Sunny",
    chanceOfPrecipitation: 20,
    zipcode: 63108
}

Use the DOM and JSON Data to Update the Page
Now that we have JSON weather data, we can add HTML elements to the page to display that data.
The following example uses the javascript-projects/fetch/chapter-examples/fetching-data/fetch-weather-part-3.html file.
- On line 8, the
divobject is defined and linked to the HTML element with the idweather-conditions. - On line 10, the
innerHTMLproperty of thedivobject is set to be the HTML elements in lines 11 - 16.
<html>
    <head>
    <title>Launch Status</title>
    <script>
        window.addEventListener("load", function() {
            fetch("https://handlers.education.launchcode.org/static/weather.json").then( function(response) {
                response.json().then( function(json) {
                const div = document.getElementById("weather-conditions");
                // Add HTML that includes the JSON data
                div.innerHTML = `
                    <ul>
                        <li>Temp ${json.temp}</li>
                        <li>Wind Speed ${json.windSpeed}</li>
                        <li>Status ${json.status}</li>
                        <li>Chance of Precip ${json.chanceOfPrecipitation}</li>
                    </ul>
                `;
                });
            });
        });
    </script>
    </head>
    <body>
    <h1>Launch Status</h1>
    <h3>Weather Conditions</h3>
    <div id="weather-conditions">
        <!-- Weather data is added here dynamically. -->
    </div>
    </body>
</html>
Let’s take a look at the expected sequence of events:
- In line 6, the
fetchcommand sends a request to the URL. - When the API returns a response, the
thenmethod calls the anonymous handler function and passes in theresponseobject (also line 6). - On line 7, the handler function tries to retrieve the JSON data from the
responseobject. When this is successful, the anonymousfunction(json)gets called.- On line 8, the
divobject is defined and linked to the HTML element with the idweather-conditions. - On line 10, the
innerHTMLproperty of thedivobject is set to be the HTML elements in lines 11 - 16. - The HTML in lines 11 - 16 gets filled in using weather data stored in the
jsonobject.
- On line 8, the
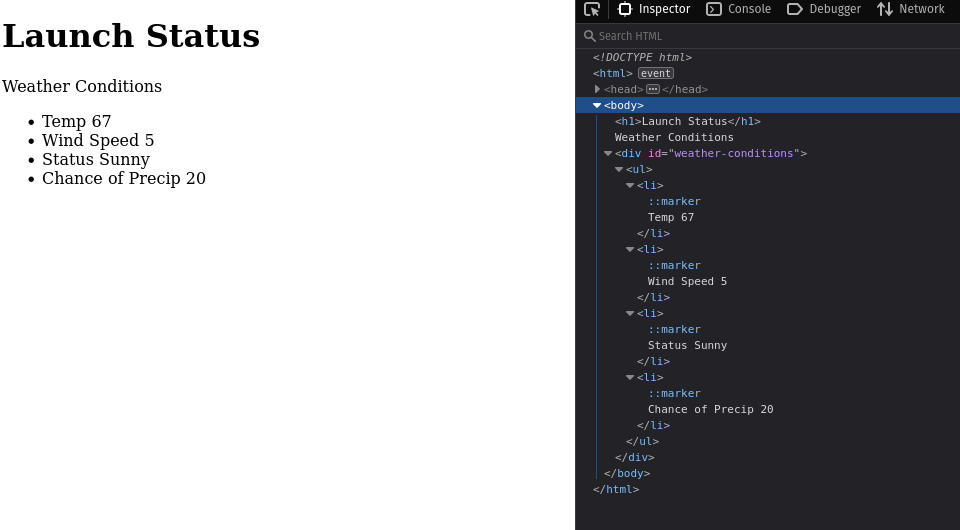
- The two anonymous functions end, and the HTML defined in lines 11 - 16 gets added to the
divelement on line 26.
Opening the developer tools on the web page shows the added HTML:
fetch was chosen as the tool to request data because it’s supported in modern browsers by default
and is simple to use. When viewing resources other than this book, you will see various other ways to
request data in a web page with JavaScript. Other ways include, but are not
limited to, jQuery.get, jQuery.ajax, and XMLHttpRequest.
Check Your Understanding
What is the correct syntax for fetch?
fetch("GET", "https://api.url").then(...);fetch("https://api.url").doStuff(...);fetch("https://api.url").then(...);