22.8. Studio: Communication Log (cont.)
Tip
As you go through these steps, you'll be working with branches.
It's very likely you will make changes to the code only to realize that you
did so in the wrong branch. When this happens (and it happens to all of us)
you can use git stash to cleanly move your changes to another branch.
Read about how to do this in our Git Stash tutorial.
22.8.1. Step 5: First Message Exchange
Pilot: Use the File menu in Visual Studio Code to open the cloned
communication-log-controldirectory. Double click theindex.htmlfile to open it in the editor.Modify the HTML to add your response to mission control. Be creative, the communication can go anywhere! Just don't ask your partner what you should write.
Pilot: After you finish, commit your change with the usual
git status/git add ./git commit -mprocess.Pilot: Push up your changes up to GitHub so Control can see them as well. Use the command:
$ git push origin main
Counting objects: 9, done.
remote: Resolving deltas: 100% (8/8), completed with 8 local objects.
To [email protected]:username/communication-log.git
   511239a..679de77  main -> main
Control: Pull Pilot's changes down from GitHub with the command
$ git pull origin main
From github.com:username/communication-log
   e0de62d..e851b7e  main     -> origin/main
Updating e0de62d..e851b7e
Fast-forward
index.html | 1 +
1 file changed, 1 insertion(+)
Control: Notice that the code your local
index.htmlfile changes to reflect the line(s) Pilot added. Cool!Respond by adding a new HTML element and some text. Save, commit, and push your changes up to GitHub.
Pilot and Control: Play with the
pull/edit/pushprocess for a while! Repeat the cycle a few more times to add to your story.
Tip
In VS Code, right-click on the index.html tab. Choose the Copy Path
option.

Next, open a web browser and paste the path into the address bar. Ta da!
Your webpage appears. Opening index.html in your browser lets you track
your progress by refreshing the page.
Notice that the path in the address bar looks very similar to the result we
would see from the pwd command in the terminal.
22.8.2. Step 6: Create a Branch In Git
This back-and-forth workflow is nice, but it can get in the way. After all, professional developers don't sit around waiting for their teammates to commit and push a change before starting their own work. Fortunately, Git branches allow partners to work on a project at the same time and at their own pace.
Pilot: While Control is working on the next part of the story, use the terminal to create a new branch called
open-mic. Recall that a branch is a separate copy of the codebase. This lets you commit changes without affecting the code in themainbranch.$ git checkout -b open-mic Switched to a new branch 'open-mic' $ git branch main * open-mic
Pilot: In VS Code, create a new file called
style.cssand add the following CSS style rule:1 2 3 4
body {
   color: white;
   background-color: black;
}
Pilot: Next, open
index.htmland link to the stylesheet. Your HTML should look something like this:1 2 3 4 5 6 7 8 9 10
<!DOCTYPE html>
<html>
   <head>
      <link rel="stylesheet" type="text/css" href="style.css">
   </head>
   <body>
      <p>Radio check. Pilot, please confirm.</p>
      <!-- Your ongoing conversation here... -->
   </body>
</html>
Pilot: Save and commit your changes, then push the new branch up to GitHub with the command:
$ git push origin open-mic
Note that the command is a little different than what you used before (
git push origin main). The final part is the name of the branch that you want to push to GitHub.Control: To pull down the new
open-micbranch, enter the command:$ git pull origin open-mic
Note
If you don't know the name of the new branch, then just enter
git pull. This will pull down all new branches and show you a list of the options.Pilot and Control: If you haven't already done so, open
index.htmlin a browser to see what it looks like.
Good! Now let's take a look at GitHub and find the new open-mic branch.
22.8.3. Step 7: Open a Pull Request in GitHub
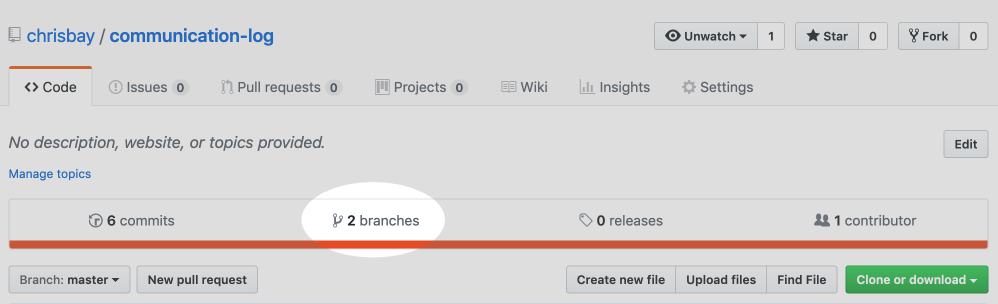
Pilot: In your browser, go to the GitHub project and click on Branches and make sure you see the new branch name, open-mic.
The branches page in GitHub.
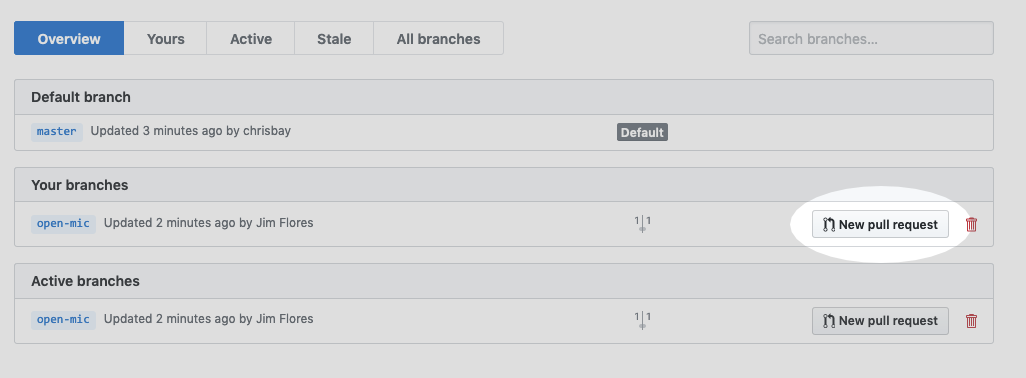
Pilot: Click New Pull Request to ask Control to review your changes in the
open-micbranch before merging them intomain. Add some text in the description box to let Control know what you did and why.Note
The branch selected in the base dropdown is the one you want to merge into, while the selected branch in the compare dropdown is the one you want to merge from.
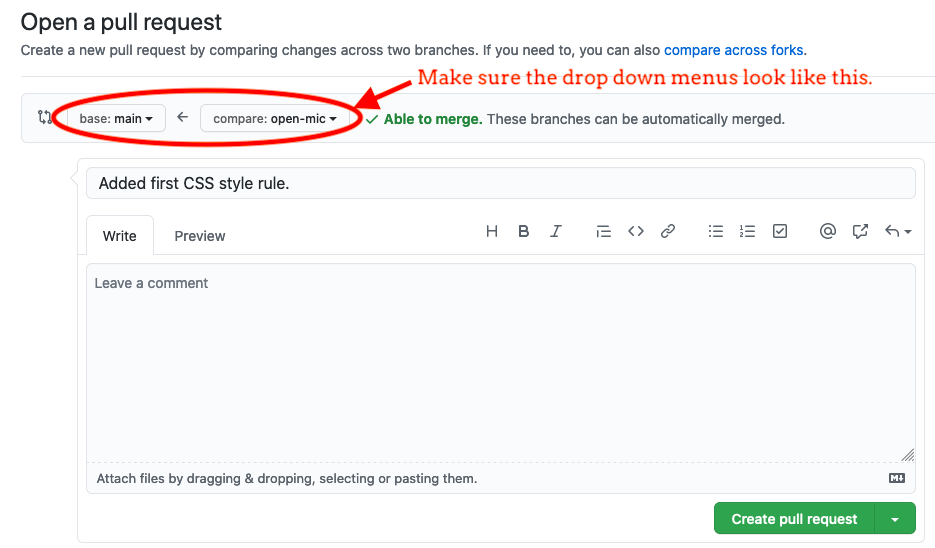
Open a PR in GitHub.
This is what an opened pull request looks like:

An open PR in GitHub
22.8.4. Step 8: Merge the Pull Request
Control: Go to your repo in GitHub. Click on Pull Requests. Next, click on the title for the one and only PR.
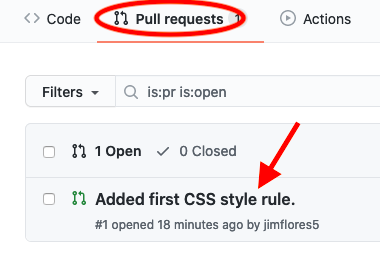
PR Open in GitHub
Control: The page that opens shows the history of all the commits made to the
open-micbranch. When ready, click the green Merge Pull Request button, followed by Confirm Merge.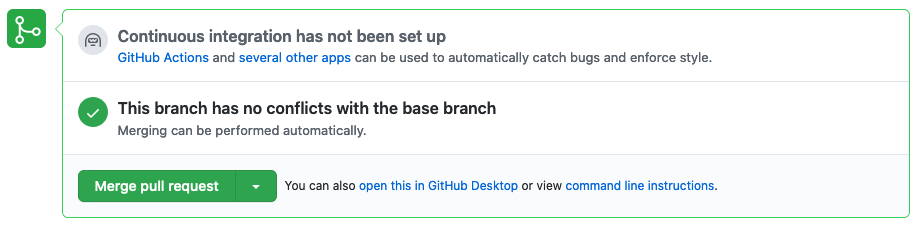
Finally! Merge the pull request.
Upon a successful merge, you should see a screen similar to the following:
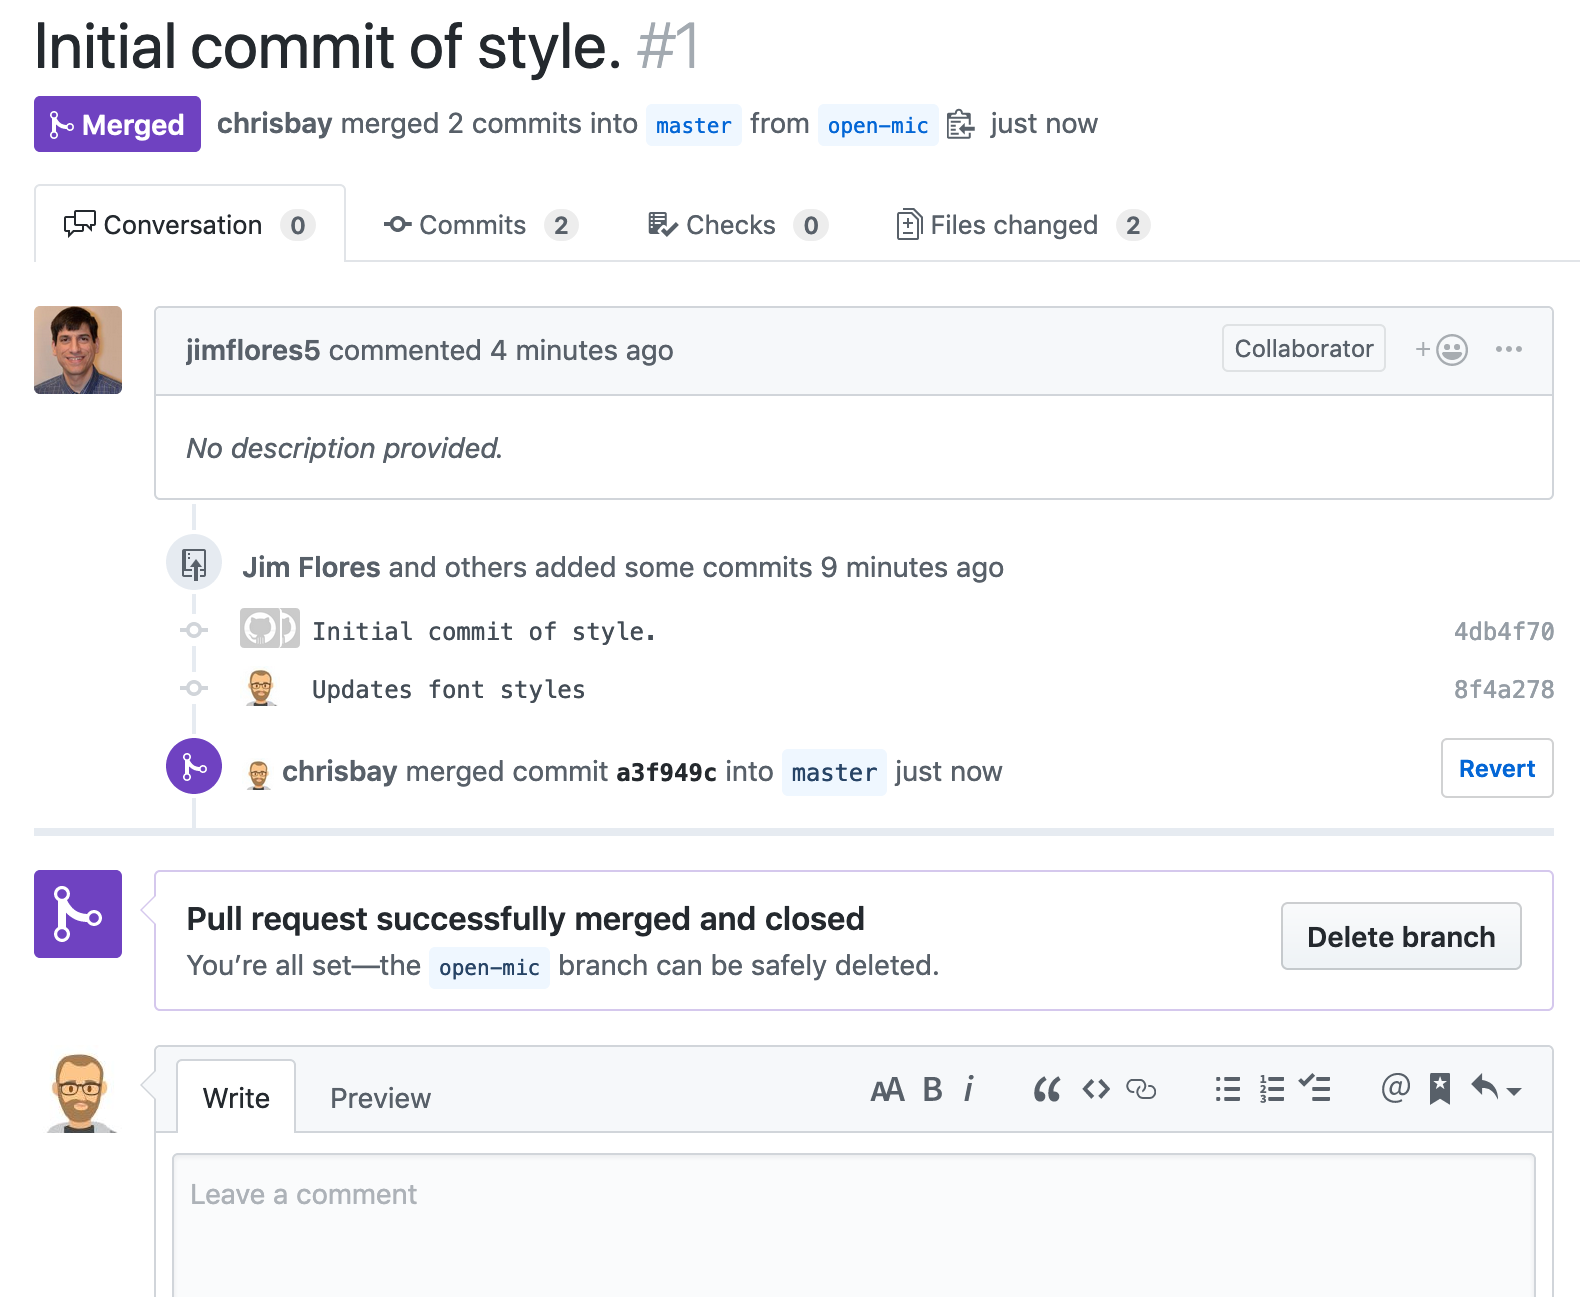
PR Merged in GitHub
Pilot and Control: The changes from
open-micare now in themainbranch, but only in the remote repository on GitHub. You will need to pull the updates to yourmainfor them to be present locally.$ git checkout main $ git pull origin main
Git is able to merge these files on its own.
Notice that the changes made in the open-mic branch now appear in main.
Refreshing the tab in your browser should display the styled webpage!
Tip
When you save a change to our HTML code, clicking the Refresh button in the browser displays the new layout. However, this doesn't always work for changes made to the CSS. Browsers often save the stylesheet in memory to speed up reloading. If the browser continues to use the old code, you won't see your new styles.
To fix this, force a clean reload of the page. For most browsers (like
Firefox, Chrome, and Safari), hold down the Shift key and click
Refresh. For Microsoft Edge, use the Control key plus Refresh.
22.8.5. Resources
Before moving on to the bonus studio content, here are some external resources for using Git and GitHub.
22.8.6. Bonus: Merge Conflicts!
When teaming up on a project, things won't always go smoothly. It's common for two people to change the same line(s) of code on their separate machines. This prevents Git from being able to automatically finish a merge.

Merge conflicts!
Merge conflicts often occur, and they are not a big deal. To see how to handle this situation, you will intentionally create a merge conflict and then resolve it.
Pilot: In VS Code, switch back to the
mainbranch.Pilot: Change the
style.cssfile. The webpage is looking pretty plain, so spice up thebodystyle rule to look like this:1 2 3 4 5 6 7
body {
   color: white;
   background-color: #333;
   font-size: 150%;
   font-family: 'Satisfy', cursive;
   margin: 5em 25%;
}
The result:
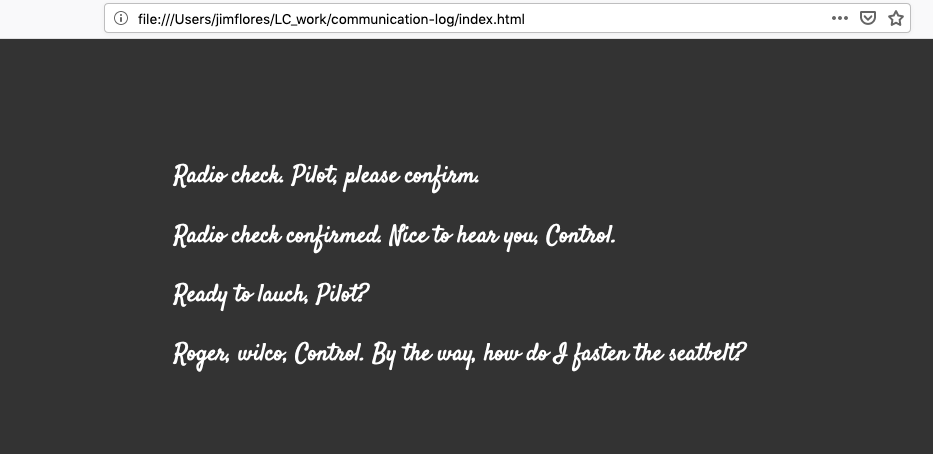
Satisfying!
Pilot: Save and commit the changes, then push them up to GitHub.
$ git push origin main
Meanwhile...
Control: In VS Code, switch back to the
mainbranch.Control: In your local
style.cssfile, change thebodyrule to look like this:1 2 3 4 5 6 7 8 9
body {
   color: white;
   background-color: black;
   font-family: 'Sacramento', cursive;
   font-size: 32px;
   margin-top: 5%;
   margin-left: 20%;
   margin-right: 20%;
}
Control: Save and commit your changes to
main.
22.8.6.1. Resolve the Merge Conflicts
Control: Try to push your changes up to GitHub. You should get an error message. How exciting!
$ git push origin main

To [email protected]:username/communication-log.git
! [rejected]        main -> main (fetch first)
error: failed to push some refs to '[email protected]:username/communication-log.git'
hint: Updates were rejected because the remote contains work that you do
hint: not have locally. This is usually caused by another repository pushing
hint: to the same ref. You may want to first integrate the remote changes
hint: (e.g., 'git pull ...') before pushing again.

There's a lot of text in the message. However, the main idea is clear:
``Updates were rejected because the remote contains work that you do not have
locally.``
Somebody (Pilot, in this case), pushed changes to
main, and you don't have those commits on your computer. To fix this, begin by pulling those changes down from GitHub:$ git pull From github.com:username/communication-log 7d7e42e..0c21659 main -> origin/main Auto-merging style.css CONFLICT (content): Merge conflict in style.css Automatic merge failed; fix conflicts and then commit the result.
Since Pilot and Control both made changes to the same lines of code, Git cannot automatically merge the changes.
Control: The specific locations where Git could not automatically merge files are indicated by lines that begin with
CONFLICT. You will have to edit these files yourself to incorporate Pilot's changes. Open thestyle.cssfile.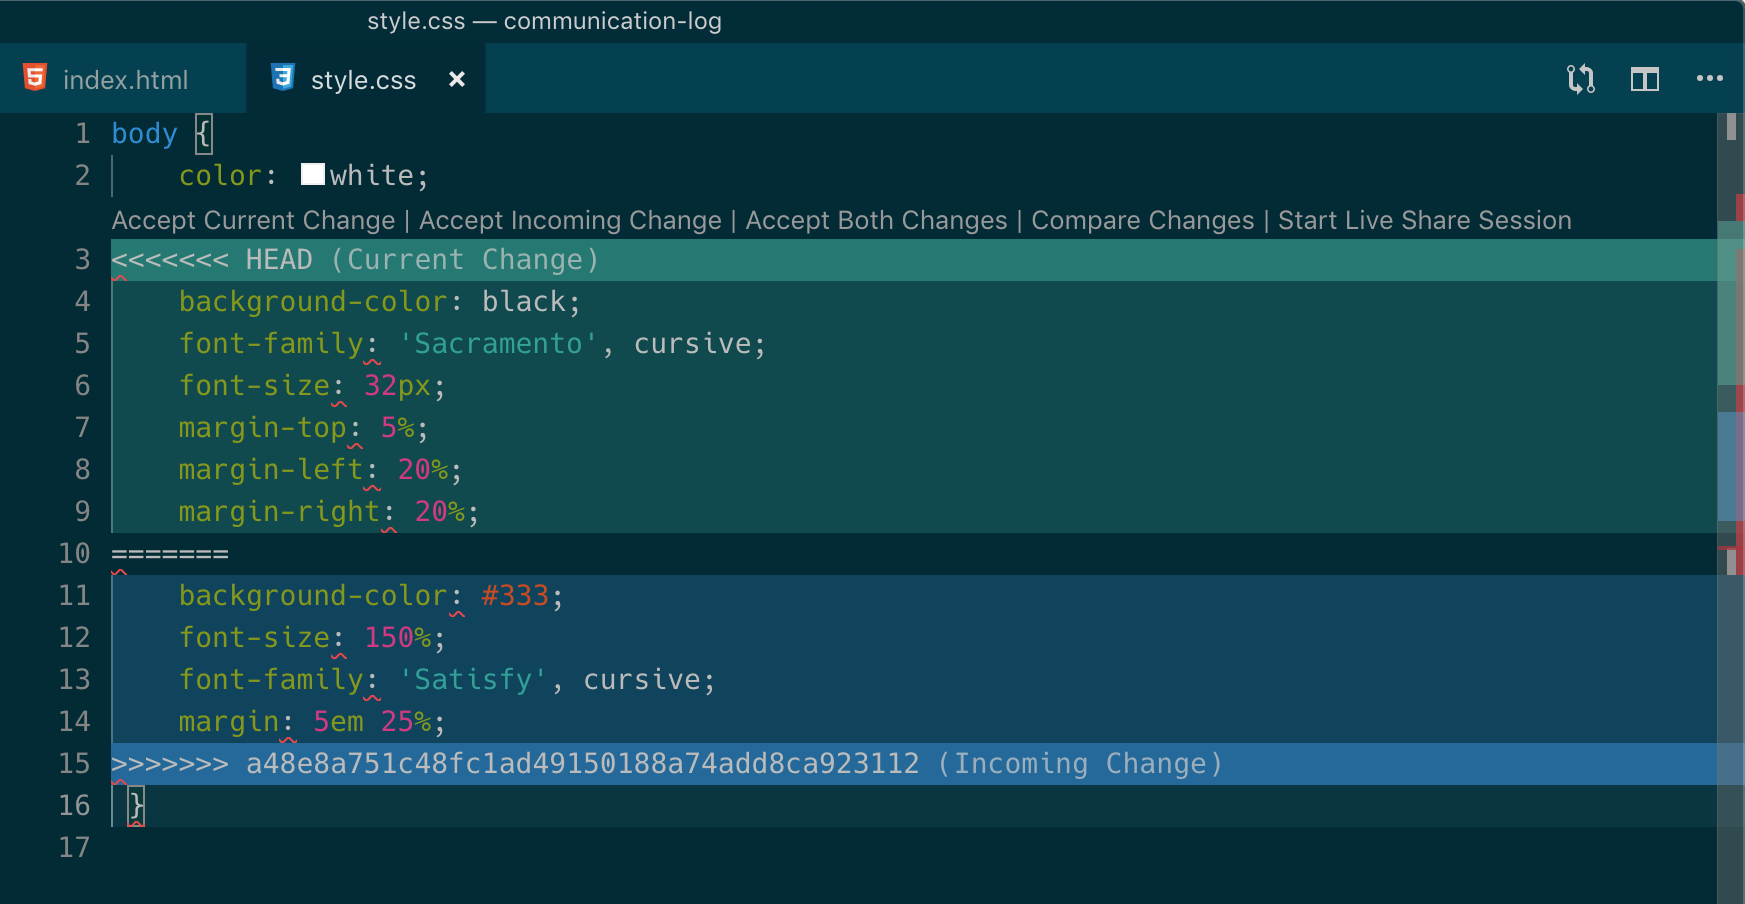
Merge conflicts in
style.css, viewed in VS Code¶At the top and bottom, there is some code that could be merged without issue. Between the
<<<<<<< HEADand=======symbols is the version of the code that exists locally. These are your changes.Between
=======and>>>>>>> a48e8a75...are the changes that Pilot made (the hasha48e8a75...will be unique to the commit, so you'll see something slightly different on your screen).Control: To fix the conflicts, you need to tell Git what code to keep. You can use the provided buttons to either
Accept Current Change(which is your code),Accept Incoming Change(from Pilot), or you can update the highlighted statements directly in the editor. We'll let you decide how to handle this!Control: Save, commit, and push your changes. You should see no error message this time.
Pilot: Pull down the new updates. Notice that since Control dealt with the merge conflicts, you don't have to!
Congratulations! You just fixed your first merge conflict!
22.8.6.2. More Merge Conflicts!
Turn the tables so Pilot can practice resolving a merge conflict.
Control and Pilot: Decide which file and lines of code you will both change. Make different changes in those places.
Control: Save, commit, and push your changes up to GitHub.
Pilot: Try to pull down the changes, and notice that there are merge conflicts. Resolve them, then save, commit, and push the result.
Control: Pull down the final, resolved code.
22.8.7. Avoiding Conflicts
Git happens. Merge conflicts will pop up, but they're not a big deal. Still, the best way to handle them is to try to avoid them in the first place. Here are some tips:
Deal with any uncommitted work before trying to merge.
Partners should avoid working on the same file at the same time.
Try to avoid adding code directly into
main. New ideas should be explored in a different branch first and then merged.