Git and GitHub
Git is a programming language used by many companies to track changes to projects and share projects between team members as part of a process called version control. Github is the biggest online hub for storing code and the workflow of submitting your assignments is all done with Git. Cloning an online repository to your computer is just one of those steps.
While at the beginning of class, Git and Github may seem like just one way for you to save and share your assignment code with course staff, these workflows are going to serve you well for a career in tech. Many companies even look at job candidate’s Github profiles to see not only their work, but also how often they are working on code!
To store your work on Github, you will need to set up Git on your machine. First, ensure that you have properly set up your terminal. Then, follow the steps to install Git.
Your Github account needs a Personal Access Token. Setting up a token for your account is fairly straightforward.
Create a GitHub Account
Create a GitHub account.
Create a Personal Access Token (PAT)
To use HTTPS to push and pull from GitHub, users must create a personal access token. A PAT takes the place of a password, and the token process is considered more secure than a username/password verification.
Once you create your PAT, you will use it instead of your password to perform HTTPS Git operations.
$ git clone https://github.com/username/repo.git
Username: your_username
Password: your_token
Some users question the need for a PAT, since it looks like another password they have to remember. Rather than diving into a lengthy debate and justification, we’ll focus on the main point: GitHub requires a PAT or similar token. The platform is incredibly helpful, and we want to use it, so we’ll follow their advice.
GitHub provides detailed instructions for setting up your PAT, so we will use their documentation. Follow steps 1 - 9 for Creating a Token carefully.
Tips:
The checkboxes in step 7 select the actions you’re allowed to perform from the command line (terminal). For now, just choose the repo option.
There’s no harm in selecting more options, but you won’t need any of them for this course.
After you generate your PAT in step 8, copy and save it somewhere safe! Your new PAT will NOT be an easy-to-remember sequence of characters (that’s the whole point), so you need to record it somewhere.
If you use a password manager, that’s a perfect place to keep your PAT. If you use an unsecured spreadsheet or a folded piece of paper, you want to break that habit now.
If you will be pushing and pulling from a repository multiple times in quick succession, you can save your PAT in memory for a short time. Run the command:
$ git config credential.helper 'cache --timeout=3600'The next time you access your remote repo, Git will ask for your username and PAT. It will then remember your credentials for a certain amount of time. In the example above,
timeout=3600saves your information for 1 hour (3600 seconds). You can adjust the amount of time up or down as needed.Mac Users: At the bottom of the PAT documentation page, you can find some OPTIONAL instructions for saving your PAT in the MacOS Keychain app.
Tip
Before starting on any assignment, make sure you are signed into your Github account!
A repository is a Github term for a folder of code. Write down the name of the repository you will be working with. Having the repository name written somewhere will ensure you can access your assignment code if you are interrupted from the rest of the setup process.
Once you clicked the Code button a menu will dropdown.
To clone your repository, you need the HTTPS link for your repository.
Click on the Clone button on the repository page and copy the link!
Tip!
If you are not sure if you selected the HTTPS clone code, look at the url you are asked to copy. The HTTPS will start with “https:…” If something else is starting the code in the box, try clicking on the HTTPS above the box holding the url.
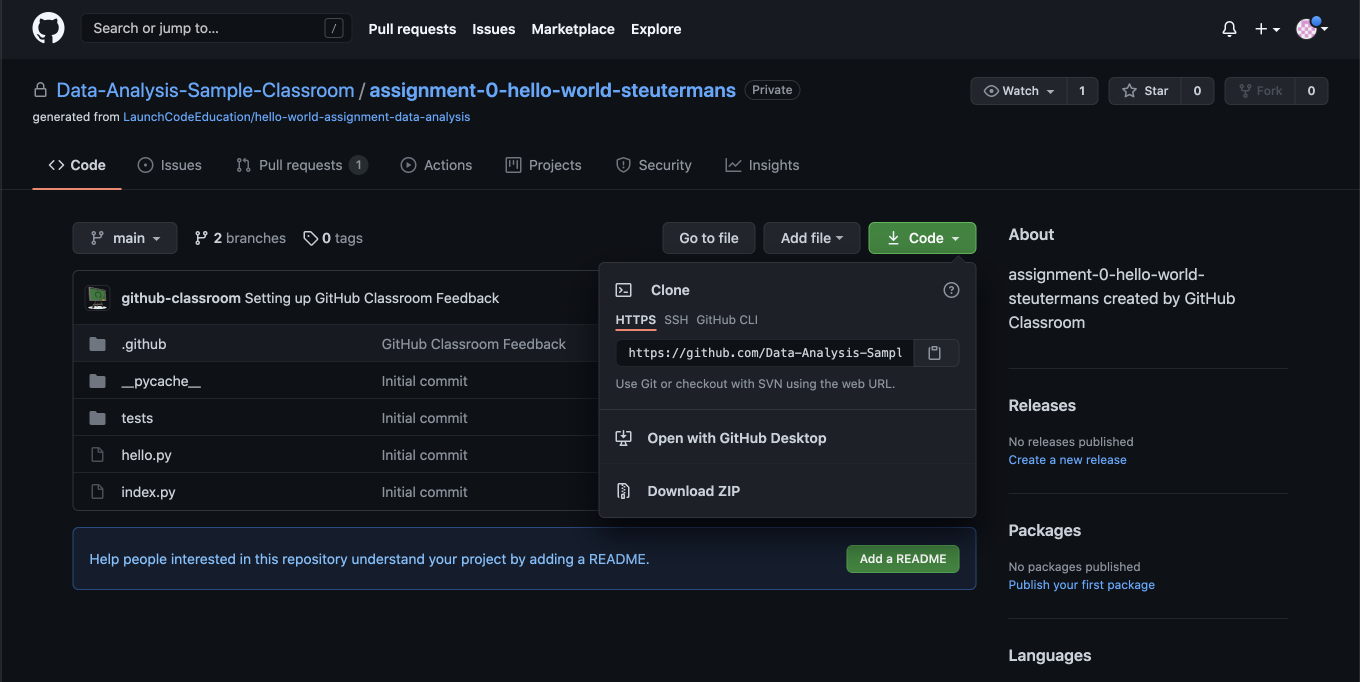
After clicking on the green Code box, the menu dropped down.
There is an orange line under the HTTPS indicating that the item to copy is an https link.
Setting Up Git
Mac Users
Open a new terminal window.
Type the command,
git --version, in the terminal.If the output includes a Git version, like the code below, then you are ready to use Git!
LaunchCode-Super-Computer:~ launchcode-student$ git --version
git version 2.6.4 (Apple Git-63)
If the output does not include a Git version, then a popup will open and ask you to install Developer Tools. Click “Install”!
After the installation is done, you can double check that it worked by typing
git --versionand the version of Git will be part of the output!
Windows Users
Since you already installed Git Bash when you set up your terminal, you are good to go!