Simple Controllers
The first of the MVC elements we’ll work on implementing are the controllers. Recall that controllers are like the traffic cops of our application. They handle the requests made from users interacting with the application’s view and update model data accordingly. Conversely, changes to model data are sent to the view via controller methods. When the client issues an HTTP request via a URL, we want to make sure that the URL leads to the correct controller so we get an appropriate response. A route is the mechanism by which a request path gets assigned to a controller within our application.

Do HTTP requests and responses feel unfamiliar? If you’re feeling rusty on these topics, it’s a good idea to brush up now, as routing requires a foundational understanding of HTTP data transfer.
Here’s our introduction to HTTP for reviewing the concepts.
Controllers and Static Responses
Controller
In ASP.NET, we’ll organize controller code into the provided Controllers directory.
Some tools may depend on us following the convention of the MVC design pattern, so it is important to put our controller code in this directory.
If you want to change something about the provided structure, be sure to double check the documentation to make sure a tool does not depend on you following it!
To designate a given class as a controller within the ASP.NET framework, we extend the Controller class.
The Controller class
provides us with the necessary members and methods to manage traffic between the three components in our MVC application.
   public class HelloController : Controller
   {

      // class code here ...

   }
Controllers Map to Requests
Controllers need to handle HTTP requests coming in and routes are a key component of that process. ASP.NET MVC has two different ways to map these routes: conventional routing and attribute routing. Conventional routing establishes the routes as endpoints in one of the application’s configuration files. Attribute routing establishes the routes using C# attributes that are placed in the controller file.
Routes in conventional routing are setup via endpoints in a configuration file called Program.cs.
When an HTTP request comes in, routing matches the request with an endpoint.
Endpoints designate the controller action that executes when the appropriate HTTP request comes into the application.
When we created a new ASP.NET application, without adding any code, we were immediately able to run it.
This is because the MVC application we start out with already has the routing and endpoints set up.
When we open the application, we see in the Controllers directory that Microsoft has a preconfigured HomeController.
Straight out of the box, ASP.NET is set up to use conventional routing with a configured default route that maps to the HomeController.
While the default route maps to localhost:5001, when we are using conventional routing, our routes follow the same general pattern:
localhost:5001/<controller>/<action>
This pattern is key in conventional routing and something to commit to memory.
To see the result of any given action method in a controller, we can count on this pattern.
Navigating to localhost:5001/home/index, we see the result of the Index() method, a view.
If we added a new method, Hello(), to the HomeController, we would see the result of that method at localhost:5001/home/hello.
Throughout this book, we will be using attribute routing to break the pattern established by conventional routing.
However, if you want to investigate further on how to use an endpoint for a rule-breaking route in conventional routing,
Microsoft has a great article
on the subject.
For example, endpoints preconfigured in Program.cs is how we can navigate to localhost:5001 and localhost:5001/Home/Index to see the same page.
Remember: Program.cs contain the endpoints in an ASP.NET 6.0 application.
When adding a new controller, such as HelloController, we need to make sure that routing is properly configured whether
we use conventional routing or attribute routing.
We want to start by adding a new action method to HelloController. Action methods are the public methods in a controller class.
Action methods respond at a specific route and that response can be an update to a view, sending new data to a model, returning some simple HTML, and so on.
When we are creating a new action method, we want to think about what route the method needs to respond at, what request type the action method should respond to, and what that response entails.
Let’s start by adding the following Index() method:
| |
Every time you add a new action method, you should write a comment above it to make note of the route that you want the method to respond to and the type of request that it should respond to at that route.
With conventional routing, the action methods can respond to different types of requests at the given route.
So even though we made a note that we want the Index() method to respond to GET requests at the route, localhost:5001/hello, the Index() method could also respond to a POST, PUT, or DELETE request at that route.
Attribute routing is a way for us to specify which request type the method can respond to.
But for now, let’s run the app and navigate to localhost:5001/hello to check our work.
Conventional routing makes use of the controller’s name and action method’s name. If you mistype either in the URL when testing out your application, you will run into an error.
We also want to make use of attribute routing in our new HelloController.
To do so, we can add attributes to our Index() method.
As you may recall from the chapter on unit testing
, attributes in C# lie somewhere between code and comments.
While an attribute cannot change the code inside the method or class, an attribute in attribute routing does supply critical information about routes and request types.
Attribute routing is powerful because it does not depend on any endpoint mapping info in Program.cs, can defy the pattern established by conventional routing, and specify one request type for a method to respond to.
ASP.NET has many different attributes that we can use in our controllers. For a more in-depth catalog of different attributes, check out the documentation .
As we noted above, we want the Index() method to respond to a GET request at a specified route.
Every time we write an action method, we should be thinking about what type of request the action method should respond to.
Once we have noted our decision about the request type in a comment, we could add an HTTP verb attribute above the action method.
While we know that our Index() method can respond to GET requests at localhost:5001/hello, we should always be adding HTTP verb attributes to action methods for practice.
As our controllers grow in complexity, HTTP verb attributes grow in importance!
We are going to focus on action methods that respond to GET and POST requests for now.
An [HttpGet] attribute is used for action methods responding to GET requests and an [HttpPost] attribute is used for action methods responding to POST requests.
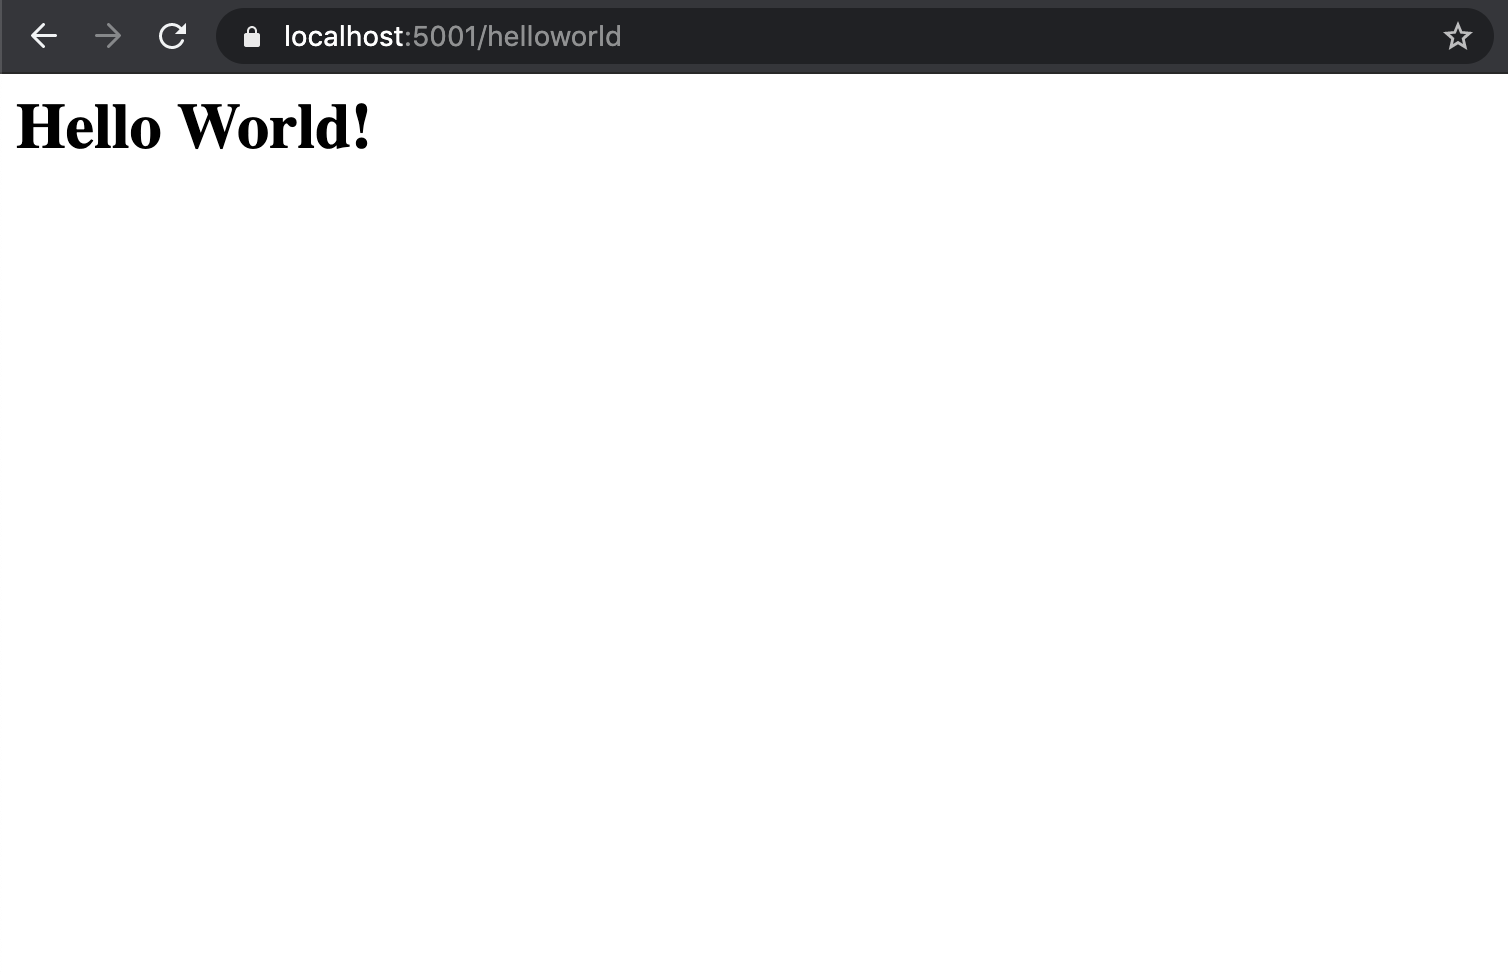
The route we now want to go to see the result of the Index() method is localhost:5001/helloworld.
We will use an [HttpGet] attribute to specify that the method will respond to a GET request.
We also want to use a [Route("path")] attribute.
[Route("path")] is used above the action method to establish the route that maps to that method.
Let’s see how we can use these attributes in our HelloController class.
| |
On line 4, you may have noted that we did not include localhost:5001 in the path we used in our [Route("path")] attribute.
The path portion of a URL is a specific section that comes after the host and port.
If you want a quick refresher on the structure of a web address, check out this section
from our introduction to HTTP.
Now when we run our application, we can head over to localhost:5001/helloworld to see the result.
If we head over to the route that was mapped through conventional routing, localhost:5001/hello, we will find a broken page.
The result is a simple web page with one heading that says “Hello World!”.
While the book focuses on attribute routing, in this chapter, we will map our routes with both approaches. Many applications contain a combination of both conventional and attribute routing. We encourage you to try out both approaches to make sure that you can recognize and understand both approaches to routing.
Now that our new controller and action method are working, we can take a closer look at the Index() method.
Index() above returns an unfamiliar type, IActionResult.
We will be using IActionResult quite a bit in our applications and it is an important interface for us to be aware of.
IActionResult
IActionResult is an interface in the ASP.NET framework and often times the return type of action methods.
When we specify the return type as IActionResult, the returned value dictates what the client will display after the action is complete.
We can use IActionResult to get the client to display plain text or other data types.
In a later section on views, we will use IActionResult to return HTML templates.
We will only scratch the surface of what IActionResult can do so for now, let’s focus on Content.
Content is a class that implements the IActionResult interface.
In our Index() method, we want to return a simple string of HTML to be displayed on the webpage.
We use Content() to specify which string we want to use for our content and we specify the content type with "text/html".
When using Content(), we need to specify the content type in order the page to render how we want it to!
For more info on the different types of results we could specify as return types, check out this article !
Check Your Understanding
True/False: The Controller class does not have to be extended to classify a class as a controller.
Which of the following is true about controllers?
- Controllers handle the data storage of an MVC app.
- Controllers manage what the user of an MVC application sees.
- Controllers relay the messages between data and views in an MVC application.
- Controllers determine what information can be submitted in an online form.